Wednesday, August 3, 2011

Tiny Fudge Tarts


Any one who knows me knows that I graduated from college with a degree in history. I love learning about how some things came to be and lately I have taken a liking into antiques. Growing up I didn't really care for going to antique stores, in fact I thought they were quite boring. Now I find them very interesting and I love looking at all the items that they have in store. Well recently my co-worker Michelle has been giving me some very interesting antiques that I love. First she gave me a copper cookie press that has never been used with all of the attachments. Then she gave me an old cookbook called Betty Crocker's Cooky Book. In fact the cookie that I am posting today called Tiny Fudge Tarts came from that cook book. The other items she gave me was an old flour sifter and four issues of The Saturday Evening Post ranging from 1914 to 1920. Tomas and I have been enjoying reading the Evening Post. It is very interesting seeing the ads and what people were interested in during that time period. I really appreciate all the things Michelle has given me, so in return I am going to make her something nice. I would give her the cookies I just made from the book, but they didn't come out looking nice. They taste great, but because I didn't seal their edges well enough, they opened up and look kind of funny. I guess that means more cookies for us. I will think of something nice to make for her later. :)


The Saturday Evening Post

An up close look of the delicious but not so attractive Tiny Fudge Tarts.


Tiny Fudge Tarts

1 1/2 cups flour
1/4 teaspoon salt
1/2 cup butter
3 tablespoons water
1 teaspoon vanilla

Fudge Filling

1/4 cup butter
1 egg yolk
1/2 cup sugar
1 teaspoon vanilla
1/4 cup cocoa powder
1/2 cup coconut

Preheat the oven to 350*F. Mix flour and salt; cut in the butter. Sprinkle with water and vanilla; mix well. Using 1/2 of the dough at a time, roll out to 1/16" thick on a board generously sprinkled with sugar. Cut into 2 1/2" squares. Spread 1 teaspoon of the fudge filling in center of each square. Bring the corners to the center and seal together. Place sealed side up on an ungreassed baking sheet. Bake for 15-20 minutes.

To make the fudge filling combine all the filling ingredients until combined.


Pin It

Sunday, July 31, 2011

Golden Snitch Peanut Butter Ball Candies.


On Thursday, Tomas and I were finally able to go see the new Harry Potter and the Deathly Hollows movie. I was happy to finally go see it, but I was also sad that it was the last. I loved watching those movies over the years and I especially loved reading the books. Well since I had the day off yesterday I also watched the first three movies again. I would have loved to watch the others again, but I only have the first three. I am waiting for a boxed set to come out before I buy the movies again. With all this Harry Potter I have been watching, I decided that I should make a Harry Potter themed snack. That is why I decided to make Golden Snitch Peanut Butter Ball Candies. I found the peanut butter ball recipe on various websites, which were pretty much all the same recipe. The one I ended up following in the end was from joyofbaking.com. To make the wings I decided to melt some white chocolate in a piping bag and pipe out wing shapes on to a piece of parchment paper. In the end I thought the Golden Snitches came out cute and went perfect with my Harry Potter movie marathon. I think these will be especially great for a Harry Potter themed party. Enjoy :) And if you have not gone to see the movie yet you must go.

I caught the Golden Snitch :)

Golden Snitch Peanut Butter Ball Candies

2 cups creamy peanut butter
1/4 cup butter, room temperature
1/4 teaspoon salt
1/2 teaspoon pure vanilla extract
2 - 2 1/2 cups confectioners sugar

About 1/4 cup White dipping chocolate

Place the peanut butter, unsalted butter, and salt in a microwaveable bowl, and heat in the microwave for about one minute or until just soft (check and stir the ingredients every 20 seconds). Stir in the vanilla extract and confectioners sugar and mix until it has the consistency of a dough (add more sugar if necessary). Roll into balls and refrigerate for about an hour. Melt some white chocolate in a piping bag or a ziploc bag with the corner snipped off. Place a piece of parchment paper on a baking sheet and make some wings with the chocolate. Let harden. once the peanut butter balls are cool, stick two wings into the balls and repeat for the others. You now have yourself a Golden Snitch. :)


Pin It

Wednesday, July 20, 2011

Garlic Bread with Garlic Butter


This garlic bread is absolutely amazing, so amazing it was devoured in no time leaving no leftovers. Usually I make my garlic bread by spreading butter and sprinkling cheese and garlic, but now I think I will be making it this way for now on. It is made using garlic butter. Once in a while I will make this butter and all we would do is spread some on our warm dinner rolls. Well last night I decided that I should spread some on a roll of French bread sliced in half and broiled in the oven. I am glad I did because it came out amazing. Now I originally got this recipe from Allrecipes but I changed it around. Well I hope you get a chance to try this garlic bread or at least try the butter on something else.

Garlic Bread with Garlic Butter

1 cup butter, softened
3-4 cloves of garlic, minced
1/4 cup grated Parmesan cheese
1 tablespoon garlic salt
1 teaspoon Herb de Provence seasoning
1/2 teaspoon ground black pepper
1/2 teaspoon Spanish Hot paprika

Directions

In a small bowl, combine softened butter, minced garlic and parmesan cheese. Season with garlic salt, Italian seasoning, pepper and paprika. Mix until smooth. Spread the butter all over the French bread. Place on a baking sheet and place under broiler until the bread begins to turn a nice golden brown. Slice and enjoy. :)


Pin It

Saturday, July 16, 2011

Quick Trail Mix

What a view.


I just recently took a trip to Yosemite where we hiked the trail to Clouds Rest. You can read all about our trip under My Life page. It was a very long hike, but very rewarding. Along our hike we took a lot of breaks and one of the things we ate along our hike was the trail mix I quickly put together the night before. Trail mix is something anyone can make. The best things about making it yourself is you can put all the things you like in it and keep the things you don't like out. I would have put more in it but I just used what I had on hand. In my trail mix I took some salted peanuts, a package of dried cranberries, Reese's peanut butter chips, and chocolate covered raisins and dumped them in a large Ziploc gallon bag, sealed it shut and threw it in my backpack and headed off for our hike. Well I hope you get a chance to make your own trail mix and take a beautiful hike in Yosemite.

A view of the trail mix with Half Dome in the background and the clouds passing through us.
Pin It

Tuesday, July 12, 2011

Chocolate Whoopie Pies


On Sunday while cutting my coupons out of the newspaper I came across a recipe for Chocolate Whoopie Pies. They looked so good I just had to try them. I followed the recipe given for the cakes, but when it came to the filling I did not have any marshmallow filling, so I used the filling recipe that my mom used when she made Whoopie Pies a while back. They came out very good. LinkI feel they actually taste better cold, but that is just my opinion. Well if you never had a Whoopie pie I would recommend you do. :)


Chocolate Whoopie Pies

Cakes:
1 2/3 cups all-purpose flour
2/3 cup cocoa powder
1 1/2 tsp baking soda
1/2 tsp salt
4 Tbsp butter softened
4 Tbsp vegetable shortening
1 cup packed brown sugar
1 egg
1 tsp vanilla extract
1 1/4 cups milk

Filling:
1 cup butter, softened
4 cups powdered sugar
1 tsp vanilla extract
2 Tbsp water

Preheat the oven to 375*F. Line baking sheets with parchment paper. Sift together flour, cocoa powder, baking soda, and salt. In a mixer, with a paddle attachment, beat butter, shortening, and brown sugar on low speed until combined. Increase speed to medium and beat for 3 minutes. Add egg and vanilla; beat 2 more minutes. Add half the flour mixture and half of the milk to the batter, beat on low. Add the rest of the flour mixture and milk. Using a spoon drop batter 1 Tbsp at a time onto the baking sheets, spacing 2 inches apart. Bake for 10 minutes, or until cakes spring back when gently touched. Remove from oven and transfer to cooling racks. While cooling prepare the filling. Add the butter, powder sugar, vanilla, and water to a mixer. Beat until smooth. Place filling on one of the cakes and then take another cake and place it on top making a sandwich. Repeat until all cakes are filled and enjoy. :)
Pin It
Thursday, July 7, 2011

Apple Cinnamon Chip Pancakes with Crumb Topping


A while back I went to have breakfast/lunch with my friend Jeni. We decided to go to one of our favorite places Batter Up. At Batter Up they serve many different types of fun pancakes, as well as other foods, but I always get the pancakes. This time I decided to try the apple cinnamon chip pancakes with a crumb topping on top. They tasted amazing, so amazing that I had to try making them for myself. So this morning I went in the kitchen and attempted to make the pancakes myself. It was a success, they came out really good and I even have some left that I will be able to enjoy for breakfast tomorrow. Well I hope you get a chance to enjoy these lovely pancakes as I have. :)

Apple Cinnamon Chip Pancakes with Crumb Topping

Crumb Topping
1/2 cup oats
1/4 cup brown sugar
2 tablespoons flour
2 tablespoons butter

Pancakes
1 3/4 cups all-purpose flour
2 tablespoons sugar
1 tablespoon baking powder
1/4 teaspoon salt
1 egg
1 1/2 cups milk
1 tablespoon canola oil
1 half chopped apple
1/2 cup cinnamon chips

Crumb topping: Preheat the oven to 350*F. In a bowl combine the oats, brown sugar, flour, and butter. Using your fingers combine the ingredients, forming clumps, until all is combined. Spread on a cookie sheet and bake for 10 minutes, check on it constantly and flip and move the crumb topping around to prevent burning.

Pancakes: In a large bowl stir the flour, sugar, baking powder, and salt. In another bowl combine the egg, milk, and oil. Add all the egg mixture to to the flour mixture and mix until combined. Gently stir in the chopped apples and cinnamon chips. Heat an electric griddle or skillet. Pour a desired amount of batter on to the hot surface. Cook 1-2 minutes on each side or until pancakes turn a beautiful golden brown. Remove from heat. Sprinkle some crumb topping over the pancakes and enjoy. :)

Pancake recipe from Better Home and Garden cookbook.
Pin It

Saturday, July 2, 2011

Sprinkle Obsession


I have a confession to make, I am obsessed with sprinkles. I was organizing my sprinkle and cupcake wrapper shelf in my pantry and that is when I realized that there were more sprinkles in there than I thought I had. After counting them I found out I have 29 containers of sprinkles and some of those containers are sectioned off having four or more choices in each container. So I actually have tons of choices when it comes to what sprinkles I want to use. I don't know when this obsession began, but one thing I do know is most of these came from HomeGoods, where I work. We always get in different types of sprinkles at great prices, so I just can't resist their beautiful shapes and colors. Also whenever I see a new container of sprinkles I don't have, I start thinking of a the things I can do if I had those sprinkles, so I buy them. Some may say that I have enough sprinkles, but I know that I will probably be buying some again in the near future, especially if it is a color or shape that I wont be able to resist. :)
Pin It

Thursday, June 30, 2011

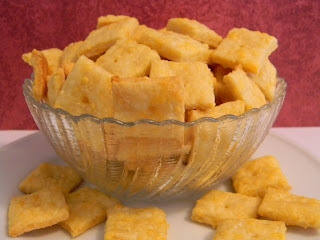
Homemade Cheez-Its


I just finished making my own homemade Cheez-Its and decided that this is something I must share. My mom told me about this recipe for homemade Cheez-Its on a blog called In Katrina's Kitchen. After reading her post I decided that I too need to make these, especially since Tomas loves Cheez-Its. Now they don't taste exactly like the same things, but they do come pretty close and are very yummy. As I am writing this, Tomas brother Lukas is in the kitchen munching away at them. So if you like Cheez-Its I highly recommend you try making them on your own, especially since they are easy to make. Enjoy :)

Homemade Cheez-Its

8 oz sharp cheddar cheese, grated
· 3 Tablespoons of unsalted butter, room temperature
· 1 Tablespoon vegetable shortening*
· ½ teaspoon salt
· 1 cup flour
· 2 Tablespoons ice water
· Coarse salt for sprinkling

Combine cheese, butter, shortening, and salt in the bowl of your mixer fitted with the paddle attachment. The mixture will be crumbly. Slowly add flour and then the ice water. You may add a few more drops of water to help it come together but be careful not to add too much. You don’t want a wet dough. Pat the dough into 2 discs and wrap in plastic wrap for at least 30 minutes (or longer).

Preheat oven to 375⁰F.Using parchment paper or a silicone mat roll each disc to 1/8 inch or less and cut into 1 inch squares (a pastry wheel or pizza wheel is easiest). Use a toothpick to punch a hole into the center of each square. If you have difficulty separating and transferring the crackers onto the baking sheet return the parchment paper/mat to the refrigerator for 10 minutes (while you roll out the 2nd dough disc). Bake for 10 – 15 minutes or until puffed and browning around the edges. If you pull them out too soon and the crackers don’t have the desired crispiness you want then simply return them to the oven for 2-3 more minutes. Move crackers to a cooling rack.

Pin It

Wednesday, June 29, 2011

Red, White, and Blue Firecracker Cake


I dedicate this post to my mom. While talking on the phone with my mom yesterday, she told me about this firecracker cake recipe that she found on BettyCrocker.com. and she said that I should make it. Now if you were wondering why she wouldn't make it herself, it was because she doesn't like to eat anything blue. She will eat natural blue things like blueberries, but she will not eat things that are dyed blue. So instead of having the cake go unmade, I went ahead and made it since I don't have a problem with blue. Now if you don't have a problem with eating blue things and are looking for a cake to make for the Fourth of July, I would recommend this one because it was actually very easy to make. Enjoy :)


Red, White, and Blue Firecracker Cake

1 box Betty Crocker® SuperMoist® white cake mix
Water, vegetable oil and egg whites called for on cake mix box
Red food color
Blue food color
1 container (12 oz) Betty Crocker® Whipped fluffy white frosting

Heat oven to 325°F. Generously grease 12-cup fluted tube cake pan. Make cake batter as directed on box, using water, oil and egg whites. Pour 1 cup of the batter into small bowl; stir in red food color until well mixed. Pour another cup of the batter into separate bowl; stir in blue food color until well mixed. Pour red cake batter into bottom of pan. Carefully pour remaining white batter over red batter in pan. Carefully pour blue batter over white batter. (Blue batter does not need to cover white batter completely; it looks better if it just forms a ring in the center of the white batter.)

Bake as directed on box or until toothpick inserted near center comes out clean. Cool cake 5 minutes. Meanwhile, place cooling rack over cookie sheet. Turn pan upside down onto cooling rack. Cool cake completely, about 30 minutes.

When cake is cool, divide frosting evenly into 3 microwavable bowls. Microwave 1 bowl of frosting uncovered on High a few seconds until smooth enough to drizzle over cake. With spoon, drizzle all of white frosting back and forth around cake in a striping pattern. Repeat microwaving second bowl of frosting until smooth. Stir in a few drops blue food color until well blended. Drizzle over cake, scattering frosting back and forth. Repeat with remaining bowl of frosting and red food color, making sure red, white and blue frostings can be seen on cake. Let cake stand at room temperature until frosting is set before serving.

Pin It

Tuesday, June 28, 2011

Cougar Cake #2

I don't know what has come over me, but I think some kind of lazy bug bit me. For some reason I just could not get myself to make anything. I think it had more to do with the heat. The thought of turning the oven oven sounded miserable because it would just make the house hotter. Now I could just turn the AC on, but we are trying to hold out until it is hotter outside. We have given in a couple of times because we just couldn't take the heat especially when I had to make a cake for someone. Plus I didn't want the frosting to melt so I had to make sure it was cool in the house. Well this cougar cake is actually the second one I made. I made the first one a couple of years back for my friend's 30th birthday. The reason for the cougar cake is because her husband says that him and his friends always said that cougars were 30. Well the joke continued and now my friend's friend is getting a cougar cake for her 30th birthday. Now for some reason I lost the photo of the first cougar cake I made so it is not exactly the same, but it is pretty close. All I did was find an image of a cougar that I liked, but instead of transferring it with piping gel like I did last time, I actually drew the image of the cougar myself on to the cake. I was actually proud of myself because that was the first time I drew the image on my own with out having to do the whole transferring thing. Well that is how the finished product came out and I hope she likes her cake. :)

Pin It

Thursday, June 2, 2011

Cupcakes With Chocolate Scissor Decorations


Today is my friend Jeni's last day of work. So I made a special treat to celebrate her leaving us to pursue her career as a great hair stylist. She is very good at what she does and I am very happy that she will be doing what she loves best. That is why I had to make cupcakes that have a little pair of chocolate scissors on them to symbolize her being a hairdresser. The cupcake was just a basic white cake mix and the frosting was just a can of white frosting that I dyed pink. To make the chocolate scissors I printed up an small image of scissors that would fit on the cupcake. I then melted about 1/4 cup of chocolate ships in a plastic sandwich bag with the tip cut off. I then took a large piece of waxed paper and placed it over the image of the scissors. I traced the scissors and repeated until i had about 30 chocolate scissors (make extras in case one breaks). I then placed the waxed paper on a baking sheet and placed in the freezer to set. After frosting the cupcakes place the pair of scissors on top and serve. Well I hope Jeni loves her cupcakes and I wish her the best of luck at her new job. And if you ever need a hair cut or styled let me know and I will tell you where she works. :)
Pin It

Tuesday, May 31, 2011

Peanut Butter Truffle Cookies

It has been a while since I made anything yummy lately. I ended up getting sick about a week ago, therefore I was not able to make anything. Then I have just been to busy as well as lazy to do anything. But Tonight that changed because I was craving something sweet really bad, especially since someone polished off my ice cream that I was looking forward to all day. But I guess things happen for the reason because I I had ice cream then there would have been no cookies. I didn't know what I wanted to make at first, all I know is that I wanted chocolate to be one of the ingredients but I only had less than a cup of chocolate chips left in my cabinet. I ended up pulling out one of my cookbooks I forgot I had. That cookbook is called The Magic of Peanut Butter, put out by Skippy peanut butter. While thumbing through the pages I came across one called truffle cookies. Not only did the title catch my attention, it was also the fact that it only called for 1/2 cup chocolate chips. I was sold. I got up right away and made myself a batch. I must make my cookies too big though because I only ended up with 2 dozen and the recipe says it make 4 dozen. But no matter what the size, they came out great. And since they called for very little ingredients and were very easy to make, I will definitely be making them again shortly, especially since I didn't end up with too many. Well I hope you enjoy them as much as we have here, and let me just say there is probably only a dozen left now. :)
Peanut Butter Truffle Cookies
1 cup peanut butter (creamy or chunky)
1 cup firmly packed light brown sugar
1 large egg
1 tsp baking soda
1/2 cup chocolate chips
Preheat the oven to 350*F. In a small bowl combine all the ingredients except the chocolate chips until blended. Stir in the chocolate chips until combined. Drop by rounded teaspoon on to an ungreassed cookie sheet. Bake 9 minutes or until puffed and golden brown. Remove to cooling racks and enjoy. :)
Pin It

Friday, May 20, 2011

Homemade Strawberry Jam


So today is national pick strawberries day. Well I didn't pick my own strawberries, which I would actually love to do, instead we got our strawberries from a field where someone else got to pick them. Well back on Easter I got to learn how to make strawberry jam with my mom. I was so excited because I always wanted to learn to make jam with my mom and because I think homemade jam taste better than store bought. And it turned out to be easier to make than I thought. I wanted to make this post sooner, but every time I would put the jam on my toast or sandwich I couldn't wait to eat it, therefore I could never snap a picture fast enough. But I guess it worked out in the end because I can use it for today's national food holiday, even though I didn't pick the strawberries myself. Well the recipe we used came from the package of sure-jell pectin that we bought, you can even find the recipe along with many others on their website. So if you end up making your own homemade jam, you will be hooked. :)


Homemade Strawberry Jam


5 cups prepared fruit (about 2 quarts fully ripe strawberries)
1 box SURE.JELL Fruit Pectin
1/2 tsp. butter or margarine (optional)
7 cups sugar, measured into separate bowl


Bring boiling-water canner, half full with water, to simmer. Wash jars and screw bands in hot soapy water; rinse with warm water. Pour boiling water over flat lids in saucepan off the heat. Let stand in hot water until ready to use. Drain well before filling.

Stem and crush strawberries thoroughly, one layer at a time. Measure exactly 5 cups prepared fruit into 6- or 8-quart sauce pot.

Stir pectin into prepared fruit in sauce pot. Add butter to reduce foaming, if desired. Bring mixture to full rolling boil (a boil that doesn't stop bubbling when stirred) on high heat, stirring constantly. Stir in sugar. Return to full rolling boil and boil exactly 1 minute, stirring constantly. Remove from heat. Skim off any foam with metal spoon.

Ladle immediately into prepared jars, filling to within 1/8 inch of tops. Wipe jar rims and threads. Cover with 2-piece lids. Screw bands tightly. Place jars on elevated rack in canner. Lower rack into canner. (Water must cover jars by 1 to 2 inches. Add boiling water, if necessary.) Cover; bring water to gentle boil. Process 10 minutes. Remove jars and place upright on a towel to cool completely. After jars cool, check seals by pressing middle of lid with finger. (If lid springs back, lid is not sealed and refrigeration is necessary.)


Pin It

Tuesday, May 17, 2011

Mario Kart DS Cake in Red


Here is my latest cake creation, which I am very proud of. As you can see it is a red Nintendo DS which has a game of Mario Kart in progress. This cake will be for my friend's son Jaxon's 6th birthday. Well one day me and Jaxon sat down and started talking about what kind of cake he wanted for his birthday. He told me he wanted to have a cake with Mario on it because he loves Mario and he loves the Super Mario Bros cake I made last year (which happens to be my top blog post of all time :) ) Well he also told me that he wanted a Nintendo DS for his birthday and that he loves playing Mario Kart. So I got the idea that I should make a cake that looks like a DS and have Mario Kart playing on it. Now I knew that the images were going to be a challenge to make, so I came up with the idea of laminating a couple of Mario Kart images to put on top of the cake. Plus if I laminate them it will give it that glossy look of the screen on a real DS. So I researched the web to find some photos, I cropped them down to the size I needed and then I laminated them. Then I baked a regular sized rectangle cake and frosted it red. I place the laminated images on the cake and frosted little buttons on the cake as well as the other details need to make it look like a DS. I even frosted the little touch screen stick on the side as a nice extra touch. And as you can see from the photos how it all came together in the end. I know Jaxon will love his cake and I can't wait to bring it to him. :)


Here is another image of the cake .

I added these on last minute becasue I forgot that there are buttons on the sides of the DS


I added the power switch and where the stick goes as well.


Pin It

Sunday, May 15, 2011

Banana Nut Bread


So I have a legitimate reason for not blogging this past week. That reason being that I had to go away for work again. I was sent to Irvine this time for some training. I had a lot of fun and learned a lot of useful things, but it is good to be back home with Tomas because I missed him a lot. Well the recipe I am going to share with you today is a banana nut bread that I made with my mom not too long ago. We were looking through the Food Network Magazine and found the banana nut bread recipe and decided to give it a try. It came out very yummy and I hope you like it too. Enjoy :)


Banana Nut Bread


1 banana, mashed

1 cup chocolate chips

3/4 cup walnuts

1 1/4 cup flour

3/4 cup sugar

1 teaspoon baking powder

1 teaspoon salt

1/2 teaspoon baking soda

1/2 teaspoon cinnamon

1/2 teaspoon nutmeg

2 eggs

1/2 cup melted and cooled butter

1/2 cup sour cream

1 teaspoon vanilla extract


Preheat the oven to 350*F. Lightly grease 1 loaf pan. Mix the flour, sugar, baking powder, salt, baking soda, cinnamon, and nutmeg in a large bowl. Add in the walnuts and chocolate chips. In a medium bowl whisk the eggs, butter, sour cream, and vanilla. Stir in the banana into the egg mixture, then fold in the dry mixture until well combined. Spread the batter into the prepared pan. Bake for about 55 minutes or until toothpick inserted in the center comes out clean. Cool for 30 minutes and then slice and enjoy :)
Pin It

Sunday, May 8, 2011

Coconut Cream Pie


Today is a special day. As most of you already know today was Mother's Day, but did you know today is also national coconut cream pie day. And another thing no one else would know is that it was Tomas sister Monika's Birthday (my future sister in law). Therefore I had three things to celebrate today. Since I got off work early today, I was able to go home and surprise my mom for Mother's day. It turned out great. I got to spend the day with my wonderful Mom and my family. I not only surprised her with myself, I also brought her a homemade coconut cream pie since today is national coconut cream pie day. That was actually the second time I made that pie this week. The first time I made it, the pie was gone in no time. Lukas, Tomas brother, got excited when he saw me making the second pie, but I broke his heart when he found out he was not going to be able to eat this one since it was for my mom. Well anyways, I found this recipe in the Southern Living Our Best-Ever Cakes and Pies Magazine which has been on my book shelf for a few years and it wasn't until now that I decide to try out the recipe for the coconut cream pie. Well I hope you enjoy it as much as we have and for those of you moms out there I hope you had a wonderful Mother's day. :)


Coconut Cream Pie


1 package refrigerated pie crust, divided

1/2 cup sugar

1/4 cup cornstarch

2 cups half and half

4 egg yolks

3 Tbsp. butter

1 cup sweetened flaked coconut

2 1/2 tsp. vanilla extract, divided

2 cups whipping cream

1/3 cup sugar

Garnish with toasted coconut


Preheat the oven to 425*F. Fit one crust into a 9-inch pie plate according to package directions; fold edges under and crimp the edges. Pick the bottom and sides of the crust with a fork. Save the other pie crust for a future pie or you can cut out borders to place around the pie if you desire. I saved the other pie crust for making another pie.Bake the pie crust for 12-15 minutes or until lightly browned. Combine 1/2 cup sugar and cornstarch in a heavy saucepan. Whisk together the half-and-half and the egg yolks. Gradually whisk the egg mixture into the sugar mixture; bring to a boil over medium heat whisking constantly. Boil 1 minute and remove from the heat. Stir in the butte, coconut, and tsp of vanilla. Place plastic wrap directly over warm custard and let stand for 30 minutes. Remove the plastic wrap. Spoon custard mixture into prepared pie shell and cover and chill for 30 minutes or until set. Beat the whipping cream at high speed with an electric mixer until frothy. Gradually add 1/3 cup sugar and remaining 1 1/2 tsp vanilla, beating until soft peaks form. Spread the cream over the pie filling and top with toasted coconut. Serve and enjoy :)

Pin It

Friday, May 6, 2011

Raspberry Filled Chocolate Cake Truffles

After making Jaylynn's wedding cake I had a lot of cake scraps and raspberry cake filling left over. As I sat there looking at the leftovers I came up with an idea of what I can do with all of it. I decided to make cake truffles with raspberry filling. Every time I make cake truffles Tomas comes into the kitchen and says that I should put some kind of fruit filling in the center. Well I finally made his wish come true with the raspberry filled cake truffles. And I have to say I am glad too because they turned out extremely yummy. Now this raspberry filling is what I use for my layered cakes, therefore if you don't want to put it in your cake truffles then you can put it in between the layers of a cake that you make. Now with Mother's Day coming up, cake truffles can make a nice gift for that special someone. As you will see in the photos below you can package up the truffles in cupcake wrappers and place them in a pretty container (if you need more height add some tissue paper to the container). Then for a nice finishing touch tie a pretty ribbon and a message on the outside of the box and then the gift is ready for that special someone in your life.


Raspberry Filled Cake Truffles


Cake Truffles

1 Chocolate cake mix
1 can chocolate frosting
1 Package dipping milk chocolate


Raspberry Filling

2 cups frozen raspberries
6 Tbsp cornstarch

8 Tbsp lemon juice

1 cup sugar


Bake the cake as directed on the box. While the cake is cookin prepare the raspberry filling. Place all four ingredients into a saucepan at a medium high heat. Heat until the sauce boils and begins to thicken. Let the raspberry mixture cool (you can place it in the fridge to cool faster). When cool place in a ziploc bag with the corner snipped off and set aside. When the cake is done let it cool until cool enough to handle.Crumple up the cake completely. Add in the entire can of frosting and mix thoroughly. Roll the cake mixture into small balls, about 1 inch each leaving about 1/2 cup of cake mixture behind. After making all the balls, make a hole in the center of each ball and set aside. Fill each hole with the raspberry filling and take some of the leftover cake mixture and cover the hole. Place the balls in the fridge to help firm, about 30 minutes. Melt the dipping milk chocolate according to package. Dip the cake balls into the chocolate one at a time. Shake off excess chocolate and place on a cookie sheet lined with wax paper. Let set and enjoy :)


Here is a picture of what the trufles look like packaged up and placed in a nice box.


Here is the package of the truffles wrapped in a box and tied with a bow and message.


Pin It

Thursday, May 5, 2011

Jaylynn's Wedding Cake With Purple Hearts


This here is the first wedding cake that I have ever made. I have done wedding cupcakes and a bridal shower cake before, but never a wedding cake. So I was a little nervous at first. I made this cake for my friend and coworker Jaylynn's wedding. The cake is a chocolate cake with raspberry filling. She wanted a cake with white buttercream icing with purple hearts decorated on it, and this is how it came out looking in the end. So I hope she likes it and that she has a wonderful and beautiful wedding. Congratulations Jaylynn :)
Pin It

Monday, May 2, 2011

Cream Filled Cake Truffles

I think that it is time that I get back to celebrating national food holidays. Not only is it fun to cook and eat food, it is even more fun to celebrate food. To get back into the roll of things I made cream filled cake truffles to celebrate national truffle day. Yay for Truffle Day!!!!! Everyone loves when I make cake truffles and to no surprise these are already gone. Now these cake truffles actually did not come out the way they were supposed to be. They are suppose to be mini hostess cupcake truffles which I found on a blog called Sugar Derby But since all the white chocolate disappeared at my house, I couldn't do the cute curvy white line on the top. Therefore I ended up just making cream filled cake truffles instead. So if you want you can make the line on top to make them mini hostess cupcake truffles, or just make them cream filled. Which ever you decide to choose have fun celebrating national truffle day. :)


Cake Truffles

1 Chocolate cake mix
1 can chocolate frosting
1 Package dipping milk chocolate
1 package dipping white chocolate (optional)


Cream Filling


2 tsp very hot water, not boiling
1/4 tsp salt
1 jar marshmallow creme
1/2 cup shortening
1/3 cup powdered sugar
1/2 tsp vanilla


Bake the cake as directed on the box. When the cake is done let it cool until cool enough to handle. While the cake is cooling prepare the cream filling. To prepare dissolve the salt in the water and set aside. Whip the marshmallow cream, shortening, sugar and vanilla until fluffy. once the water is cool add to the marshmallow mixture and whip well. Set aside until ready to fill the cake truffles. Crumple up the cake completely. Add in the entire can of frosting and mix thoroughly. Roll the cake mixture into small balls, about 1 inch each leaving about 1/2 cup of cake mixture behind. After making all the balls, make a hole in the center of each ball and set aside. Fill each hole with the cream filling and take some f the leftover cake mixture and cover the hole. Place them balls in the fridge to help firm, about 30 minutes. Melt the dipping milk chocolate according to package. Dip the cake balls into the chocolate one at a time. Shake off excess chocolate and place on a cookie sheet lined with wax paper. If you want to make a white curvy line on top to make them look like Hostess cupcakes, then melt a little bit of white chocolate. Place the chocolate in a Ziploc bag with a corner snipped off and make a swirly line on top of each truffle. Let set and enjoy :)


Pin It

Saturday, April 30, 2011

Red Wine Bottle Cake


This here is my latest cake creation, which is a red wine bottle shaped cake. It is not as extravagant as other cakes I saw online, but it is the best that I could do. So let me talk a little about what I did. The reason I did the star tip design is because since I carved the two layer cake into a wine bottle shape, I didn't want to get crumbs in the frosting when spreading it. Therefore I did the star tip that way the crumbs would not go everywhere. The hardest thing about this cake was making the frosting a red wine color, which I was never able to do. Therefore it is more of a grape purple color. Now you cant really notice in the picture, but there is three shades of purple on the cake, however it was not intentional. Every time the frosting would get warm while piping, I would put it in the fridge to cool. When ready I would take it out and continue frosting the cake. Well I didn't notice until the next day that each time I did that the purple shade got darker and darker. Even with the little flaws I think the cake still came out great and I hope that Penny loves the cake. :)
Pin It

Wednesday, April 27, 2011

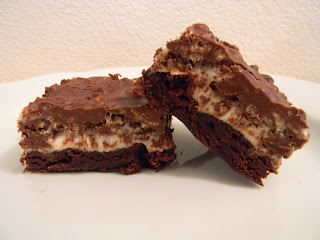
Brownie Mallow Bars


So I have to admit that I have been a little lazy lately. When I get off work I usually come home and do nothing. Therefore my laziness has taken a toll on my creations as well as my blog. So I am going to try and get out of my lazy rut and get back to posting things on my blog again, especially since I do have a lot I can post about. So to get things started up again I made these really delicious brownies that I found in my Taste of Home Cookbook. They are so easy to make I don't know why I didn't think of it myself. Well I hope you enjoy and I will be back real soon. :)


Brownie Mallow Bars

1 package fudge brownie mix (13-inch x 9-inch pan size)
1 package (10-1/2 ounces) miniature marshmallows
2 cups (12 ounces) semisweet chocolate chips
1 cup peanut butter
1 tablespoon butter
1-1/2 cups crisp rice cereal


Prepare brownie batter according to package directions for fudge-like brownies. Pour into greased 13-in. x 9-in. baking pan. Bake at 350° for 28-30 minutes. Top with marshmallows; bake 3 minutes longer (marshmallows will not be completely melted). Cool on a wire rack.
In a microwave-safe bowl, melt the chocolate chips, peanut butter and butter; stir until smooth. Stir in cereal; spread over brownies. Refrigerate for 1-2 hours or until firm before cutting.
Pin It

Monday, April 11, 2011

Sea Shell Wind Chime


Today I will be doing a post on something other than food. Just recently I made a sea shell wind chime out of some shells that I have collected over the years. Some of the shells I found at various beaches and I bought the more exotic ones at the store. Well i would always see sea shell wind chimes come in to the store I work at. I always thought they were nice, but I didn't want to pay a lot for something like that, especially if I could make it myself. And it turns out that is was actually very easy to make. The one thing that took a lot of time was drilling all the holes in each of the shells, but once you get past that step it takes no time at all to make it. After it is all put together you end up with a one of a kind custom made sea shell wind chime, which sounds very pretty when a breeze goes by. Now if my directions make no sense at all then I apologize. I tried to describe it the best way I could. If anyone ever has any questions on this or anything else I ever make feel free to ask away. Enjoy


Sea Shell Wind Chime


Various sea shells

Transparent plastic string/fishing line

Clear sea beads

1 wooden circle plaque

1 key ring


Drill holes in the tops of all the shells. Also drill a hole in the middle of the wooden plaque as well as three holes evenly around the edge. Cut a long piece of string and tie a knot at the end around a sea bead. String a shell on to the strand letting it rest on the bead. Leave about a 1-inch space from the shell and tie another knot on the string with a bead and the string down the next bead. Repeat until you have all four strands made. End each strand with a knotted sea bead to help support the wood plaque. String the strands through the wooden plaque and then tie all the strands around a key ring. Cut off excess stings and then hang it up some where nice.


Pin It

Friday, April 8, 2011

Toasted Coconut Bird's Nest Cupcakes


I just love coconut, so I figured why not make a coconut flavored cupcake and put toasted coconut on top. Plus since they look like nest it goes perfect for the Easter holiday. They are very simple to make and you can make them for any occasion, just don't put the egg candies on top and they wont look Easterish. Just prepare a white cake mix according to the box and after all combined add about two or more teaspoons of coconut extract to the batter, if you don't have any coconut extract you can just do with out. Bake the cupcakes according to the package and let cool. While the cupcakes are cooling dump a whole package of shredded coconut on to a cookie sheet and place under a broiler. Cook until the coconut starts to turn brown but don't let it burn. Try to stir the coconut every once in a while to make sure it browns evenly. Frost the cupcakes with a white frosting and then dip the frosted cupcake into a coconut, and repeat for each cupcake. Ta da you now have coconut nest cupcakes. Place a few candy eggs on top, if you like, and enjoy.
Pin It

Friday, April 1, 2011

Pickle Cupcakes


Anyone want to try a pickle cupcake? They are the most wonderful thing in the world. If you have not tried them yet you are really missing out. April Fools!!!! These are not real pickle cupcakes. I actually think that would be really disgusting. The pickle on top of these cupcakes are actually pickle shaped candy that I found at work the other day. When I first saw these candies I just thought they were the funniest candy I have ever seen and I just had to buy them and do something fun with them. That is when I came up with the fun idea of pickle cupcakes. To make the cupcakes more interesting I dyed the cake batter with green food coloring to make it more pickle like. I can't wait to see every ones reaction at work today when they see these cupcakes. Hopefully everyone gets a good laugh out of these. Have a fun April Fools Day!!!


Unfortunately, the wrapper to the pickle candies got tossed right after making the cupcakes and I cannot remember the brand. I have been searching and searching online since I made these as well as continuously looking at my job, and I cannot find these candies anywhere. As soon as I do I will post all the information on here that way everyone can enjoy these pickle candies. :) 
Pin It

Monday, March 28, 2011

Blackberry Pie


More blackberries!!! I just couldn't resist buying more blackberries while at the grocery store last night, especially since they are on sale for buy one get two free. Who could resist such a great deal. Now I didn't want to make blackberry cobbler again, even though it tasted wonderful. I wanted to make something different this time around, therefore I decided on making a pie. Now usually I buy the pie dough at the store, but I decided to make it myself for a change. To my surprise it was easier than I thought it would be, so easy I would definitely make this pie crust again.

Pie Crust

1/2 cup vegetable shortening

1 1/2 cup all purpose flour

1/4 teaspoon salt

1/2 cup cold water

Double if doing a two layer crust or lattice crust


Blackberry Filling

3 baskets of blackberries

1/4 cup granulated sugar


Toss the blackberries in sugar and set aside. Mix the shortening, flour and salt together using a pastry blender until well combined and crumbly. Add in the water a little at a time. Mix well using a fork until combined. Place dough on a floured surface and roll out into a 12 inch circle. Place the dough into a pie plate and cut off any excess dough. Add the blackberry mixture to the pie plate. If you want to make a lattice crust or give it a layer of crust on top then repeat the recipe to make more pie dough. If you choose not to do the lattice crust you can do a crumb topping if you like. If doing a lattice crust roll out the dough and cut into 1/2 inch strips. Weave the strips over and under to give the latticed look. Bake at 425*F for 15 minutes then turn the oven down to 375*F and continue to bake for 25-30 minutes or until the pie is done. Sprinkle a little sugar on top for a little sparkle. Serve and enjoy. :)


Pie crust recipe from allrecipes.com
Pin It

Thursday, March 24, 2011

Fresh Blackberry Cobbler


Tomas and I just love cobbler. Yesterday I was at the grocery store I saw that blackberries were on sale. So I grabbed a few baskets of blackberries and decided that I would make a cobbler for us. We were both very glad I did because it tasted wonderful. Now I have posted a cobbler on here before and I just so happens to be the same recipe as last time, besides I used a different fruit this time. I just had to share this recipe again because it very easy to make and it is very versatile. All you have to do is substitute whatever fruit you like for the blackberries, but I do recommend the fresh blackberries because it was super delicious. Whatever you decide to do I hope you enjoy it as much as we do. :)

Fresh Blackberry Cobbler
3 baskets fresh blackberries, washed and dried
Topping:
1 cup sugar
1 cup flour
½ cup butter

Place blackberries in a lightly greased 13x9 inch baking dish or any baking dish of your choice. In a separate bowl mix sugar, flour, and butter until crumbly. Sprinkle over fruit mixture. Bake at 400ºF for 30-45 minutes or until topping is a nice golden brown. Enjoy
Pin It

Tuesday, March 22, 2011

Soft Sugar Cookies

It has been a long time since my last post. Part of it had to do with the fact that I went out of town for business. But I am back and well rested and ready to post on my blog again. While away I bought myself a new cookbook, which happened to be on clearance which is probably why I bought it. Anyways the book I bought was The Taste of Home Cookbook and it is full of great recipes that I can't wait to try. Today I tried my first recipe out of the book which was for the soft sugar cookies. They remind me of the soft sugar cookies you can buy at the grocery store, which I absolutely love. So which is why I could not resist making them, and I do not regret one bit. I will be making these for sure in the future.
Soft Sugar Cookies
1 cup butter, softened
3/4 cup sugar
2 eggs
1 teaspoon vanilla extract
1/2 teaspoon almond extract
2 cups all-purpose flour
1 teaspoon cream of tartar
1/2 teaspoon baking soda
1/4 teaspoon salt
1/4 teaspoon ground nutmeg
Frosting
1/4 cup butter, softened
3 cups powdered sugar
3 tablespoons hot water
Sprinkles, optional
Preheat the oven to 350*F. In a large mixing bow, cream butter and sugar until light and fluffy. Beat in the eggs, vanilla and almond extract. Combine the flour, cream of tartar, baking soda, salt, and nutmeg; gradually add to creamed mixture. Drop by rounded teaspoonfuls on an ungreassed baking sheet. Bake for 8-10 minutes or until light brown. Remove to wire racks to cool. To make frosting combine all the ingredients into a mixing bowl and blend until it is fully blended. If you want you can add food coloring at this point or you can keep it white. Gently spread the frosting on to the cookies and sprinkle the sprinkles of your choice on top. Serve and enjoy :)
Pin It

Monday, March 14, 2011

Brownie Ice Cream Cake

Happy Birthday To Me !!!!!! Yup, today was my birthday and I had a very great day. To celebrate Tomas and I went to the Fresno Chaffee Zoo and we had a blast. (I posted some of the pictures of the animals under the My Life section of my blog if you want to see them). Anyways for my birthday I wanted to make myself something special. I really did not want a cake, but I wanted something like a cake. Therefore I thought that instead of cake I will make brownies and turn it into an ice cream cake. It came out good, very rich, but very good. Since it was frozen it made it very difficult to cut, so I recommend defrosting it a bit before serving. Enjoy :)
Brownie Ice Cream Cake
2 brownie mixes (or prepare your favorite brownies)
Ice cream
Chocolate frosting
Prepare your brownies according to the package, but bake in two round greased cake pans. Bake 40 minutes or until toothpick inserted in the center comes out clean. Remove from the oven and let the brownies cool completely. When cool remove the ice cream from freezer and set on the counter to soften. once soft enough to handle, spread the ice cream on to one of the brownie layers. Place the second layer on top of the ice cream and then place the brownie layers back into the freezer to set. When set, remove fro the freezer and frost the cake. When ready to eat, defrost for a little while then cut and serve.

Pin It

Thursday, March 10, 2011

Pesto Bean Soup


This has to be one of the best soups i have made, and Tomas agrees with me. It has a nice kick to it and lots of flavor. One of the things that he likes most is that it has no meat in it. I originally found this recipe in the Foodnetwork magazine, but I made quite a few changes. First off I doubled the recipe, besides when it came to the beans which I only added 3 cans, 2 cans of cannellini beans and one can of red kidney beans. Next I omitted the olives and celery, because I don't like either of those ingredients. When it came to the red pepper flakes I just about dumped a lot in since we love the spice. Now if you don't like the changes I made then you can always follow the original from Food Network if you like. Well anyways, I hope you love the soup as much as we did.
Pesto Bean Soup
Saute 1 head of sliced garlic cloves and 1 or more tablespoons of red pepper flakes in a pot with olive oil. Add 2 cans drained cannellini beans and 1 can drained red kidney beans and add 2 cups water; simmer until thick, 8 minutes. Stir in 6 tablespoons pesto ( I bought pre-made pesto at the grocery store) and 4 tablespoons grated parmesan.

Add 6 cups chicken broth. Cook 15 minutes. Stir in 1 diced roasted red bell peppers. Serve and enjoy.
To roast a bell pepper:
Using a pastry brush, brush vegetable oil over the bell pepper, making sure it is fully covered. Place the pepper on a baking sheet and place on the top rack in the oven and broil them. Using tongs, turn the pepper over as it blackens. Once blacked a little on each side, place in a container and cover for 15 minutes. Take the pepper out and pull the stem out. Dice up and set aside until ready to place in the soup.

Pin It

Saturday, March 5, 2011

Coconut Stuffed Brownies

I love brownies and I really love coconut. I don't just love coconut, I am obsessed with it. My friend Katie and I always talk about how much we love coconut and anytime we find something good with coconut in it, we always share with each other what that something is. For instance at our job, HomeGoods, we sometimes get in these toasted coconut chips, and let me just say they are to die for. The only down side to these chips is that because they are so good they fly off the shelves in no time. Lucky for us I found them at Savemart, which I told Katie about right away, so now we can have those delicious coconut chips anytime we like. We did get even luckier when the came into our store a couple of weeks ago.
Well anyways let me get to the coconut stuffed brownies. The other day I was sitting at home pondering on different things I should make. Since I was really craving coconut and chocolate brownies, I knew I wanted to do something dealing with those two ingredients. So I got to thinking, why don't I make coconut stuffed brownies. I didn't know how they were going to turn out because I have never made them before, but I gave it a try and they came out tasting amazing. They would have probably come out tasting even better if I made the brownies from scratch, but I used a boxed brownie mix instead to make it easier on myself. When it came to the coconut filling I got the recipe from the chocolate macaroon cake that my mom and I make ( you can find the recipe for the cake on her blog. I have yet to make it for my blog, but I plan on making it real soon). So if you love coconut and brownies and think that the two combined sound amazing, then I highly suggest you make these things yourself real soon. :)
Coconut stuffed Brownies
1 boxed brownie mix ( and the ingredients listed on the package)
2 egg whites
Pinch of salt
1/3 cup white sugar
2 Tablespoons flour
1 3/4 cups shredded coconut
Preheat the oven and prepare the brownie mix according to package. In a mixing bowl, beat the egg whites and salt until foamy.Gradually add the sugar and continue beating until the mixture forms stiff peaks. Blend in flour and coconut. Pour half of the prepared brownie batter into a greased baking pan. Spread the coconut mixture on top of the brownie batter. Pour the remaining half of the brownie batter on top of the coconut mixture, making sure all the coconut mixture is covered. Bake according to the package directions or until a toothpick inserted in the center comes out clean. Serve and enjoy. :)
Pin It

Monday, February 28, 2011

Fancy Cupcakes With Pearls


Today is my little sister Ariel's birthday, and even though she is my little sister she is no longer little because today she turned 20. So to celebrate my family actually came down to Fresno and we all went out for lunch and did some shopping before they headed back home. Well last night I ended up making some banana cupcakes because I was bored and since my family was coming down for the day I put some candles on a few and when my sister came up to the door I surprised her with the cupcakes. I soon learned that she didn't like banana cupcakes, but she did think they were pretty. They were very easy to make, they were just a little time consuming so I didn't decorate all the cupcakes. All I did was swill on the frosting with a frosting tip and then I took the white pearl sprinkles and went around some, not all, of the edges of the frosting. They came out very elegant in the end. I really love using those pearl sprinkles. So if you ever see them in the store I highly recommend buying them.
Pin It

Sunday, February 27, 2011

3D Hello Kitty Cake


Saturday was my friend's daughter Jillian's 4th birthday party. So this year she wanted me to make her a Hello Kitty cake for her birthday. Since I have already made a Hello Kitty cake once before I decided that I wanted to challenge myself and have her sitting up this time instead of laying flat. To make this challenge easier, I went and bought the 3D teddy bear pan put out by Wilton, but instead of frosting it to look like a bear I frosted it to look like Hello Kitty. For her whiskers I used some black plastic string because I couldn't find any black licorice rope, but I didn't look at too many places for the licorice in the first place :) For the words and border around the cake I used edible pearl sprinkles in pink and white. The pearls were very time consuming because I placed each one on the cake individually. Because I used the pearls for the words, they ended up a little off centered, but because they took a while to place on the cake I didn't want to spend more time fixing it. I don't think Jillian cared or even noticed that the words were off centered, all she cared about was that she got a cake with Hello Kitty on it just like she wanted.


Here is a close up of the pearl detail.


Pin It

Thursday, February 24, 2011

Brownie Bites With Heart Chocolate Centers


I know Valentine's Day was over a week ago, but I still wanted to share the treat that I made for my work. I was craving brownies so I wanted to make bite sized ones that involved no cutting. Now I was a little worried at first when I failed at making brownie bites a while back, but I didn't let it get to me and I attempted to make them again. Which they totally turned out great because this time I properly greased the mini muffin pan. Since it is no longer Valentine's you can put a different chocolate candy of your choice. Be creative and have fun when you make your own tasty brownie bites.
Brownie Bites With Heart Chocolate Centers
1 package of brownie mix (and ingredients listed on the back)
1 package of heart shaped chocolates, unwrapped
Festive sprinkles (optional)
Preheat the oven according to package directions. Mix the ingredients together according to package directions. Grease the mini muffin pan very well and fill with the brownie batter about half to three quarters way up. Bake for 15 minutes or until a toothpick inserted in the center comes out clean. Remove from oven and instantly insert chocolates in the center. Once all the chocolates are inserted sprinkle the sprinkles on top and remove from pan using a spoon or fork. Cool and enjoy :)
Pin It

Thursday, February 17, 2011

Roasted Asparagus with Herb de Provence


Roasted asparagus with Herb de Provence is one of the dishes that I made for our Valentine's Day dinner, along with the chicken Marsala which I have shared on my blog a while back. Anyways, my boyfriend Tomas loves asparagus prepared this way. Not only is it delicious it is very easy to make. I originally got the idea for this recipe from another recipe on all recipes, but when I went back to find it I couldn't remember what they called it and how they made it. Therefore I will share for you the way I made it. The measurements are an estimate, because depending on your taste you may want more or little of the seasonings listed below.
Roasted Asparagus with Herb de Provence
1 bunch of asparagus
2 tablespoons olive oil
1 teaspoon sea salt, or regular salt
1 teaspoon pepper
2 tablespoons Herb de Provence
Preheat the oven to 450*F. Wash and cut the asparagus. Lay the asparagus on a baking sheet. Drizzle the olive oil over the the tops of the asparagus and sprinkle the salt, pepper, and herb de Provence. Toss the asparagus to make sure evenly coated with the oil and seasonings. Bake in the preheated oven for 15-20 minutes or until tender. Serve and enjoy. :)
Pin It

Tuesday, February 15, 2011

Key Lime Cheesecake

I hope everyone had a wonderful Valentine's Day yesterday because I know I did, even though I had to work. Well while I was at work my boyfriend Tomas surprised me by bringing me a dozen roses and some balloons. I was extremely surprised because he already got me a pair of Burberry sandals, so I was not expecting anything else. Because of his sweet an special delivery I was all smiles for the rest of the day. Well after work I had a special dinner planned for Tomas and his sister Monika and her boyfriend, but since no one would be home until 10PM I had a few hours until they all came home. So over the next few days I will share some of the things that was on the menu, but first I will share what we had for desert. I didn't want to make key lime pie, like I did last year, so instead I made key lime cheesecake. It came out amazing, especially since it was the first cheesecake I have ever made. It even tasted better the next day, at least what was left of it. Now I got the original recipe from Allrecipes.com however I made a change to one of the ingredients in the crust. Instead of using graham crackers I used ginger snaps because I feel that it is a more flavorful crust. So whatever way you decide to make it I hope you enjoy it as much as we did. :)
Key Lime Cheesecake
1 1/2 cups ginger snap crumbs
6 tablespoons butter, melted
24 ounces cream cheese, softened
1 cup white sugar
1 tablespoon cornstarch
3 eggs
1 tablespoon grated lime zest
2/3 cup key lime juice
Directions
Combine ginger snap crumbs with butter or margarine. Press into bottom and partially up sides of 9 inch springform pan. Refrigerate. In a large bowl, beat with an electric mixer the cream cheese, sugar, lime peel, and cornstarch until smooth and fluffy. Beat in eggs one at a time, blending just until smooth. Add key lime juice with mixer on low. Finish mixing by hand. Do not over beat, or cake will crack during baking. Pour batter into prepared crust.
Bake at 300 degrees F (150 degrees C) for 55 to 65 minutes, or until set. If possible place a shallow pan half full of hot water on lower rack during baking to prevent cracking, if you cannot then just place the cheesecake in the oven. Turn oven off, and let cheesecake stand in oven 30 minutes with the door open at least 4 inches. Remove from oven. Refrigerate cake overnight, and up to three days.

This is the place setting for our Valentine's Day dinner.


Here are the beautiful flowers and balloons that Tomas gave me. :) I love him so much.


Pin It
Related Posts with Thumbnails