Monday, October 1, 2012

Spooky Wreath


Its Halloween Season, Yay!!!!! I actually feel like it has been Halloween season for a while now, but that is because I work in retail and the seasons come around early. Well anyways I decided that I should get into the spirit of things and do a little decorating for Halloween, especially since I always see great ideas on Pinterest. So I decided to make a wreath for my door, like I did back during Valentine's Day. I didn't want to spend much money on the project so after looking at other wreaths I have seen I decided to make one using mostly things I had around my house. 

I remembered I had a black feather boa that I used for a Halloween costume years ago, so I dug it out of the box and got to thinking of all the ideas I could do with it. One if the things I was going to do was put foam balls as eyeballs on the wreath, I even thought about buying orange glass ornaments and placing them through out the wreath. While at The Dollar Tree one day I saw that they had a great selection of Halloween Ribbon. So I decided that I should just keep my wreath simple and just make a pretty bow and attach it to the wreath. When it came to the wreath structure I was lucky to already have had a wicker wreath in my craft closet (which I actually found at the Dollar Tree a while back). Unfortunately, the wreath was light brown and I did not want it to show through the feathers so I spray painted it black with the paint I already had. Overall I was satisfied with the finished product and I also felt like it didn't cost me much to make, especially since I bought the things over a period of time. Also Tomas loved the wreath too, so that made me happy.  :)


Supplies

1 Wreath structure (wicker or foam)
1 black feather boa
Ribbon
Floral Wire
Hot glue


To Make

First wrap the boa around the wreath. If the boa is not big enough or you can see the color of the wreath and it is not black I would suggest painting it black first. After you wrap the boa around the wreath completely, glue or tie it in place. My boa had some sort of ribbon loops on the end, so I was able to tie the ends together and use one of the loops to hang it on the door. After the boa is wrapped around you can use glue to secure it all in place if needed. Mine stayed put so I did not use any glue. This comes in handy because if I ever need my boa for a costume again I will be able to take it off and use it. Next take your ribbon and make a nice bow and use floral wire to hold the bow together and to secure in place. Now your wreath is ready to hang up and enjoy.   
Pin It

Sunday, September 30, 2012

DIY Sea Shell and Burlap Wall Art


One of the things I like to look at on Pinterest is the Home Decor section. It gives me ideas on what I can do to decorate my house for cheap. While browsing through Pins, I came across this Pin on some Sea Shell wall art that someone else did. Before I even clicked on the Pin I was in love and told myself that is something I can recreate. So I clicked the Pin and read what they did. I loved what they did and thought it was beautiful, but I could not afford the $150 to do it myself. So I came up with my own way of doing it for way cheaper, and I even got to use some of the shells I collected on the beach. The total cost in the end was around $10, which was more within my budget. In the end I was very pleased with the finished product and I love how they look in my little bathroom. :) 


Supplies Needed

Burlap (found on the remnant shelf at Joanns for 50 cents)
4 picture frames (from the Dollar Tree)
Paint in Navy and White
Assortment of shells (I found the star fish 3pk for $1 and a bag of assorted shells $1 at Michaels in the impulse buy section and they were on sale that week too).
Scissors
Paint Brushes 
Hot Glue


To Make

First take out the glass and paint the picture frames the color that you would like then let dry. Next paint the shells white and let dry. Next take the glass from the frame and line it up on top of the burlap and use the glass as a guide to cut out the burlap. Now take the piece of burlap and carefully glue it to the glass while making sure it stays straight. Cut off any excess strands of burlap, if any, that gets in the way of placing the glass back in the frame. Now place the back of the frame back in place and secure shut. Now take your shells and figure out how you want them placed on the burlap. Glue in place once you decide where you like them. Now arrange your art work on the wall where you will like them. Now sit back and enjoy the beautiful art you just created for very little money.


Pin It

Tuesday, September 11, 2012

Knitted Pumpkin Baby Hat


Every time I would see knitted pumpkin hats on Pinterest and Ravelry I would just think they were the cutest thing. Jillian, the girl I used to babysit, had one and would wear it every time I would take a walk with her. Well since she already has one I decided that I would make one for Jasey, my friend Bethany's baby girl. I already had some orange yarn in my stash from when I made Tomas an orange beanie, so all I had to buy was the green yarn. After I had all the yarn it was then time to finally decide on which pattern I wanted to go with. For the beanie I made I used two different patterns. I did not care for the leaves that were with the pattern for the hat. Part of it had to do with a crocheted trim and I cannot crochet yet. Plus I loved the curly vines that I saw on a different pattern so I decided to combine the two patterns together. When it came to the vines I did two different sizes. I did one the way it was written and for the second I cast on an extra ten stitches. Both of these patterns I got from Ravelry so if you have an account you will be able to access them there for free. I hope you enjoy your pumpkin baby hat as much as I did and especially as much as my friend Bethany did, which she loved :)


Knitted Pumpkin Baby Hat

Supplies:
Red Heart Super Saver Yarn: Pumpkin Color
Vanna's Choice Yarn: Kelly Green Color
Needles: 
Size No. 6 16" circular knitting needles 
Size 6 double point needles

Patterns:


Pin It

Sunday, September 9, 2012

Neapolitan Coconut Cake


I was going through a Neapolitan phase so I decided why not make a Neapolitan cake. Lucky for me I had chocolate cake mix as well as strawberry and vanilla cake mix in my pantry. So one by one I baked them according to the package directions as they cooled I made some coconut butter cream frosting. The reason I did coconut flavor was because I was out of vanilla extract, so I used coconut extract instead. After the cake was cool I began frosting the cake. After frosting the outside of the cake I covered the cake with shredded coconut. As soon as I finished the cake I quickly took some pictures and ate some. It was so yummy and tasted just like Neapolitan ice cream. 

Now because I used a cake mix I ended up with two layers of each flavor. But no worries because It was also a friend Josh birthday so I made him a cake as well.

Slice of cake close up.


So yummy!!!

Pin It

Saturday, September 8, 2012

Nurse Bait


A few months back I came across this cute and clever gift idea on Pinterest for people who are in the hospital. This cute gift that I am talking about is called Nurse Bait. At the time I found this idea I had no one to give it to, but recently I have had 2 important people in my life to give it to, my Grandma and my friend Bethany. When it came to the one for my Grandma I used a lot of good hard candies because it had to be sent by mail. For Bethany's I used chocolates and some fruity candies since I was able to deliver it myself. Bethany and her Mom really loved this gift. Most importantly Bethany said it was a hit with the nurses, which let me know it served its purpose :)

Now I do not know who came up with this clever idea was or who wrote the poem. The Pin that I saw on Pinterest was just a picture with no link to follow. I wish I was creative enough to come up with this idea, but I didn't someone else did first and who ever did was very clever because this is a perfect gift to give someone in the hospital, that way they will get a little more needed attention from the nurses :)


Here is the close up of the Poem that I printed out and included with the gift.

This is how we placed it on the small table in the room for the nurses to see. Every time they came to check on Bethany we would point out the basket and ask if they would like a piece of chocolate :)
Pin It

Tuesday, August 28, 2012

Apple Slice Pancakes


While browsing on Pinterest the other day (which I am always doing), I came across a yummy picture and recipe of something called Fried Apple Pancake Rings. I really wanted to make them for breakfast, but after reading the recipe I did not have all the ingredients and so I decided to make it a bit easier and use what I had on hand. Also mine did not come out looking like rings because the pancake batter would stay in the holes or while cooking the batter would spread to the hole and cover it up, that is why I decided to call mine apple slice pancakes. These things were yummy and I felt they were healthy because they were more apple than pancake. I will be making these again soon especially when I have some apples that need to be eaten up. 

Apple Slice Pancakes

Pancake Mix
Ground Cinnamon 
Green Apples, peeled, sliced into rings, and cored

Make pancake mix according to the package then add 2 teaspoons ground cinnamon. Depending on how much batter you have will depend on how many apples you will need. I used two small green apples and had a small amount of batter left to make a regular pancake. Dip the sliced apples into the batter and using a toothpick or chop stick take the apple ring out and place on a warm skillet. Cook just like a pancake until golden brown. Serve with syrup or sprinkle a little bit of cinnamon and sugar on top. Serve warm and enjoy. :)  
Pin It

Monday, August 13, 2012

Knitted Elephant


This is Barbri. Barbri is the elephant I hand knitted while Tomas studied for the bar using a study program called Barbri. Everyday Tomas would come home and talk about what he studied that day and what he learned from the lectures he watched from Barbri that day. Therefore since I always heard the name Barbri while I knitted my elephant, I only saw it fit that I name my elephant Barbri. 

Barbri was the first knitted stuffed animal I made, the knitted bunny I just posted about recently was the second. For a while I wanted to knit a stuffed animal, but I was a little intimidated because they look so hard. After looking at a bunch of animal patterns my mom showed me one on Ravelry called Elefante. After looking over this pattern I saw that it wasn't going to be too hard, therefore I gave it a try. After a few days of knitting all the parts and piecing them together I had myself a cute little hand knitted elephant stuffed animal. I was extremely proud of myself and Tomas was too. Because this was the first stuffed animal I knitted I became attached and could not give it away, Tomas agreed with me too. We decided that we would hold on to it for the day we have kids. So for now Barbri sits on a shelf in my room until the day that there is someone to play with her.  :)


The pattern for the elephant  is called Elefante and can be found on Ravelry
The pattern I used for the ears I found on The Rainey Sisters Blog. I made four ears instead of two though. I made two pink and two grey that and then stitched them together. I did that because i wanted both sides to be in a stockinette stitch as well as I wanted the inside of the ears to be pink and the outside to be grey.

The needles I used were size US 5
The yarn I used was from my stash
The Grey yarn was Patons Canadiana in Medium Grey Heather
The pink yarn was Bernat Satin Satin Breast Cancer Yarn in Flamingo
The black eyes was Embroidery Floss in Black


Isn't she just the cutest <3 br="br">

 Her standing on all fours as well as her nose :)

  A side shot including her tail.

Of course I needed to take a butt shot. Just look how cute it is :)
Pin It
Friday, August 10, 2012

London Knitting Charms


I am a little late posting these London Knitting Charms that I made, and when I say late I mean months. I made these charms for my friend Laurie back in January and some how I forgot them so their photos ended up forgotten in a file on my computer until now. With the London Olympic games going on right now it will make this post that much better, so maybe it is a good thing the pictures were forgotten until now. 

Now let me tell you a little on why I made these London Knitting Charms to begin with. Laurie, my friend and coworker loves everything London. Every time something with the Union Jack flag comes in I run over to show her. Well while I was shopping at Michael's when I noticed these cute London charms in the bead section. I instantly thought of Laurie and decided that I would make these into knitting charms for her. When I gave them to her she loved them, she even said she was going to take them to her knitting group that night.

To make these charms follow the instructions that I gave for the Pearl Stitch Markers.


And if you are giving homemade knitting charms as a gift tie them to some scrap yarn for that extra nice touch.  :)
Pin It

Thursday, August 9, 2012

Pepperoni Pizza Pinwheels


While walking through the isles of the grocery store last night something caught my eye, mini pepperonis by Hormel. Once I saw those cute mini pepperonis my mind started thinking of all the possibilities that can be done with them. The first thing that popped in my head were pinwheels made with canned crescent rolls. When I was younger and my mom would throw parties we would make crescent pinwheels with ham and cheese or turkey and cheese as her hours d oeuvres. So I decided that the first thing I will make with the mini pepperonis would be pepperoni and cheese pinwheels just like the ones I made for my mom. 

As I was making them for dinner Tomas kept asking me what I was making and I just kept telling him it was a surprise. As they were cooking he asked again because he said it smelled good and I still would not tell him. As soon as they were done he came into the kitchen and said "those look amazing." I then proceeded to pour him some marinara sauce, which he then doctored up with some garlic and spices, then he took one of the pinwheels and gave it dip. It was love at first bite. He loved these little flaky pizza bites and lets just say they were so good that they on lasted a few minutes until we devoured every last one. I will have to make more the next time I make these instead of the little bit that I did.  :)


Pepperoni Pinwheels  
1 can refrigerated crescent rolls
Shredded Cheese
Hormel Mini Pepperonis
Marinara sauce

Preheat the oven to 375*F. Take two of the crescent triangles and piece together to make a rectangle. You should get four rectangles per can of crescent rolls. Sprinkle some cheese on top of the rectangle and then sprinkle some pepperonis on top of that. I really don't have a precise measurement for the cheese and pepperoni, just put however much you want, just don't over fill or they will become to hard to roll up. After you put the cheese and pepperoni on the crescent dough start rolling from one short end to the other. Press the end to seal shut. Take a knife and cut the roll four times to make circle pinwheel shapes. Place on an ungreased baking sheet. Bake for 10 minutes. As soon as you remove the pinwheels from oven, use a spatula to remove from pan before the cheese causes then to stick to the pan . Enjoy while hot and use marinara sauce for dipping if you like. Enjoy :)   

Pin It

Wednesday, August 8, 2012

Bethany's Flower Congrats Cake


When my friend Bethany had her baby Jasey I decided that I should make her a Congrats cake. I actually had this idea planned when I made her baby shower cake, so I pre-made the flowers and leaves using royal frosting. I did the flowers on this cake using the color theme of her baby shower. Since the flowers were pre-made it made decorating this cake a lot easier. As soon as the cake cooled I covered it in butter cream frosting and then I placed the flowers in spots that I thought would look good. I brought Bethany this cake when I went to go see her and Jasey for the first time. It was unexpected nice surprise for Bethany and she loved it :)       


Pin It

Monday, August 6, 2012

Easy Knit Bunny


I was going to meet Jasey, my friend Bethany's new daughter, for the first time and I wanted to bring something for Jasey. So I decided that I would knit her something nice that she can cherish and keep for a long time. Well while browsing on Pinterest one day I came across this cute pin of a knitted bunny that my mom repinned from her browsing on Pinterest. When I clicked the link on the bunny it took me to my favorite knitting source called Ravelry, which I love, and the pattern was on there for free. Looking at the pattern I was amazed on how simple this pattern was. It was basically a knitted washcloth that when sewn up a certain way makes a cute bunny. So I pulled out some nice yarn from my yarn stash and got started right away. When it came to the tail I saw that others did a pom pom so I wanted to do one too. I never made a pom pom before so I went straight over to YouTube and watched a how to video on how to make the pom pom. I finished off the bunny by sewing some eyes on and tying a coral color bow around its neck. This bunny was so easy to make and took no time at all to make. I think I will be making more of these bunnies for all my friends that have babies that way they all can have a nice little had knitted bunny.  :)


If you decide to make your own knitted bunny the pattern can be found on Ravelry
Pin It

Thursday, August 2, 2012

Elephant Baby Mobile


 In my previous post on Bethany's Baby Shower Gifts I gave a sneak peak of the baby mobile I made her. Well after a long wait, here it is. Before I get into detail on how to make it, let me start of by telling you how we came up with the idea. It all started with Pinterest. I was browsing through pins when all of a sudden this cute elephant baby mobile popped up. I clicked on it thinking there would be instructions on how to make it, but instead it took me to someones Etsy account that sells them. Well knowing that Bethany was having an elephant theme as well as the colors grey, coral, and peach I took a picture of the mobile and sent it to her. She text me back right away saying that it was exactly what she wanted. That is when I told her that it cost a lot, but I think I could recreate it for very little. So I went and bought all the materials which cost me under $10 and got started making the mobile. At first I almost gave up because the original one was made of wood on the top, but that was to difficult for me because I didn't have the necessary tools. That is when I came up with the idea of buying a metal ring at Joann's and wrap it in ribbon. After hours and hours of making the elephants it was finally time to put it together. To tell you the truth I had no clue what I was doing, but some how it all worked out in the end and Bethany loved it and I hope Jasey does too.

Below I will give the instructions on how to make the elephant mobile the best way I can. If you have any questions let me know and I will be happy to help. I have included a few photos showing the process on making the elephants.


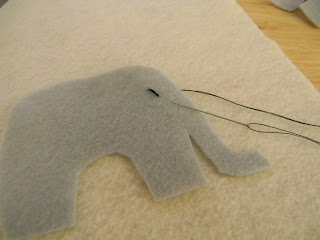
1) Use an elephant template to cut the elephants out of the felt

2) Cut out ears from the felt.

3) Sew on an eye on all of the elephants.

4) Next sew on the ears.

5) Now sew the two elephants together and stuff them as you go before closing them up.

Materials Needed

Felt in at least two different colors
Matching thread
Pillow stuffing
Buttons
Clear fishing line
Metal ring
Ribbon
1 small ring or key chain ring
Hot Glue
 First start off by sketching out an elephant on a piece of paper and cut it out. Then use that paper as a template to cut out elephants from the felt. I wanted to have 7 elephants, 4 in gray and 3 in cream, so I had to cut out 14 of them. Do the same for the ears 14 total. Next sew on black eyes on all the elephants keeping in mind that you sew the eyes on have of them on the opposite side (refer to image 3 and 4). Next sew on the ears in the color that is not the same color as the elephant. Now its time to sew the elephants together. While sewing together make sure you stuff the elephant as you go before closing it up. Next glue a couple of buttons on to the elephants. Besides elephants I also did felt hearts on the mobile. When it came to the hearts I kept it simple. There was no sewing involved, instead I glued two hearts together on the fishing line. I would suggest not doing the hearts until after the elephants are connected to the line first.

Now it is time for the assembly part. I really did not know what I was doing on the assembly, I would just try things until it worked. To attach the fishing line to the elephants I took the line and tied it in a knot a couple of times around a stitch on the top of the elephant. Next I would glue the hearts to the line. Repeat this steps until all your elephants and hearts are all connected to fishing line. The next thing I did was tie the eight strands of elephants at different levels onto the metal hoop and put a drop of hot glue on the spot I wanted the strand to stay. Then I took the ribbon and wrapped it around the hoop until completely covered. Then I cut out 8 strands of ribbon and glued them over a small metal ring one by one. Then the last thing to do is glue the ribbons one at a time to the hoop where each of the strands of elephants hang.

If you decided to make this mobile for yourself I wish you luck. I tried my best to describe how I made it and hopefully it makes some since. I would suggest looking at the photos when possible in hopes that it will help make since of things. If you  do decided to make the mobile you will be happy with your finished product :)  

Here is a close up of the one of the elephants hanging on the strand with the hearts.

Here is a close up of the top of the mobile. You will also see I made a moon at the top. To make the moon do the same thing as the elephants and stuff the two pieces of felt.

And here is one last look at the mobile hanging from my ceiling :)
Pin It

Sunday, July 8, 2012

Bethany's Baby Shower Gifts

 Beth and I at her baby shower.

About a month ago was my friend Bethany's baby shower. Now I already showed you the cake I made as well as the blanket I knitted for her. Now I am going to show you the card I made, how I packaged the gift, and the onesie I made for the decorating contest. At the end of the post I will also be giving you a sneak peak of my next post of the baby mobile I just made.  


Usually when I go to someones party I always end up giving them a card that someone else gives them as well (I guess that's what happens when everyone shops at Target). Well I wanted to give Bethany a card that no one else would be giving her, so i decided I would make her a card. I decided that it had to have an elephant on it, since that was part of her theme. After looking online to get ideas I decided that I wanted to make an Origami elephant to put on the card. Now in order to make the Origami elephant I had to YouTube it and constantly pause the video to make sure I was making it right. Next I cut out the size card I wanted from some peachy color card stock paper. Then I cut out a cream rectangle card stock and glued it on the bottom. Next I took some ribbon from my stash and glued it on the cream piece of card stock. Next came gluing the elephant on. Because I used a thick piece of paper I had to use some hot glue to glue the legs close as well as other parts. To finish the card I wrote the baby's name on the front and wrote my message on the inside. I was happy to give Bethany my one of a kind card, especially since I knew no one else would be giving her the same card.  :) 


When it comes to gifts I like to make them as gift baskets whenever possible. Since I was doing a gift basket I needed a basket big enough to fit the blanket I knitted. So I went to the best place possible to buy the basket, work. If you didn't know already I work at HomeGoods. While at work one day I found the grey basket which worked out perfectly. The pink hat, dog bath towel, and the pink elephant frame, which I put Jasey's pic in, all came from HomeGoods as well. As a filler I got some baby lotion and baby wash to put in the basket. After arranging where i wanted the items I put some tissue in the holes and then it was time to wrap it up.


To wrap, I bought some clear cellophane and wrapped up the gift. To tie the top I took some ribbons from my stash and tied it shut with the card attached (which I had to punch a hole in). 


Bethany decided that she wanted to have a decorated onesie contest. So I decided to incorporate some of the things on her shower invitation. First, I found a polka dot onesie at Old Navy. Then I decided that the onesie needed pearls. I found a strand of half pearls and cut them into three strands and used jewel fabric glue to glue to pearls to the onesie to look like a necklace. Next came the tu-tu. I bought 2 yards of pink tulle and cream ribbon. I cut out a piece of ribbon that would be long enough to tie to the baby and then cut out strips of tulle and ribbon and tied them to the long ribbon. I kept going until the tu-tu was full.  


Here is a close up on the bear wearing the tu-tu.


Here is a sneak peak of my next post to come. It is of the baby mobile I made for Bethany's Baby Jasey. :)
Pin It

Thursday, July 5, 2012

Knitted Heart Blanket


When I found out that my friend Bethany was going to be having a baby I instantly went home and started looking up things on Ravelry that I can knit for a baby. I found a lot of cute things that I can make, however I did not want to start making anything until I knew what she was having. Well when I found out she was going to have a girl, named Jasey Rae, I instantly decided that I wanted to make a blanket with hearts. As a child I had a crocheted blanket with hearts in it that my mom made for me, therefore I thought it would be nice for me to make one for Jasey Rae. The blanket was part of my gift at Bethany's baby shower and she absolutely loved it and I am pretty sure Jasey Rae will love and appreciate it as well.   

The pattern used to make the blanket was called Baby Love Blanket by Renae Jones and I found it on Ravelry. The needles used were size 8 29in. The yarn I used was Lion Brands Pound of Love. I chose white because I felt it made it look very elegant, but any color will look just as nice. 


Here is a close up of the heart details <3

Pin It

Sunday, June 24, 2012

Honey-Lime Chicken Skewers


I wanted to make something good for dinner tonight, so before work this morning I searched Pinterest in hopes to find something good to eat. Within minutes a tasty looking picture caught my eye so I instantly repined it and followed to the pin to the original site. The recipe was called Homey-Lime Chicken Skewers and the recipe looked extremely easy and I had most of the ingredients already. So I made a list of the things I did not have and  headed off to work, followed by the grocery store to pick up the needed items. As soon as I got home I got to marinating, because the chicken would need at least an hour to marinate, and I did not want to be eating dinner too late. Not knowing if we were going to like this recipe or not we gave it a chance and after first bite Tomas and I both agreed that this will definitely have to be made again. I especially knew it was a hit when I saw Tomas get up for seconds, that is usually a sign that what I made was good. :) On top of that it was gone in no time because his brother and sister loved it too. Unfortunately, for me there were no leftovers left for me to have for lunch tomorrow.  


Honey-Lime Chicken Skewers 

3 tablespoons soy sauce
2 tablespoons honey
1 tablespoon vegetable oil
juice of one lime
2 garlic cloves, minced
1-2 teaspoon Siracha
red pepper flakes, to taste
2 tablespoon cilantro
1 pound skinless, boneless chicken breasts

In a small bowl, combine your ingredients, through the cilantro. Mix thoroughly. Pour marinade over chicken breasts and turn to coat. Cover and allow to marinate for at least 1 hour. Grill on medium high heat for 6 to 8 minutes per side, until juices run clear.


The website the recipe came from was Kitchen Meets Girl
Pin It

Sunday, June 10, 2012

Beth and Jasey Rae's Baby Shower Cake


Today was my friend Beth's baby shower. She is very lucky because soon she will be having a little girl named Jasey Rae. I felt lucky too because I was asked to make the cake for the special occasion. The design of the cake was Beth and her Mom's idea, I helped to bring their design to life. The bottom tier of the cake was a four layer strawberry cake and the top tier of the cake was a four layer pink champagne cake, making the cake an 8 layer cake all together. To make the ruffles on the bottom tier I used Wilton tip # 124. The ribbon on the second cake was just regular ribbon. I made the polka dots a couple days in advance with royal frosting and placed them on the cake with butter cream frosting when it was time. The J on the top was a wood cutout on a stick. I used royal frosting to glue down edible pearl sprinkles to the J, I also made this a couple of days in advance. Overall I feel this was one of the best cakes I ever made. It was also the tallest cake I ever made. Everyone loved it, most importantly Beth loved the cake and that made me extremely happy. :)  

An up-close look at the J covered in edible pearl sprinkles.

A closer look at the top tier of the cake with polka dot decorations. As well as a look at the ribbon and bow.

The bottom tier of the cake decorated with ruffles.

Another view of the beautiful cake I made for Beth and Jasey Rae.  :)

Pin It

Friday, June 1, 2012

Tomas Law School Book Graduation Cake


First off I would love to say congratulations to my wonderful boyfriend Tomas on Graduating Law School I'm so proud of you. For those of you that don't know Tomas, he just spent the last four years in Law School where he studied just about everyday. So I felt he deserved a wonderful cake to celebrate his graduating. So the day before, while he was off at school studying for the bar, I made a cake with out him knowing and when finished I put it in our mini fridge and made sure he never went in there. On the morning of the graduation he came into the living room to the surprise of the table being decorated with confetti and balloons and in the center of the table was his book cake. Which at first quick glance he thought I just put his books on the table, but as he came closer he realized that the books were a cake. He loved the cake so much he took pictures of it and showed his friends. He then proceeded to tell me how much he loved his cake and it was the best cake anyone ever made for him. That made me so happy to hear.

This cake was actually very easy to make. The bottom red  book was a 9x13 red velvet cake that I cut in half and stacked on top of each other. The top blue book is actually a rice krispie treat which was also made into a 9x13 pan that I then cut in half and stacked on top of each other also. First I frosted the red book and decorated it to look just like Tomas Law book. To make the pages on the book I used Wilton Tip #48. after finishing the red book I moved on to the blue one which I also decorated to look like his law book. Instead of putting the edition of the books or publishers names, I put his school name and the year he graduated in their place. I even put "Congrats Tomas" in the place of those things as well. The finished product came out great and most importantly Tomas loved it and that is what matters most to me.  :)

The side view of Tomas book cake.

The table that I decorated and surprised Tomas with the morning of his graduation :)

Tomas and me. I am so proud of him :)

My mom, Tomas and I.

Congratulations Tomas!!!
Pin It
Related Posts with Thumbnails