Wednesday, December 29, 2010

Sugar Coated Pecans

About a couple of weeks ago my mom came to Fresno with her friend Susan to do a little shopping. While here they came by my job to pay me a visit and I got to hang out with them during my lunch break. Well while my mom found a can of burnt sugared pecans I have never had them before so I tried them. It was love at first bite. I have been thinking about them ever since. When I went home for Christmas I actually finished up the can we bought and I still can't stop thinking about them. Well as I was at the grocery store tonight I thought to myself that I should make some burnt sugared pecans of my own. Well I wasn't quite able to do that one reason being I didn't know how and two I could not find a recipe online or in my cookbooks. I did however find a recipe for sugar coated pecans on allrecipes.com and they came out amazing. They were so good that I have been munching on them as I write this post. So if you love pecans, you will love these. So I hope you enjoy them ax much as I have. :)


Sugar Coated Pecans
1 egg white
1 tablespoon sugar
4 cups pecan halves
1 cup granulated sugar
3/4 teaspoon salt
1 1/2 teaspoons cinnamon
Preheat the oven to 250*F. Grease one baking sheet. Mix the sugar, salt, and cinnamon in a small bowl and set aside. In a separate mixing bowl whip together the egg white and water until frothy. Add the pecans to the egg mixture, stir to coat the nuts evenly. Place the nuts in the sugar mixture and toss until evenly coated. Spread the nuts on the prepared baking sheet. Bake for 1 hour stirring every 15 minutes. Enjoy. :)
Pin It

Tuesday, December 28, 2010

Elephant Ears (Palmiers)


I was bored on my lunch break the other day so I began to look at a Good Housekeeping magazine that I saw on our break room table. While flipping through the pages I saw a recipe for elephant ears and I got really excited. I remember eating these growing up and liking them a lot. So I went to the store and picked up one of the two ingredients needed and I got busy. When baking them pay close attention to them because they can easily burn. Other than that these are very simple to make and I hope you enjoy them as much as have and always will.
Elephant Ears (Palmiers)
2 cups sugar
1 package (17 1/4 oz ) frozen puffed pastry, thawed.
Preheat the oven to 450*F. Line cookie sheets with parchment paper.
Pour 1 cup mixture onto work surface. Unfold 1 sheet puff pastry onto sugar mixture; pour another 1/2 cup mixture on top, spreading it evenly onto the pastry. With rolling pin, lightly roll dough into 13-inch square, pressing sugar into pastry on top and bottom. Fold two sides of square toward center so edges are halfway to middle. Fold again so the two folds meet exactly at middle of dough. Then fold one half over other half as though closing a book. (You will have 6 layers.) Cut dough crosswise into 3/8-inch-thick slices; place slices, cut side up, 1 inch apart on prepared cookie sheets. Bake for 6 minutes or until caramelized and lightly browned. Using a metal spatula or two forks flip each cookie over and bake for another 4 minutes until caramelized and browned on that side as well. Transfer cookies to a wire rack to cool and enjoy.

Here is a photo of how they look cut and placed on the pan.

Pin It

Thursday, December 23, 2010

Coconut Cake Truffles


Coconut cake truffles are my latest cake truffle creation. Once again Jeni and I got or creative cake truffle ideas flowing and we came up with the idea of making them coconut flavored. So since my job was having a Christmas party today, I thought this would be the perfect time to experiment and make this new truffle idea and bring it to work to see if everyone would like it. Well they were a success. Even my coworkers that didn't like coconut loved them. So that lets me know that the coconut idea was a great one. Now I just need to sit down and think of another cake truffle idea. :)
Coconut Cake Truffles
1 white cake mix
1 can vanilla frosting
1 cup shredded sweetened coconut
1 package dipping white chocolate
More coconut for decorating

Bake the cake as directed on the box. When the cake is done let it cool until it is cool enough to handle. Crumple up the cake completely. Add in the entire can of frosting 1 cup coconut and mix thoroughly. Roll the cake mixture into small balls, about 1 inch each. Refrigerate until they hold their shape. When the balls are ready, melt the dipping chocolate according to package. Dip the cake balls into the chocolate one at a time. Shake off excess chocolate and place on a cookie sheet lined with wax paper. Sprinkle coconut on the tops of the truffles. Let chocolate dry then serve. Enjoy.


Pin It

Tuesday, December 21, 2010

Gingerbread House


This year I thought it would be fun to make a gingerbread house. For years now I have wanted to make one, but I have never actually sat down and made one. So this year I wanted to make sure that I finally sat down and make one. I also wanted to make the gingerbread myself instead of buying the kit, even though the kits would have been way easier. Going into this I had no idea how time consuming making a gingerbread house was. It took me so long to roll and cut the gingerbread pieces that I didn't even decorate it until days later. I had fun decorating it but then that was time consuming too and I didn't have time to put a lot of time into decorating it. So for my first gingerbread house I think I did an ok job. Next year I will plan out my time better.
Gingerbread House
1 cup (2 sticks) butter
1 cup sugar
1 cup unsulphred molasses
4 1/2 cups all-purpose flour
1 teaspoon baking soda
1 teaspoon salt
1 tablespoon ground ginger
1 teaspoon ground cinnamon
1 teaspoon ground nutmeg
1/2 cup all purpose flour
In a medium saucepan, melt the butter. Add and stir in the sugar and molasses until sugar is dissolved and is no longer gritty. Remove from heat and set aside to cool to lukewarm. In a separate bowl whisk together the 4 1/2 cups flour, ginger, cinnamon, nutmeg, baking soda, and salt. Make a well in the center of the dry ingredients, pour in the lukewarm butter mixture, and beat to blend everything together. Work in the 1/2 cup of flour beating until the dough forms a ball ands pulls away from the sides of the bowl. Remove the dough from the bowl and knead 3 or 4 times on the counter until smooth and pliable. Wrap well and refrigerate until dough is cool. After refrigerating roll out and cut out house shaped pieces or gingerbread men pieces. Bake in a 350*F oven for about 12-15 minutes or until color darkens.
Royal Frosting
3 tablespoons Meringue powder
4 cups sifted powder sugar
7 tablespoons lukewarm water
Place meringue powder and powder sugar in a bowl, mix until blended. Add water and mix for 7-10 minutes at low speed until the icing loses its sheen. Place in a piping bag or a ziploc bag with a corner snipped off. Buy various candies and decorate the house however you like.
Gingerbread recipe comes the Joy of Cooking cookbooks and the Royal Frosting recipe comes from Wilton.
Pin It

Thursday, December 16, 2010

Croquembouche

Monday December 13th was my Dad's and boyfriend Tomas birthday. And for their birthdays Tomas mom made him a cake and my mom made my dad his cake. Therefore when it came to Tomas I wanted to make him something else instead of a cake. Well I was looking at some of my old Food Network magazines and I saw this picture of a Croquembouche and knew that Tomas would love it since he loves cream puffs. So I decided to give it a try. I first started of by trying the recipe in the magazine, but I failed. My dough was too runny and therefore my cream puffs never puffed. So I researched online and I found a recipe at Easy French Food.com that was actually easier so I made a second batch as well. When it came to the filling I didn't want to do the one from the Food Network magazine because it called for to many eggs and vanilla beans and I didn't want to spend too much. So I found this great filling recipe on Allrecipes.com (which I changed a little). The one thing I did do from the magazine was the caramel crunch web that I swirled around the tower of creme puffs. Therefore I took three recipes and combined them to make the Croquembouche for Tomas. For being my first time making this I think I did a fairly good job, even though my tower is a little slanted, but the most important thing is Tomas loved it.
Croquembouche

Cream Filling
2 (3.5 oz ) boxes of vanilla pudding mix
2 cups heavy cream
1 cups milk

Choux Pastry (dough)
1 cup water
6 tablespoons butter
pinch of salt
1 teaspoon sugar
1 cup flour, sifted after measuring
3 large eggs

Caramel
3 cups sugar
3 tablespoons light corn syrup
1 cup water

First make the cream filling by mixing the vanilla pudding mix, heavy cream, and milk together. Cover and refrigerate. Preheat the oven to 400*F. In a saucepan mix the butter, salt and sugar with the water, and heat until the water boils. Remove from the heat and immediately add all of the flour. Beat with a wooden spoon until the dough forms a ball and detaches form the sides of the pan. The website warns that this next step is a workout and they were right. Add the eggs one at a time , fully incorporating each before adding the next one. To make the cream puffs, works with two tablespoons, one to scoop and one to scrape. Place mounds of dough on nonstick cookie sheets space them apart. Dip finger tips in water to smooth down the rough edges of the dough. Bake for 20 minutes. remove immediately from the oven and prick each puff with a toothpick to help the steam escape. After all the puffs have cooled you can now fill the puffs. Either you can cut off the tops and fill with the prepared filling or you can use a piping bag and tip and pierce a hole in the puff and fill with the filling. Place filled puffs bake in the fridge until ready to use.

To make the caramel crunch mix the sugar, corn syrup,and water in a saucepan, cover and bring to a boil over high heat; don't stir. Uncover and boil; swirling the pan, until the syrup turns a deep amber color, about 20 minutes. Immediately dip the bottom of the saucepan in a large bowl full of ice for a few seconds to slow down the cooking. Transfer the caramel to a liquid measuring cup and slightly cool. Draw about a 7-inch circle on a piece of parchment paper. Partially dip each puff in the caramel mixture and then arrange the puffs around the circle. Keep building the tower up until it comes to a point. Line your working area with parchment paper because things will get messy. Dip the tip of the fork in the caramel and wave it in circles around the tower to create a web of caramel strands. Let set. Cut the parchment paper around the tower and use two spatulas to carefully transfer the Croquembouche to a platter. Serve and enjoy. :)

Pin It

Wednesday, December 15, 2010

Sunflower Cupcakes


Today is national cupcakes day as well as my friend Melissa's birthday. So for her birthday I wanted to make her something special. We got in these dishes at my job that she really loved because they matched her kitchen. So I decided that i would buy the pitcher and I would arrange some cupcakes that looked like sunflowers in it. When putting it together I ran into some problems that I will definitely fix for the next time. For the brown center of the cupcakes I used Oreos. Well the Oreos seemed to be a little heavy and therefore I lost one of the flowers when it was positioned on the ball. So next time I am going to use mini Oreos instead of regular. The second problem I ran into was with the frosting. Since this was a red velvet cake I wanted to use cream cheese frosting. The problem I ran into with that was that it wasn't as stiff as the butter cream frosting I make. Therefore the petals didn't real hold their shape or hold the Oreo in place. Nest time I will also use green cupcake wrappers instead of white, but that is because I think it would make it look better. Even with my little mistakes Melissa absolutely loved her cake which made me happy.


To assemble the cake can be a little tricky, but it is actually easier than it appears. first you need to pick out the vase you want to use and then you need to get a styrofoam ball that will fit on the top. Firmly push the styrofoam ball through the opening until it stays put. In the case for this cake my opening was too small to hold the ball so I found this circular shaped styromfoam thing and pushed that into the opening. I them shoved about 5 wooden skewers into the ball and then into that circular piece to hold it is place. Next make your cupcakes (depending on the size of the ball will depend on how many cupcakes will fit). My arrangement took about 2 dozen. Now when it comes to decorating the cupcakes you can either do it before placing it on the ball or do it when they are positioned on the ball. For this one since my frosting wasn't holding too well I decorated then first. To put them on place a few toothpicks in the place you want to put the cupcake. Using a hand on each side firmly push the cupcake down on the toothpicks. Because I had the Oreo center it helped in pushing the cupcake down. Keep going until the whole styrofoam ball is covered. To fill in the gaps between the cupcakes and on the bottom of the ball I bought some fake leaves and hot glued them into place. In the end you end up with a flower arrangement of cupcakes. Enjoy :)

Pin It

Saturday, December 11, 2010

Peanut Brittle


About a year ago I made some peanut brittle and brought it to work. Ever since my co-worker Anthony has been asking when will I make it again. I told him about a month ago that I was going to make it, but I didn't get the chance until now. So after I made some I placed some in a bag and brought it to work. A couple of days later I asked if he enjoyed it and turns out he didn't even get a piece. He placed it on the table at his house and his dad got to it. Therefore Anthony got none of the peanut brittle, but his dad absolutely enjoyed it. The peanut brittle recipe I am going to share with you is one I have been using for about 10 years now. I got it from my Foods and Nutrition teacher and my family and I have been enjoying it ever since. I hope you enjoy it too. :)
Peanut Brittle
1 cup sugar
1/4 cup water
1/2 cup light corn syrup
3/4 teaspoon baking soda
1 cup peanuts
3/4 teaspoon vanilla
2 tablespoons butter
Combine sugar, water, and corn syrup in a 3 quart saucepan. Boil to a hard ball stage (250*F-268*F). Remove from heat. Add peanuts. Mixture will be thick. Return to heat and boil until syrup is golden brown. Stir in butter, baking soda, and vanilla. Pour onto a buttered 10x15 cookie sheet. When cool crack into pieces. :)


Pin It

Wednesday, December 8, 2010

German Chocolate Brownies


Today has to be one of the greatest national food holidays out there because today is national brownie day. So to celebrate I made my most famous brownies that everyone loves. Those brownies happen to be my German chocolate brownies. Unfortunately, I will not be able to eat any because I made them for my friend Mallory. Tomorrow is her last day at work, so I wanted to bid her farewell with some wonderful brownies. Since I am giving her this pan of brownies I don't have a picture to share of what they look like cut, but believe me they look and taste amazing. So I hope you get a chance to one day enjoy these brownies for yourself and I also hope you have a wonderful national brownie day. :)
German Chocolate Brownies
Brownies
3/4 cup all-purpose flour
1/4 teaspoon baking soda
3/4 cup sugar
1/3 cup butter
2 tablespoons water
1 cup semi-sweet chocolate chips
1 teaspoon vanilla extract
2 eggs
Topping
25 caramel squares
2 tablespoons butter
2 tablespoons milk
1 cup semi-sweet chocolate chips
1 cup chopped pecans
1/2 cup toasted coconut
Preheat the oven to 325*F. Grease a 9-inch square baking pan. In a small bowl, mix together the flour and baking soda and set aside. In a small sauce pan, combine the sugar, butter, and water. Bring to a boil over a medium heat; remove immediately from heat. Stir in the 1 cup chocolate chips and vanilla until chocolate is melted and the mixture is smooth. Transfer the mixture to a bowl. Cool complete,y. Stir in eggs, 1 at a time, beating well after each addition. Gradually stir in flour mixture until smooth. Pour into the prepared pan. Bake for 30-35 minutes or until a toothpick inserted comes out clean.
To make the topping toast the coconut under the broiler until it turns a golden brown. Mix the coconut, chocolate chips, and chopped pecans together and set aside. In a microwave safe bowl place add the caramels, butter, and milk. Microwave for 1-2 minutes, stirring every 30 seconds until melted. Pour the caramel mixture over the cooked brownies reserving a little caramel for drizzling on the top. Add the chocolate chip mixture to the top of the caramel and then drizzle the excess caramel on top. Let it cool and then enjoy. :)
Pin It

Monday, December 6, 2010

Chocolate Chip Cookie Cupcakes


I can't believe how fast time is going by. I feel like my days are not long enough because I have so much I need to do and not enough time to do it. Luckily my Christmas shopping is done because that would just mean one more thing to add to my to do list. Well anyways I want to share these cupcakes I made that look like chocolate chip cookies. I actually wanted to share these two days ago on the 4th because that was national cookie day, but since I had no time I will share them now. These cookies are actually really simple to make. Just make your favorite cupcake flavor, if you want to be more creative make chocolate chip flavored cupcakes. Then after the cupcakes are baked and cooled use vanilla frosting to frost the cupcakes. Then dip the cupcakes in crushed vanilla wafers and push the chocolate chips down into the cupcakes. After all said and done you will have yourself a cupcake that resembles a chocolate chip cookie. Its like having best of both worlds. Enjoy :)


Pin It

Thursday, December 2, 2010

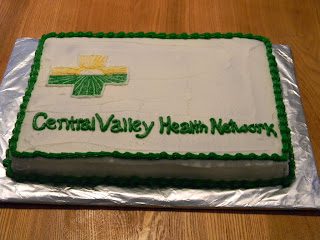
Central Valley Health Network Cake


This here is my latest cake. It is not something easily recognized because it is the logo to my friends company. About a week ago my friend sent me a picture of their logo and asked if it would be possible to put it on a cake, I told her it would be no problem at all. It actually looked easier then what it was. It was the logo I had issues with because I I was never satisfied with the orange color. In the end it worked out just fine and she liked it. Lets just hope her job liked it too. :)
Pin It
Related Posts with Thumbnails