Friday, September 13, 2013

Quick Pink Monkey Diaper Cake


This post is a little over due. I made this diaper cake for my sisters baby shower that was in May and now its September. I don't know why I didn't post it sooner, but at least I'm sharing it now. I made this diaper cake as a surprise for my sister and put it as a centerpiece on her gift table. It was a fun and cute way for me to give her some diapers as a gift, along with the many other gifts I gave her. 

It is actually very easy to make the diaper cake and took no time at all to assemble. I will try my best to describe what I did to make it. I have some pictures that show the assembly, but I don't have photos of some of the steps because the cake require both my hands and I had no one home to take pictures of me making it. Good luck when you make your diaper cake and I hope whoever you give it to loves it as much as my sister did :)

Supplies Needed

About 100 diapers (preferably with minimal to no pattern)
A paper towel roll
About 6 rubber bands
Wide pink ribbon
Another size pink ribbon (smaller than the other)
Pink shredded gift basket paper
Hot Glue
3 different sized cake pans
A cute stuffed animal for the top


This is what the layer looks like put together with the rubber bands 

Building the layers
 
Start placing the diapers in the cake pan in a fan like motion going around one of the cake pans with the top of the diaper on the inside and the bottom going around the edge. Keep filling with the diapers until you cant put anymore. Slide 2 rubber bands onto the diapers. Set aside until you make the other two cake layers.

To put the pieces together

Start with the biggest layer on the bottom. Place a paper towel roll in the center of the cake. Next take the medium sized cake and slide through the middle down to the top of the big layer. Next slide the small layer down the paper towel roll. Now with the cake assembled you can decorate it.


 Here is how it looks with the paper towel roll in the center

Here is how it looks putting the top layer on.


Now to make the cake pretty

 Cut and wrap the biggest sized ribbon around the cake. Piece the edges of the ribbon together with some hot glue. Now take the smaller ribbon and wrap that around the wider ribbon and press shut with some more hot glue. For an extra touch make a few bows and glue them to the ribbon on the cake. Now start stuffing some of the shredded gift basket paper into the diapers of the cake. Finish by placing the stuffed animal on top. Now you are ready to give your gift to someone special. :)

Here is how it looks with the ribbons and the process of stuffing the shredded paper into the diapers.


Here is another look at the finished product.
Pin It

Tuesday, September 10, 2013

Garlic Lentil Soup


Years ago I did a post on some lentil soup that I had made. Well now there is a new lentil soup in this house and the best thing about it is it taste just like the one I enjoyed as a kid at my daycare. Tomas also loves this soup as well because of the garlic. It is very quick and easy to make which is why i have made it twice within a couple of weeks. I know I will be making this soup in the near future. Especially since there is never any leftovers when I do make it. 

Ingredients
1 package of bacon
1 cup lentils
6 cloves garlic, minced
6 cups chicken broth
2 teaspoon onion powder
2 teaspoon chopped bay leaves 

Directions
Cook 4 strips of bacon and set aside for cooking in the soup. Chop the rest of the bacon into small pieces and cook and set aside for topping on the soup. In a pot add lentils, garlic, chicken broth, onion powder, bay leaves, and cooked strips of bacon. Cook on med high heat until lentils are soft. Serve and top with bacon pieces and homemade croutons and some bread on the side. Enjoy :) 


Pin It

Saturday, September 7, 2013

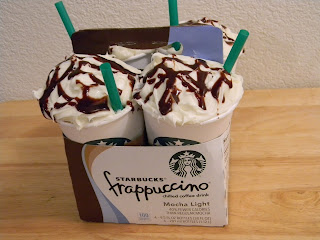
Starbucks Frappuccino Cupcakes


 My friend Beth loves Starbucks. So for her birthday I wanted to give her a special treat to go with the photo tile coasters I made her. I wanted the special treat to have something to do with Starbucks, but I didn't want to do the small Starbucks cupcakes that I have been seeing all over Pinterest. So I had to get my creative juices flowing. The idea to make Frappuccino cupcakes came to me when I bought coffee for my team at work. After they finished up the coffee I saw that there were some of the Starbucks cups left, so I grabbed them, but I still wasn't quite sure what I was going to do with them just yet. After some thinking I came up with the idea to go to the store and buy a pack of the bottled Frappuccinos, in the cardboard holder. I wanted that because I was going to take the bottles out and put the paper cups in their place. I got the straw at Starbucks when I went and bought myself a Frappuccino one day and used my own straw to drink it so I can keep the straw for her cupcakes. So none of the products I used were stolen. 


To Make:

 After gathering all the products needed it was time to assemble the cupcakes. To make the cupcakes all you need is a cake mix, a can of frosting, and some chocolate syrup. After baking the cupcakes and they cool off you can start putting the Frappuccinos together. It will take about 10 cupcakes to make them how i did. First place one whole cupcake with no wrapper in the cup. Then put a little frosting on top of that cupcake in the cup. Next cut a cupcake in half and place in the cup on top of the frosting, then put some frosting on top of that cupcake. Now place one more whole cupcake on top of the rest in the cup. There will be some space between the edge of the cup and the cupcake. Just place some frosting in the space to keep them from moving and continue to frost the whole cupcake. Give it a messy look to make it look like whipped cream was squirted on top. Top it off by drizzling chocolate syrup on top. Repeat these steps until you have four Frappuccinos. Now take your straw and cut it into fours and place in the cupcakes. Now place the four cups into the carrier and now you have a fun and tasty gift to give to someone special. I hope they enjoy it as much as Beth did :)    

This is the amazing picture Beth took of the cupcakes and photo tile coasters I gave her for her birthday :)
Pin It

Thursday, September 5, 2013

Photo Tile Coasters


I wanted to make something special for my friend Beth's birthday. So I decided that I would make her some photo coasters of her and her daughter Jasey. A long time ago I saw the pin on Pinterest on how to make them so I pinned it for future use. They were actually very easy to make, but you do have to have time and patience because of the dry time between coats of Mod Podge and the spray acrylic adhesive. 

The hardest thing about making these coasters is picking the pictures you want to use. I went onto Beth's Facebook and began picking what pictures I wanted to use. I chose 10 that I liked the most and because I wanted the coasters to be black and white, I transferred the color photos to black and white for the coasters. After picking up the photos at the store I then chose the best 6 that fit onto the tile best. 

The finished tiles turned out great. I wrapped them with a cute bow and box and gave them to Beth. She absolutely loved her coasters. I also made her some Starbucks Frappuccino Cupcakes for her birthday as well, which she also loved. Whether you make these coasters for yourself or for a gift, you or your friend will absolutely love them.  


Photo Tile Coaster Supplies

6 white ceramic tiles 
6 photos 
Glossy Mod Podge
Clear Acrylic Adhesive ( I used the one put out by Plaid)
Black Felt
Hot Glue
Acrylic Paint
Paint Brush 
Sponge Applicator

First paint the edges of your tiles with the color of your choice, I chose black to make the photos stand out. After the edges are dry cut the photos down to the size of the tiles. Apply some Mod Podge to the back of the photos and place onto the tile. After they are dry apply a layer of Mod Podge on the top of the photo and tile then allow to dry. Apply a coat of Mod Podge 2 more times allowing time to dry between each coat. Now it is time to spray the acrylic adhesive. I did this outside, since it was very hot outside I brought them inside to dry because they were not drying outside, instead mine were just getting stickier. Before spraying the adhesive lay down some newspaper then wax paper on top of that. Now you can begin spraying. Do at least 5 coats allowing dry time between each. When I brought mine in the house to dry I would slide the wax paper with the tiles onto a cookie sheet and transport them that way. If the weather is nice then you can leave them outside to dry. After the 5 coats and they are dry, it is time to put the felt backing on them so they won't scratch your surfaces.  Cut the felt (I used black) to fit the tiles. Use hot glue to apply felt. Now you have a set of beautiful coasters to enjoy.  :)

I pin I found on Pinterest on how to make these came from TheFrugalGirls.Com

Here is how I presented the coasters to Beth :)

 This is the Picture Beth took of the Photo Tile Coasters and the Starbucks Frappuccino Cupcakes I made her for her Birthday :)
Pin It
Related Posts with Thumbnails