Sunday, February 9, 2014

Darth Vader and Death Star Cake


Here is my latest cake creation. I made it for my future Nephew Austin's Birthday. I got the idea for this cake from one I saw on Pinterest. Their Darth Vader was made with fondant and since I'm not good at using fondant yet I did mine in butter cream. And let me say he was no easy task. It actually took me a few times to do his face until I decided that this will be the best I can do. Since he is all black I had a hard time with the dark lines and making him look as close to the real thing as possible. I am glad with how it came out and the good thing is the cake was a hit, which makes me very happy. 


Pin It

Thursday, October 3, 2013

Rib-Knit Baby Hat


This is my beautiful Niece Marley. Isn't she a cutie??? She is modeling the Rib-Knit Hat that I made for her, which I gave my sister at her baby shower in the box of knitted hats. Now that I finally have a picture of her wearing it I can share about the hat. I found this pattern on Raverly. It is super easy to make even a beginner knitter can make this. This hat can also be easily made in any size you want since there are no decreases or increases. Just continue knitting and purling in the round until you reach the desired size. Also since it is a baby hat it doesn't require a lot of yarn, so I used what I had in my stash. I hope whoever you knit this for enjoys it as much as Marley does. :)

Such a cute hat model :)
Pin It

Box of Homemade Knitted Baby Hats


For my sister's baby shower, I wanted to give her something for the baby that I knew no one else would give her (or at least give it in a way that no one else would). I wanted to knit some baby hats, but I wanted to take it a step further. I found this very cute polka dot luggage box at HomeGoods and right away I knew what I wanted to do. I knitted six hats and arranged them in the box. Then I made a fake luggage tag, which doubled as a gift tag. What is great about this box is once the tissue is taken out, it will fit many more hats. Also it was a big hit at the baby shower, which made me feel good .


At first my Niece Marley wasn't able to enjoy the hats because since it was summer it was too hot. Now that the weather is getting cooler I am now receiving text with pictures of her wearing the hats I made. So as my sister shares the pictures of Marley wearing the hats I will then share them with you. As I post them I will come back to this post and create the link of the hats. Just click one of the names of the hats below and if I have made a post it will direct you to that page.


Baby Turban 
Gnome Hat
Pink Bow Hat
Long-Tailed Hat
Pin It

Friday, September 13, 2013

Quick Pink Monkey Diaper Cake


This post is a little over due. I made this diaper cake for my sisters baby shower that was in May and now its September. I don't know why I didn't post it sooner, but at least I'm sharing it now. I made this diaper cake as a surprise for my sister and put it as a centerpiece on her gift table. It was a fun and cute way for me to give her some diapers as a gift, along with the many other gifts I gave her. 

It is actually very easy to make the diaper cake and took no time at all to assemble. I will try my best to describe what I did to make it. I have some pictures that show the assembly, but I don't have photos of some of the steps because the cake require both my hands and I had no one home to take pictures of me making it. Good luck when you make your diaper cake and I hope whoever you give it to loves it as much as my sister did :)

Supplies Needed

About 100 diapers (preferably with minimal to no pattern)
A paper towel roll
About 6 rubber bands
Wide pink ribbon
Another size pink ribbon (smaller than the other)
Pink shredded gift basket paper
Hot Glue
3 different sized cake pans
A cute stuffed animal for the top


This is what the layer looks like put together with the rubber bands 

Building the layers
 
Start placing the diapers in the cake pan in a fan like motion going around one of the cake pans with the top of the diaper on the inside and the bottom going around the edge. Keep filling with the diapers until you cant put anymore. Slide 2 rubber bands onto the diapers. Set aside until you make the other two cake layers.

To put the pieces together

Start with the biggest layer on the bottom. Place a paper towel roll in the center of the cake. Next take the medium sized cake and slide through the middle down to the top of the big layer. Next slide the small layer down the paper towel roll. Now with the cake assembled you can decorate it.


 Here is how it looks with the paper towel roll in the center

Here is how it looks putting the top layer on.


Now to make the cake pretty

 Cut and wrap the biggest sized ribbon around the cake. Piece the edges of the ribbon together with some hot glue. Now take the smaller ribbon and wrap that around the wider ribbon and press shut with some more hot glue. For an extra touch make a few bows and glue them to the ribbon on the cake. Now start stuffing some of the shredded gift basket paper into the diapers of the cake. Finish by placing the stuffed animal on top. Now you are ready to give your gift to someone special. :)

Here is how it looks with the ribbons and the process of stuffing the shredded paper into the diapers.


Here is another look at the finished product.
Pin It

Tuesday, September 10, 2013

Garlic Lentil Soup


Years ago I did a post on some lentil soup that I had made. Well now there is a new lentil soup in this house and the best thing about it is it taste just like the one I enjoyed as a kid at my daycare. Tomas also loves this soup as well because of the garlic. It is very quick and easy to make which is why i have made it twice within a couple of weeks. I know I will be making this soup in the near future. Especially since there is never any leftovers when I do make it. 

Ingredients
1 package of bacon
1 cup lentils
6 cloves garlic, minced
6 cups chicken broth
2 teaspoon onion powder
2 teaspoon chopped bay leaves 

Directions
Cook 4 strips of bacon and set aside for cooking in the soup. Chop the rest of the bacon into small pieces and cook and set aside for topping on the soup. In a pot add lentils, garlic, chicken broth, onion powder, bay leaves, and cooked strips of bacon. Cook on med high heat until lentils are soft. Serve and top with bacon pieces and homemade croutons and some bread on the side. Enjoy :) 


Pin It

Saturday, September 7, 2013

Starbucks Frappuccino Cupcakes


 My friend Beth loves Starbucks. So for her birthday I wanted to give her a special treat to go with the photo tile coasters I made her. I wanted the special treat to have something to do with Starbucks, but I didn't want to do the small Starbucks cupcakes that I have been seeing all over Pinterest. So I had to get my creative juices flowing. The idea to make Frappuccino cupcakes came to me when I bought coffee for my team at work. After they finished up the coffee I saw that there were some of the Starbucks cups left, so I grabbed them, but I still wasn't quite sure what I was going to do with them just yet. After some thinking I came up with the idea to go to the store and buy a pack of the bottled Frappuccinos, in the cardboard holder. I wanted that because I was going to take the bottles out and put the paper cups in their place. I got the straw at Starbucks when I went and bought myself a Frappuccino one day and used my own straw to drink it so I can keep the straw for her cupcakes. So none of the products I used were stolen. 


To Make:

 After gathering all the products needed it was time to assemble the cupcakes. To make the cupcakes all you need is a cake mix, a can of frosting, and some chocolate syrup. After baking the cupcakes and they cool off you can start putting the Frappuccinos together. It will take about 10 cupcakes to make them how i did. First place one whole cupcake with no wrapper in the cup. Then put a little frosting on top of that cupcake in the cup. Next cut a cupcake in half and place in the cup on top of the frosting, then put some frosting on top of that cupcake. Now place one more whole cupcake on top of the rest in the cup. There will be some space between the edge of the cup and the cupcake. Just place some frosting in the space to keep them from moving and continue to frost the whole cupcake. Give it a messy look to make it look like whipped cream was squirted on top. Top it off by drizzling chocolate syrup on top. Repeat these steps until you have four Frappuccinos. Now take your straw and cut it into fours and place in the cupcakes. Now place the four cups into the carrier and now you have a fun and tasty gift to give to someone special. I hope they enjoy it as much as Beth did :)    

This is the amazing picture Beth took of the cupcakes and photo tile coasters I gave her for her birthday :)
Pin It

Thursday, September 5, 2013

Photo Tile Coasters


I wanted to make something special for my friend Beth's birthday. So I decided that I would make her some photo coasters of her and her daughter Jasey. A long time ago I saw the pin on Pinterest on how to make them so I pinned it for future use. They were actually very easy to make, but you do have to have time and patience because of the dry time between coats of Mod Podge and the spray acrylic adhesive. 

The hardest thing about making these coasters is picking the pictures you want to use. I went onto Beth's Facebook and began picking what pictures I wanted to use. I chose 10 that I liked the most and because I wanted the coasters to be black and white, I transferred the color photos to black and white for the coasters. After picking up the photos at the store I then chose the best 6 that fit onto the tile best. 

The finished tiles turned out great. I wrapped them with a cute bow and box and gave them to Beth. She absolutely loved her coasters. I also made her some Starbucks Frappuccino Cupcakes for her birthday as well, which she also loved. Whether you make these coasters for yourself or for a gift, you or your friend will absolutely love them.  


Photo Tile Coaster Supplies

6 white ceramic tiles 
6 photos 
Glossy Mod Podge
Clear Acrylic Adhesive ( I used the one put out by Plaid)
Black Felt
Hot Glue
Acrylic Paint
Paint Brush 
Sponge Applicator

First paint the edges of your tiles with the color of your choice, I chose black to make the photos stand out. After the edges are dry cut the photos down to the size of the tiles. Apply some Mod Podge to the back of the photos and place onto the tile. After they are dry apply a layer of Mod Podge on the top of the photo and tile then allow to dry. Apply a coat of Mod Podge 2 more times allowing time to dry between each coat. Now it is time to spray the acrylic adhesive. I did this outside, since it was very hot outside I brought them inside to dry because they were not drying outside, instead mine were just getting stickier. Before spraying the adhesive lay down some newspaper then wax paper on top of that. Now you can begin spraying. Do at least 5 coats allowing dry time between each. When I brought mine in the house to dry I would slide the wax paper with the tiles onto a cookie sheet and transport them that way. If the weather is nice then you can leave them outside to dry. After the 5 coats and they are dry, it is time to put the felt backing on them so they won't scratch your surfaces.  Cut the felt (I used black) to fit the tiles. Use hot glue to apply felt. Now you have a set of beautiful coasters to enjoy.  :)

I pin I found on Pinterest on how to make these came from TheFrugalGirls.Com

Here is how I presented the coasters to Beth :)

 This is the Picture Beth took of the Photo Tile Coasters and the Starbucks Frappuccino Cupcakes I made her for her Birthday :)
Pin It

Wednesday, July 10, 2013

Strawberry Butter


Last month Tomas and I went to dinner at Sweet Tomatoes. One of the things we always have there is the sourdough bread and butter. Well this time there was a new butter to choose from, it was strawberry butter. It was so good that I wanted to take some home with me so I can have it for breakfast on a bagel. I didn't take any home with me, however I started researching the web and I found a recipe by Martha Stewart. The recipe is very easy to make and taste very yummy. My strawberries are a little more chunky then they should be, but that's ok, because once the butter starts melting on my warm toasted bagel I am left with chunks of strawberries on top of my bagel. Enjoy :)


Strawberry Butter

1 cup (2 sticks butter)
1/4 cup powdered sugar
1/4 teaspoon salt (if butter is salted then don't add)
1/2 cup coarsely chopped fresh strawberries (I think I did 3/4 cup:)

Beat the butter, powdered sugar and salt (if needed) into an electric mixer for about one minute. Add the strawberries and beat until combined. Chill until ready to serve.
Pin It

Friday, July 5, 2013

Baby Monkey Cake Pops


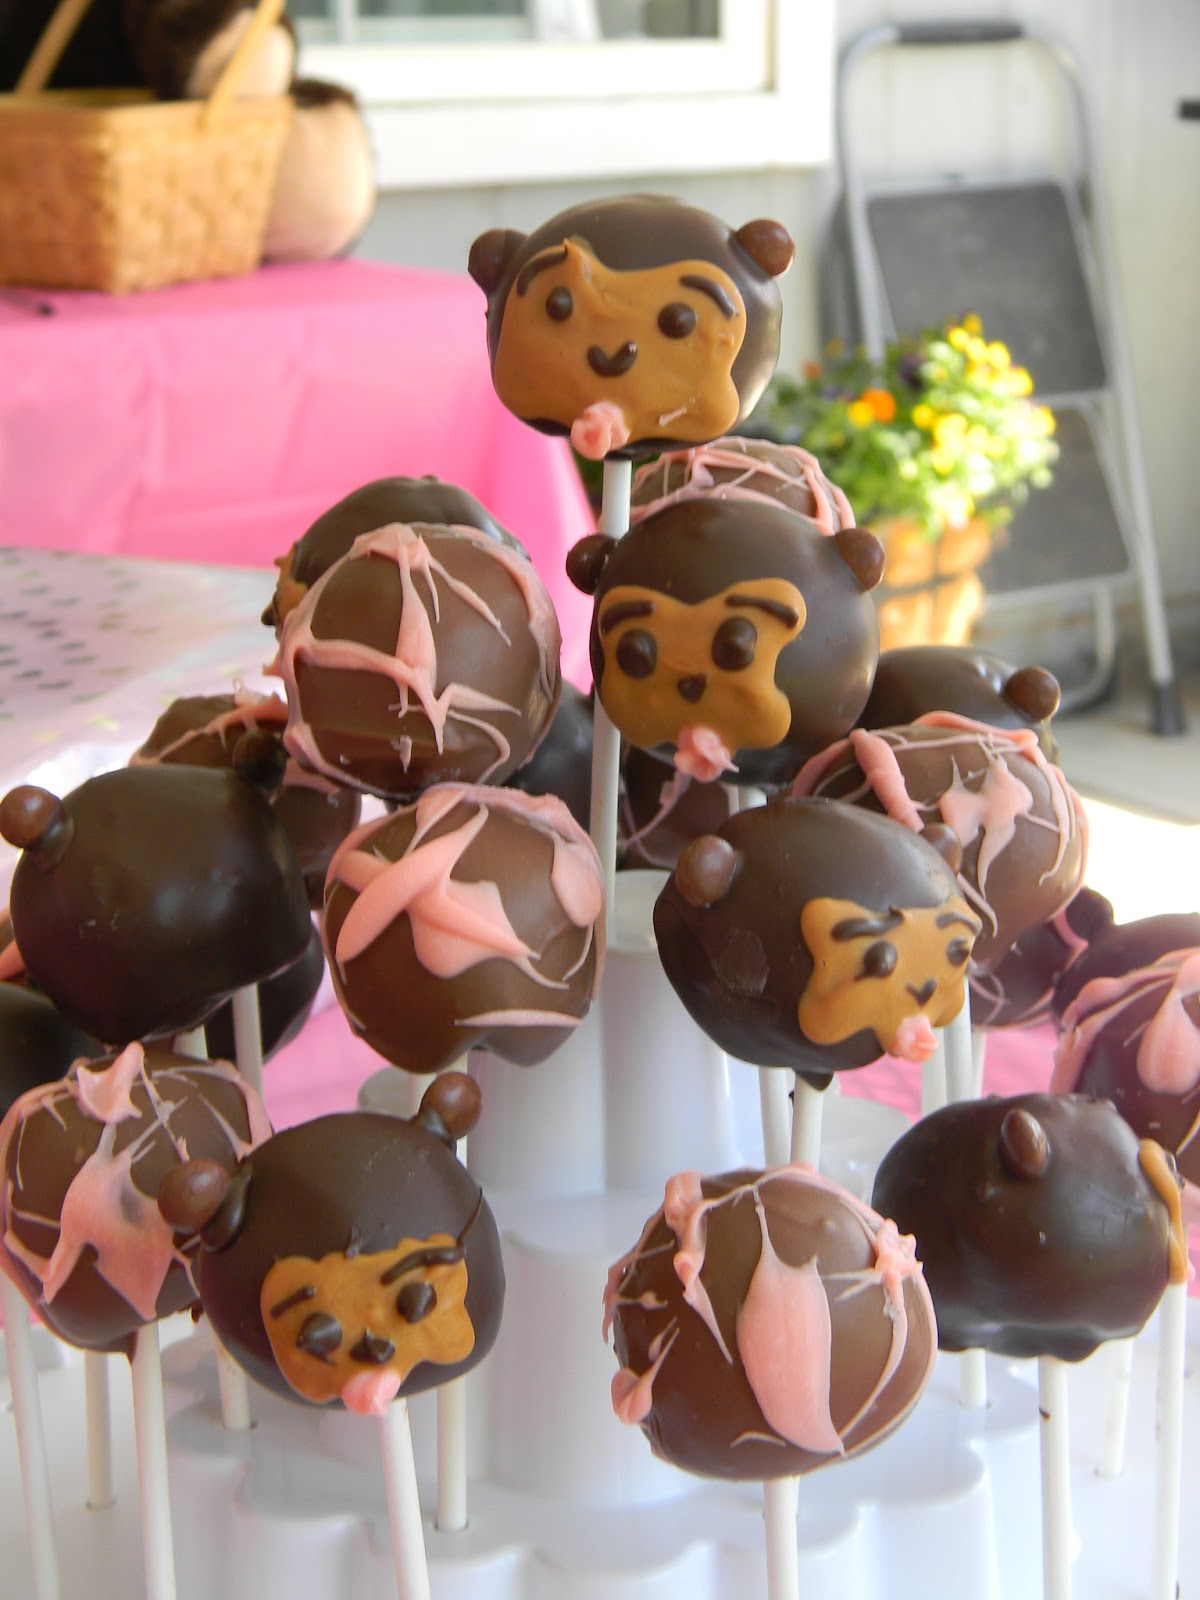
A lot has happened since the last time I was able to post something, one of those things being that my lil sis just had a baby girl named Marley. She is just so precious and all I want to do is buy and make things for her (which I will soon share some of the things I made for her). Before Marley arrived we threw my sister a monkey themed baby shower. I wanted to make a special extra treat so I made monkey cake pops. However, since they were a bit challenging and time consuming I only made 12 and I just splattered pink chocolate on the other 12. My cake truffles were very moist and since it is warm this time of year my cake pops didn't want to stay on the stick. After a lot of patience I was able to make it through making the 12 monkey pops. Everyone at the party loved them and thought they were cute.


To make the cake pops I used the same recipe I used to make my cake truffles, but if you decided to use the same recipe I suggest a lot of refrigeration. Since I was trying to get them done in a hurry they would hold on the stick. So I recommend placing them back in the fridge after you place the stick in them. Then after you finish decorating refrigerate again until ready to use.


To decorate  you will need 3 bags of melting chips (1 dark chocolate, 1 peanut butter flavor, and 1 pink) You will also need mini brown M&M's. First dip the cake pop into the dark chocolate. Before the chocolate dries place 2 brown M&M's on the sides as ears. Next take the peanut butter Melting chips and melt into a piping bag. Draw the shape of the face onto the front of the pop. Next take The melted dark chocolate and draw on a face. Next take the pink chocolate and make a circle and make a loop for the pacifier in the mouth area. Repeat for as many cake pops you want to make and enjoy.

Look at all those cute monkeys.
Pin It

Friday, March 29, 2013

Easter Egg Wreath


Last year I wanted to make a wreath for Easter, but I became too busy to make one. So when it came to Easter this year I made sure that I gave myself the time to make one for my front door. I kept it really simple that way anyone can make it. I also wanted to make it affordable so I tried to be resourceful by using a pool noodle to make the wreath form and I used ribbon I had in my stash. I found the eggs at the Dollar Tree so that helped in saving money also. The yarn to make the grass was the most expensive thing, but luckily they were on sale. I love making wreaths especially if I can do them with out spending too much. I have a couple more to share soon, but one is a surprise for someone so I wont be able to share for a while ;)  


Supplies Needed

1 pool noodle (cut down to size preferred, I cut about 6in off)
2 skeins Lion Brand Fun Fur Yarn
2 packages foam sparkly eggs (or any decorative eggs)
Ribbon
Wire
Duck Tape
Hot Glue 
Fishing line


To Make

First cut down the pool noodle to the size you prefer, I cut about 6 inches off. Duck tape the ends together, making sure it is secure. Start wrapping the yarn around the wreath (refer to images above). Stop once in a while to fluff the yarn because the threads tend to get stuck under each other keep wrapping until the whole wreath is covered using both skeins of yarn. If your wreath is smaller you will not need as much yarn, but if it is bigger you may need more. Two skeins was just enough for mine. Next make a bow using the ribbon and wire and fasten it to the wreath. Heat up the hot glue gun and glue the eggs to your wreath. Tie a piece of clear fishing line around the top by the bow. Now you are ready to hang your wreath for the Easter season. Enjoy :)
Pin It

Monday, March 4, 2013

HomeGoods Cake


Yesterday was the grand opening of HomeGoods in Clovis. So to celebrate all the hard work that the team put into getting the store ready, we thought it would be nice to give them a cake. I decided to make it a little more special by making a cake with the store logo on it. I was very proud of myself with the finished outcome and others were too. What I was most proud of was the fact that I made the logo free hand. I was going to just transfer the image onto the cake but I did not have piping gel or parchment paper. Luckily I was able to make the logo with out those things because the cake came out wonderful.
Pin It

Thursday, February 14, 2013

DIY $2 Perfume Plate


I wanted something pretty to display my perfumes on in my bathroom. Well the idea came to me while browsing on Pinterest when I came across a bunch of links showing how to make a desert plate from just a small plate and a candle stick. Some people painted theirs but I decided to keep mine plain and simple. So I went to the Dollar Tree and bought 1 glass desert plate and 1 glass candle stick. I went home and right away I made my plate. I was so happy with the finished product I decided I wanted to make another to put Tomas colognes on. This plate stand was so easy to make I know I will be making more again for parties and as gifts. :)


Perfume/ Desert Plate

1 glass plate
1 glass candle stick
Aleene's Glass and Bead Glue

Gently squeeze some glass and bead glue around the top of the candle stick where the plate is going to go (the reason you want to use this glue is because it dries clear and has a strong bond). Place the plate on top of the candle stick, but make sure it is centered while doing it. Next set it in a place to dry and set before using. After its dried, enjoy your plate stand however you choose :)


Here is how cute it looks with a few cupcakes on top :)
Pin It

Sunday, February 3, 2013

Football Chocolate Covered Strawberries


 It has been a very long time since I posted something on my blog and a lot has happened during that time.
Right after my last post I was promoted to Assistant Manager and then transferred to Bakersfield. With the promotion I was sent to Stockton for about a month, then it was off to Bakersfield. I did not move there so I was commuting sometimes from Fresno and sometimes from Visalia. I spent a lot of time on the road and pretty much had no personal life, until now because I was just transferred to Clovis. Yay!!! I will have a life again. Also during that time Tomas passed the Bar and just got a job. Yay!!! for Tomas. So now that I have my life back I thought it would be nice to start posting some of my creations again.

With today being the Super Bowl I thought I would make a nice treat to celebrate. So far there are no plans for celebrating. There are a couple of options that we were given so I thought I would be prepared just in case we go somewhere. I figured since everyone loves chocolate covered strawberries how about I make them look like footballs. Not only are they cute but they were super easy to make. Hope you enjoy them as much as we do.

Football Chocolate Covered Strawberries

1 lb Strawberries 
1 bag dipping chocolate
1/2 cup white chocolate chips

Wash and dry strawberries. Line a baking sheet with waxed paper. Melt dipping chocolate according to package directions. Dip strawberries in chocolate and place on lined baking sheet to dry. Place white chocolate chips in a ziploc bag and melt in microwave, kneading the bag every 30 seconds. Cut a corner of the bag off and squeeze onto dipped strawberries. Make a line across the top and the bottom, and another line going up the strawberry. Make a few little lines crossing over the line going up. It should resemble a football when done. Move the finished strawberries to a plate and serve.


Pin It

Monday, October 1, 2012

Spooky Wreath


Its Halloween Season, Yay!!!!! I actually feel like it has been Halloween season for a while now, but that is because I work in retail and the seasons come around early. Well anyways I decided that I should get into the spirit of things and do a little decorating for Halloween, especially since I always see great ideas on Pinterest. So I decided to make a wreath for my door, like I did back during Valentine's Day. I didn't want to spend much money on the project so after looking at other wreaths I have seen I decided to make one using mostly things I had around my house. 

I remembered I had a black feather boa that I used for a Halloween costume years ago, so I dug it out of the box and got to thinking of all the ideas I could do with it. One if the things I was going to do was put foam balls as eyeballs on the wreath, I even thought about buying orange glass ornaments and placing them through out the wreath. While at The Dollar Tree one day I saw that they had a great selection of Halloween Ribbon. So I decided that I should just keep my wreath simple and just make a pretty bow and attach it to the wreath. When it came to the wreath structure I was lucky to already have had a wicker wreath in my craft closet (which I actually found at the Dollar Tree a while back). Unfortunately, the wreath was light brown and I did not want it to show through the feathers so I spray painted it black with the paint I already had. Overall I was satisfied with the finished product and I also felt like it didn't cost me much to make, especially since I bought the things over a period of time. Also Tomas loved the wreath too, so that made me happy.  :)


Supplies

1 Wreath structure (wicker or foam)
1 black feather boa
Ribbon
Floral Wire
Hot glue


To Make

First wrap the boa around the wreath. If the boa is not big enough or you can see the color of the wreath and it is not black I would suggest painting it black first. After you wrap the boa around the wreath completely, glue or tie it in place. My boa had some sort of ribbon loops on the end, so I was able to tie the ends together and use one of the loops to hang it on the door. After the boa is wrapped around you can use glue to secure it all in place if needed. Mine stayed put so I did not use any glue. This comes in handy because if I ever need my boa for a costume again I will be able to take it off and use it. Next take your ribbon and make a nice bow and use floral wire to hold the bow together and to secure in place. Now your wreath is ready to hang up and enjoy.   
Pin It

Sunday, September 30, 2012

DIY Sea Shell and Burlap Wall Art


One of the things I like to look at on Pinterest is the Home Decor section. It gives me ideas on what I can do to decorate my house for cheap. While browsing through Pins, I came across this Pin on some Sea Shell wall art that someone else did. Before I even clicked on the Pin I was in love and told myself that is something I can recreate. So I clicked the Pin and read what they did. I loved what they did and thought it was beautiful, but I could not afford the $150 to do it myself. So I came up with my own way of doing it for way cheaper, and I even got to use some of the shells I collected on the beach. The total cost in the end was around $10, which was more within my budget. In the end I was very pleased with the finished product and I love how they look in my little bathroom. :) 


Supplies Needed

Burlap (found on the remnant shelf at Joanns for 50 cents)
4 picture frames (from the Dollar Tree)
Paint in Navy and White
Assortment of shells (I found the star fish 3pk for $1 and a bag of assorted shells $1 at Michaels in the impulse buy section and they were on sale that week too).
Scissors
Paint Brushes 
Hot Glue


To Make

First take out the glass and paint the picture frames the color that you would like then let dry. Next paint the shells white and let dry. Next take the glass from the frame and line it up on top of the burlap and use the glass as a guide to cut out the burlap. Now take the piece of burlap and carefully glue it to the glass while making sure it stays straight. Cut off any excess strands of burlap, if any, that gets in the way of placing the glass back in the frame. Now place the back of the frame back in place and secure shut. Now take your shells and figure out how you want them placed on the burlap. Glue in place once you decide where you like them. Now arrange your art work on the wall where you will like them. Now sit back and enjoy the beautiful art you just created for very little money.


Pin It

Tuesday, September 11, 2012

Knitted Pumpkin Baby Hat


Every time I would see knitted pumpkin hats on Pinterest and Ravelry I would just think they were the cutest thing. Jillian, the girl I used to babysit, had one and would wear it every time I would take a walk with her. Well since she already has one I decided that I would make one for Jasey, my friend Bethany's baby girl. I already had some orange yarn in my stash from when I made Tomas an orange beanie, so all I had to buy was the green yarn. After I had all the yarn it was then time to finally decide on which pattern I wanted to go with. For the beanie I made I used two different patterns. I did not care for the leaves that were with the pattern for the hat. Part of it had to do with a crocheted trim and I cannot crochet yet. Plus I loved the curly vines that I saw on a different pattern so I decided to combine the two patterns together. When it came to the vines I did two different sizes. I did one the way it was written and for the second I cast on an extra ten stitches. Both of these patterns I got from Ravelry so if you have an account you will be able to access them there for free. I hope you enjoy your pumpkin baby hat as much as I did and especially as much as my friend Bethany did, which she loved :)


Knitted Pumpkin Baby Hat

Supplies:
Red Heart Super Saver Yarn: Pumpkin Color
Vanna's Choice Yarn: Kelly Green Color
Needles: 
Size No. 6 16" circular knitting needles 
Size 6 double point needles

Patterns:


Pin It

Sunday, September 9, 2012

Neapolitan Coconut Cake


I was going through a Neapolitan phase so I decided why not make a Neapolitan cake. Lucky for me I had chocolate cake mix as well as strawberry and vanilla cake mix in my pantry. So one by one I baked them according to the package directions as they cooled I made some coconut butter cream frosting. The reason I did coconut flavor was because I was out of vanilla extract, so I used coconut extract instead. After the cake was cool I began frosting the cake. After frosting the outside of the cake I covered the cake with shredded coconut. As soon as I finished the cake I quickly took some pictures and ate some. It was so yummy and tasted just like Neapolitan ice cream. 

Now because I used a cake mix I ended up with two layers of each flavor. But no worries because It was also a friend Josh birthday so I made him a cake as well.

Slice of cake close up.


So yummy!!!

Pin It

Saturday, September 8, 2012

Nurse Bait


A few months back I came across this cute and clever gift idea on Pinterest for people who are in the hospital. This cute gift that I am talking about is called Nurse Bait. At the time I found this idea I had no one to give it to, but recently I have had 2 important people in my life to give it to, my Grandma and my friend Bethany. When it came to the one for my Grandma I used a lot of good hard candies because it had to be sent by mail. For Bethany's I used chocolates and some fruity candies since I was able to deliver it myself. Bethany and her Mom really loved this gift. Most importantly Bethany said it was a hit with the nurses, which let me know it served its purpose :)

Now I do not know who came up with this clever idea was or who wrote the poem. The Pin that I saw on Pinterest was just a picture with no link to follow. I wish I was creative enough to come up with this idea, but I didn't someone else did first and who ever did was very clever because this is a perfect gift to give someone in the hospital, that way they will get a little more needed attention from the nurses :)


Here is the close up of the Poem that I printed out and included with the gift.

This is how we placed it on the small table in the room for the nurses to see. Every time they came to check on Bethany we would point out the basket and ask if they would like a piece of chocolate :)
Pin It

Tuesday, August 28, 2012

Apple Slice Pancakes


While browsing on Pinterest the other day (which I am always doing), I came across a yummy picture and recipe of something called Fried Apple Pancake Rings. I really wanted to make them for breakfast, but after reading the recipe I did not have all the ingredients and so I decided to make it a bit easier and use what I had on hand. Also mine did not come out looking like rings because the pancake batter would stay in the holes or while cooking the batter would spread to the hole and cover it up, that is why I decided to call mine apple slice pancakes. These things were yummy and I felt they were healthy because they were more apple than pancake. I will be making these again soon especially when I have some apples that need to be eaten up. 

Apple Slice Pancakes

Pancake Mix
Ground Cinnamon 
Green Apples, peeled, sliced into rings, and cored

Make pancake mix according to the package then add 2 teaspoons ground cinnamon. Depending on how much batter you have will depend on how many apples you will need. I used two small green apples and had a small amount of batter left to make a regular pancake. Dip the sliced apples into the batter and using a toothpick or chop stick take the apple ring out and place on a warm skillet. Cook just like a pancake until golden brown. Serve with syrup or sprinkle a little bit of cinnamon and sugar on top. Serve warm and enjoy. :)  
Pin It
Related Posts with Thumbnails