Saturday, April 30, 2011

Red Wine Bottle Cake


This here is my latest cake creation, which is a red wine bottle shaped cake. It is not as extravagant as other cakes I saw online, but it is the best that I could do. So let me talk a little about what I did. The reason I did the star tip design is because since I carved the two layer cake into a wine bottle shape, I didn't want to get crumbs in the frosting when spreading it. Therefore I did the star tip that way the crumbs would not go everywhere. The hardest thing about this cake was making the frosting a red wine color, which I was never able to do. Therefore it is more of a grape purple color. Now you cant really notice in the picture, but there is three shades of purple on the cake, however it was not intentional. Every time the frosting would get warm while piping, I would put it in the fridge to cool. When ready I would take it out and continue frosting the cake. Well I didn't notice until the next day that each time I did that the purple shade got darker and darker. Even with the little flaws I think the cake still came out great and I hope that Penny loves the cake. :)
Pin It

Wednesday, April 27, 2011

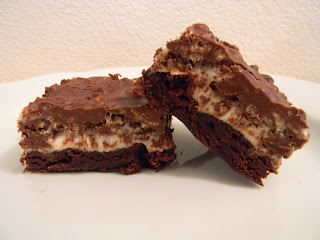
Brownie Mallow Bars


So I have to admit that I have been a little lazy lately. When I get off work I usually come home and do nothing. Therefore my laziness has taken a toll on my creations as well as my blog. So I am going to try and get out of my lazy rut and get back to posting things on my blog again, especially since I do have a lot I can post about. So to get things started up again I made these really delicious brownies that I found in my Taste of Home Cookbook. They are so easy to make I don't know why I didn't think of it myself. Well I hope you enjoy and I will be back real soon. :)


Brownie Mallow Bars

1 package fudge brownie mix (13-inch x 9-inch pan size)
1 package (10-1/2 ounces) miniature marshmallows
2 cups (12 ounces) semisweet chocolate chips
1 cup peanut butter
1 tablespoon butter
1-1/2 cups crisp rice cereal


Prepare brownie batter according to package directions for fudge-like brownies. Pour into greased 13-in. x 9-in. baking pan. Bake at 350° for 28-30 minutes. Top with marshmallows; bake 3 minutes longer (marshmallows will not be completely melted). Cool on a wire rack.
In a microwave-safe bowl, melt the chocolate chips, peanut butter and butter; stir until smooth. Stir in cereal; spread over brownies. Refrigerate for 1-2 hours or until firm before cutting.
Pin It

Monday, April 11, 2011

Sea Shell Wind Chime


Today I will be doing a post on something other than food. Just recently I made a sea shell wind chime out of some shells that I have collected over the years. Some of the shells I found at various beaches and I bought the more exotic ones at the store. Well i would always see sea shell wind chimes come in to the store I work at. I always thought they were nice, but I didn't want to pay a lot for something like that, especially if I could make it myself. And it turns out that is was actually very easy to make. The one thing that took a lot of time was drilling all the holes in each of the shells, but once you get past that step it takes no time at all to make it. After it is all put together you end up with a one of a kind custom made sea shell wind chime, which sounds very pretty when a breeze goes by. Now if my directions make no sense at all then I apologize. I tried to describe it the best way I could. If anyone ever has any questions on this or anything else I ever make feel free to ask away. Enjoy


Sea Shell Wind Chime


Various sea shells

Transparent plastic string/fishing line

Clear sea beads

1 wooden circle plaque

1 key ring


Drill holes in the tops of all the shells. Also drill a hole in the middle of the wooden plaque as well as three holes evenly around the edge. Cut a long piece of string and tie a knot at the end around a sea bead. String a shell on to the strand letting it rest on the bead. Leave about a 1-inch space from the shell and tie another knot on the string with a bead and the string down the next bead. Repeat until you have all four strands made. End each strand with a knotted sea bead to help support the wood plaque. String the strands through the wooden plaque and then tie all the strands around a key ring. Cut off excess stings and then hang it up some where nice.


Pin It

Friday, April 8, 2011

Toasted Coconut Bird's Nest Cupcakes


I just love coconut, so I figured why not make a coconut flavored cupcake and put toasted coconut on top. Plus since they look like nest it goes perfect for the Easter holiday. They are very simple to make and you can make them for any occasion, just don't put the egg candies on top and they wont look Easterish. Just prepare a white cake mix according to the box and after all combined add about two or more teaspoons of coconut extract to the batter, if you don't have any coconut extract you can just do with out. Bake the cupcakes according to the package and let cool. While the cupcakes are cooling dump a whole package of shredded coconut on to a cookie sheet and place under a broiler. Cook until the coconut starts to turn brown but don't let it burn. Try to stir the coconut every once in a while to make sure it browns evenly. Frost the cupcakes with a white frosting and then dip the frosted cupcake into a coconut, and repeat for each cupcake. Ta da you now have coconut nest cupcakes. Place a few candy eggs on top, if you like, and enjoy.
Pin It

Friday, April 1, 2011

Pickle Cupcakes


Anyone want to try a pickle cupcake? They are the most wonderful thing in the world. If you have not tried them yet you are really missing out. April Fools!!!! These are not real pickle cupcakes. I actually think that would be really disgusting. The pickle on top of these cupcakes are actually pickle shaped candy that I found at work the other day. When I first saw these candies I just thought they were the funniest candy I have ever seen and I just had to buy them and do something fun with them. That is when I came up with the fun idea of pickle cupcakes. To make the cupcakes more interesting I dyed the cake batter with green food coloring to make it more pickle like. I can't wait to see every ones reaction at work today when they see these cupcakes. Hopefully everyone gets a good laugh out of these. Have a fun April Fools Day!!!


Unfortunately, the wrapper to the pickle candies got tossed right after making the cupcakes and I cannot remember the brand. I have been searching and searching online since I made these as well as continuously looking at my job, and I cannot find these candies anywhere. As soon as I do I will post all the information on here that way everyone can enjoy these pickle candies. :) 
Pin It
Related Posts with Thumbnails