Thursday, June 30, 2011

Homemade Cheez-Its


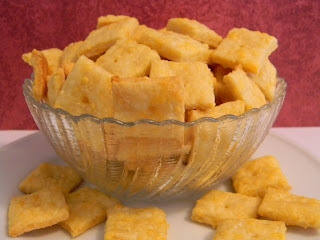
I just finished making my own homemade Cheez-Its and decided that this is something I must share. My mom told me about this recipe for homemade Cheez-Its on a blog called In Katrina's Kitchen. After reading her post I decided that I too need to make these, especially since Tomas loves Cheez-Its. Now they don't taste exactly like the same things, but they do come pretty close and are very yummy. As I am writing this, Tomas brother Lukas is in the kitchen munching away at them. So if you like Cheez-Its I highly recommend you try making them on your own, especially since they are easy to make. Enjoy :)

Homemade Cheez-Its

8 oz sharp cheddar cheese, grated
· 3 Tablespoons of unsalted butter, room temperature
· 1 Tablespoon vegetable shortening*
· ½ teaspoon salt
· 1 cup flour
· 2 Tablespoons ice water
· Coarse salt for sprinkling

Combine cheese, butter, shortening, and salt in the bowl of your mixer fitted with the paddle attachment. The mixture will be crumbly. Slowly add flour and then the ice water. You may add a few more drops of water to help it come together but be careful not to add too much. You don’t want a wet dough. Pat the dough into 2 discs and wrap in plastic wrap for at least 30 minutes (or longer).

Preheat oven to 375⁰F.Using parchment paper or a silicone mat roll each disc to 1/8 inch or less and cut into 1 inch squares (a pastry wheel or pizza wheel is easiest). Use a toothpick to punch a hole into the center of each square. If you have difficulty separating and transferring the crackers onto the baking sheet return the parchment paper/mat to the refrigerator for 10 minutes (while you roll out the 2nd dough disc). Bake for 10 – 15 minutes or until puffed and browning around the edges. If you pull them out too soon and the crackers don’t have the desired crispiness you want then simply return them to the oven for 2-3 more minutes. Move crackers to a cooling rack.

Pin It

Wednesday, June 29, 2011

Red, White, and Blue Firecracker Cake


I dedicate this post to my mom. While talking on the phone with my mom yesterday, she told me about this firecracker cake recipe that she found on BettyCrocker.com. and she said that I should make it. Now if you were wondering why she wouldn't make it herself, it was because she doesn't like to eat anything blue. She will eat natural blue things like blueberries, but she will not eat things that are dyed blue. So instead of having the cake go unmade, I went ahead and made it since I don't have a problem with blue. Now if you don't have a problem with eating blue things and are looking for a cake to make for the Fourth of July, I would recommend this one because it was actually very easy to make. Enjoy :)


Red, White, and Blue Firecracker Cake

1 box Betty Crocker® SuperMoist® white cake mix
Water, vegetable oil and egg whites called for on cake mix box
Red food color
Blue food color
1 container (12 oz) Betty Crocker® Whipped fluffy white frosting

Heat oven to 325°F. Generously grease 12-cup fluted tube cake pan. Make cake batter as directed on box, using water, oil and egg whites. Pour 1 cup of the batter into small bowl; stir in red food color until well mixed. Pour another cup of the batter into separate bowl; stir in blue food color until well mixed. Pour red cake batter into bottom of pan. Carefully pour remaining white batter over red batter in pan. Carefully pour blue batter over white batter. (Blue batter does not need to cover white batter completely; it looks better if it just forms a ring in the center of the white batter.)

Bake as directed on box or until toothpick inserted near center comes out clean. Cool cake 5 minutes. Meanwhile, place cooling rack over cookie sheet. Turn pan upside down onto cooling rack. Cool cake completely, about 30 minutes.

When cake is cool, divide frosting evenly into 3 microwavable bowls. Microwave 1 bowl of frosting uncovered on High a few seconds until smooth enough to drizzle over cake. With spoon, drizzle all of white frosting back and forth around cake in a striping pattern. Repeat microwaving second bowl of frosting until smooth. Stir in a few drops blue food color until well blended. Drizzle over cake, scattering frosting back and forth. Repeat with remaining bowl of frosting and red food color, making sure red, white and blue frostings can be seen on cake. Let cake stand at room temperature until frosting is set before serving.

Pin It

Tuesday, June 28, 2011

Cougar Cake #2

I don't know what has come over me, but I think some kind of lazy bug bit me. For some reason I just could not get myself to make anything. I think it had more to do with the heat. The thought of turning the oven oven sounded miserable because it would just make the house hotter. Now I could just turn the AC on, but we are trying to hold out until it is hotter outside. We have given in a couple of times because we just couldn't take the heat especially when I had to make a cake for someone. Plus I didn't want the frosting to melt so I had to make sure it was cool in the house. Well this cougar cake is actually the second one I made. I made the first one a couple of years back for my friend's 30th birthday. The reason for the cougar cake is because her husband says that him and his friends always said that cougars were 30. Well the joke continued and now my friend's friend is getting a cougar cake for her 30th birthday. Now for some reason I lost the photo of the first cougar cake I made so it is not exactly the same, but it is pretty close. All I did was find an image of a cougar that I liked, but instead of transferring it with piping gel like I did last time, I actually drew the image of the cougar myself on to the cake. I was actually proud of myself because that was the first time I drew the image on my own with out having to do the whole transferring thing. Well that is how the finished product came out and I hope she likes her cake. :)

Pin It

Thursday, June 2, 2011

Cupcakes With Chocolate Scissor Decorations


Today is my friend Jeni's last day of work. So I made a special treat to celebrate her leaving us to pursue her career as a great hair stylist. She is very good at what she does and I am very happy that she will be doing what she loves best. That is why I had to make cupcakes that have a little pair of chocolate scissors on them to symbolize her being a hairdresser. The cupcake was just a basic white cake mix and the frosting was just a can of white frosting that I dyed pink. To make the chocolate scissors I printed up an small image of scissors that would fit on the cupcake. I then melted about 1/4 cup of chocolate ships in a plastic sandwich bag with the tip cut off. I then took a large piece of waxed paper and placed it over the image of the scissors. I traced the scissors and repeated until i had about 30 chocolate scissors (make extras in case one breaks). I then placed the waxed paper on a baking sheet and placed in the freezer to set. After frosting the cupcakes place the pair of scissors on top and serve. Well I hope Jeni loves her cupcakes and I wish her the best of luck at her new job. And if you ever need a hair cut or styled let me know and I will tell you where she works. :)
Pin It
Related Posts with Thumbnails