Showing posts with label Baby. Show all posts

Thursday, October 3, 2013

Rib-Knit Baby Hat


This is my beautiful Niece Marley. Isn't she a cutie??? She is modeling the Rib-Knit Hat that I made for her, which I gave my sister at her baby shower in the box of knitted hats. Now that I finally have a picture of her wearing it I can share about the hat. I found this pattern on Raverly. It is super easy to make even a beginner knitter can make this. This hat can also be easily made in any size you want since there are no decreases or increases. Just continue knitting and purling in the round until you reach the desired size. Also since it is a baby hat it doesn't require a lot of yarn, so I used what I had in my stash. I hope whoever you knit this for enjoys it as much as Marley does. :)

Such a cute hat model :)
Pin It

Box of Homemade Knitted Baby Hats


For my sister's baby shower, I wanted to give her something for the baby that I knew no one else would give her (or at least give it in a way that no one else would). I wanted to knit some baby hats, but I wanted to take it a step further. I found this very cute polka dot luggage box at HomeGoods and right away I knew what I wanted to do. I knitted six hats and arranged them in the box. Then I made a fake luggage tag, which doubled as a gift tag. What is great about this box is once the tissue is taken out, it will fit many more hats. Also it was a big hit at the baby shower, which made me feel good .


At first my Niece Marley wasn't able to enjoy the hats because since it was summer it was too hot. Now that the weather is getting cooler I am now receiving text with pictures of her wearing the hats I made. So as my sister shares the pictures of Marley wearing the hats I will then share them with you. As I post them I will come back to this post and create the link of the hats. Just click one of the names of the hats below and if I have made a post it will direct you to that page.


Baby Turban 
Gnome Hat
Pink Bow Hat
Long-Tailed Hat
Pin It

Friday, July 5, 2013

Baby Monkey Cake Pops


A lot has happened since the last time I was able to post something, one of those things being that my lil sis just had a baby girl named Marley. She is just so precious and all I want to do is buy and make things for her (which I will soon share some of the things I made for her). Before Marley arrived we threw my sister a monkey themed baby shower. I wanted to make a special extra treat so I made monkey cake pops. However, since they were a bit challenging and time consuming I only made 12 and I just splattered pink chocolate on the other 12. My cake truffles were very moist and since it is warm this time of year my cake pops didn't want to stay on the stick. After a lot of patience I was able to make it through making the 12 monkey pops. Everyone at the party loved them and thought they were cute.


To make the cake pops I used the same recipe I used to make my cake truffles, but if you decided to use the same recipe I suggest a lot of refrigeration. Since I was trying to get them done in a hurry they would hold on the stick. So I recommend placing them back in the fridge after you place the stick in them. Then after you finish decorating refrigerate again until ready to use.


To decorate  you will need 3 bags of melting chips (1 dark chocolate, 1 peanut butter flavor, and 1 pink) You will also need mini brown M&M's. First dip the cake pop into the dark chocolate. Before the chocolate dries place 2 brown M&M's on the sides as ears. Next take the peanut butter Melting chips and melt into a piping bag. Draw the shape of the face onto the front of the pop. Next take The melted dark chocolate and draw on a face. Next take the pink chocolate and make a circle and make a loop for the pacifier in the mouth area. Repeat for as many cake pops you want to make and enjoy.

Look at all those cute monkeys.
Pin It

Tuesday, September 11, 2012

Knitted Pumpkin Baby Hat


Every time I would see knitted pumpkin hats on Pinterest and Ravelry I would just think they were the cutest thing. Jillian, the girl I used to babysit, had one and would wear it every time I would take a walk with her. Well since she already has one I decided that I would make one for Jasey, my friend Bethany's baby girl. I already had some orange yarn in my stash from when I made Tomas an orange beanie, so all I had to buy was the green yarn. After I had all the yarn it was then time to finally decide on which pattern I wanted to go with. For the beanie I made I used two different patterns. I did not care for the leaves that were with the pattern for the hat. Part of it had to do with a crocheted trim and I cannot crochet yet. Plus I loved the curly vines that I saw on a different pattern so I decided to combine the two patterns together. When it came to the vines I did two different sizes. I did one the way it was written and for the second I cast on an extra ten stitches. Both of these patterns I got from Ravelry so if you have an account you will be able to access them there for free. I hope you enjoy your pumpkin baby hat as much as I did and especially as much as my friend Bethany did, which she loved :)


Knitted Pumpkin Baby Hat

Supplies:
Red Heart Super Saver Yarn: Pumpkin Color
Vanna's Choice Yarn: Kelly Green Color
Needles: 
Size No. 6 16" circular knitting needles 
Size 6 double point needles

Patterns:


Pin It

Thursday, August 2, 2012

Elephant Baby Mobile


 In my previous post on Bethany's Baby Shower Gifts I gave a sneak peak of the baby mobile I made her. Well after a long wait, here it is. Before I get into detail on how to make it, let me start of by telling you how we came up with the idea. It all started with Pinterest. I was browsing through pins when all of a sudden this cute elephant baby mobile popped up. I clicked on it thinking there would be instructions on how to make it, but instead it took me to someones Etsy account that sells them. Well knowing that Bethany was having an elephant theme as well as the colors grey, coral, and peach I took a picture of the mobile and sent it to her. She text me back right away saying that it was exactly what she wanted. That is when I told her that it cost a lot, but I think I could recreate it for very little. So I went and bought all the materials which cost me under $10 and got started making the mobile. At first I almost gave up because the original one was made of wood on the top, but that was to difficult for me because I didn't have the necessary tools. That is when I came up with the idea of buying a metal ring at Joann's and wrap it in ribbon. After hours and hours of making the elephants it was finally time to put it together. To tell you the truth I had no clue what I was doing, but some how it all worked out in the end and Bethany loved it and I hope Jasey does too.

Below I will give the instructions on how to make the elephant mobile the best way I can. If you have any questions let me know and I will be happy to help. I have included a few photos showing the process on making the elephants.


1) Use an elephant template to cut the elephants out of the felt

2) Cut out ears from the felt.

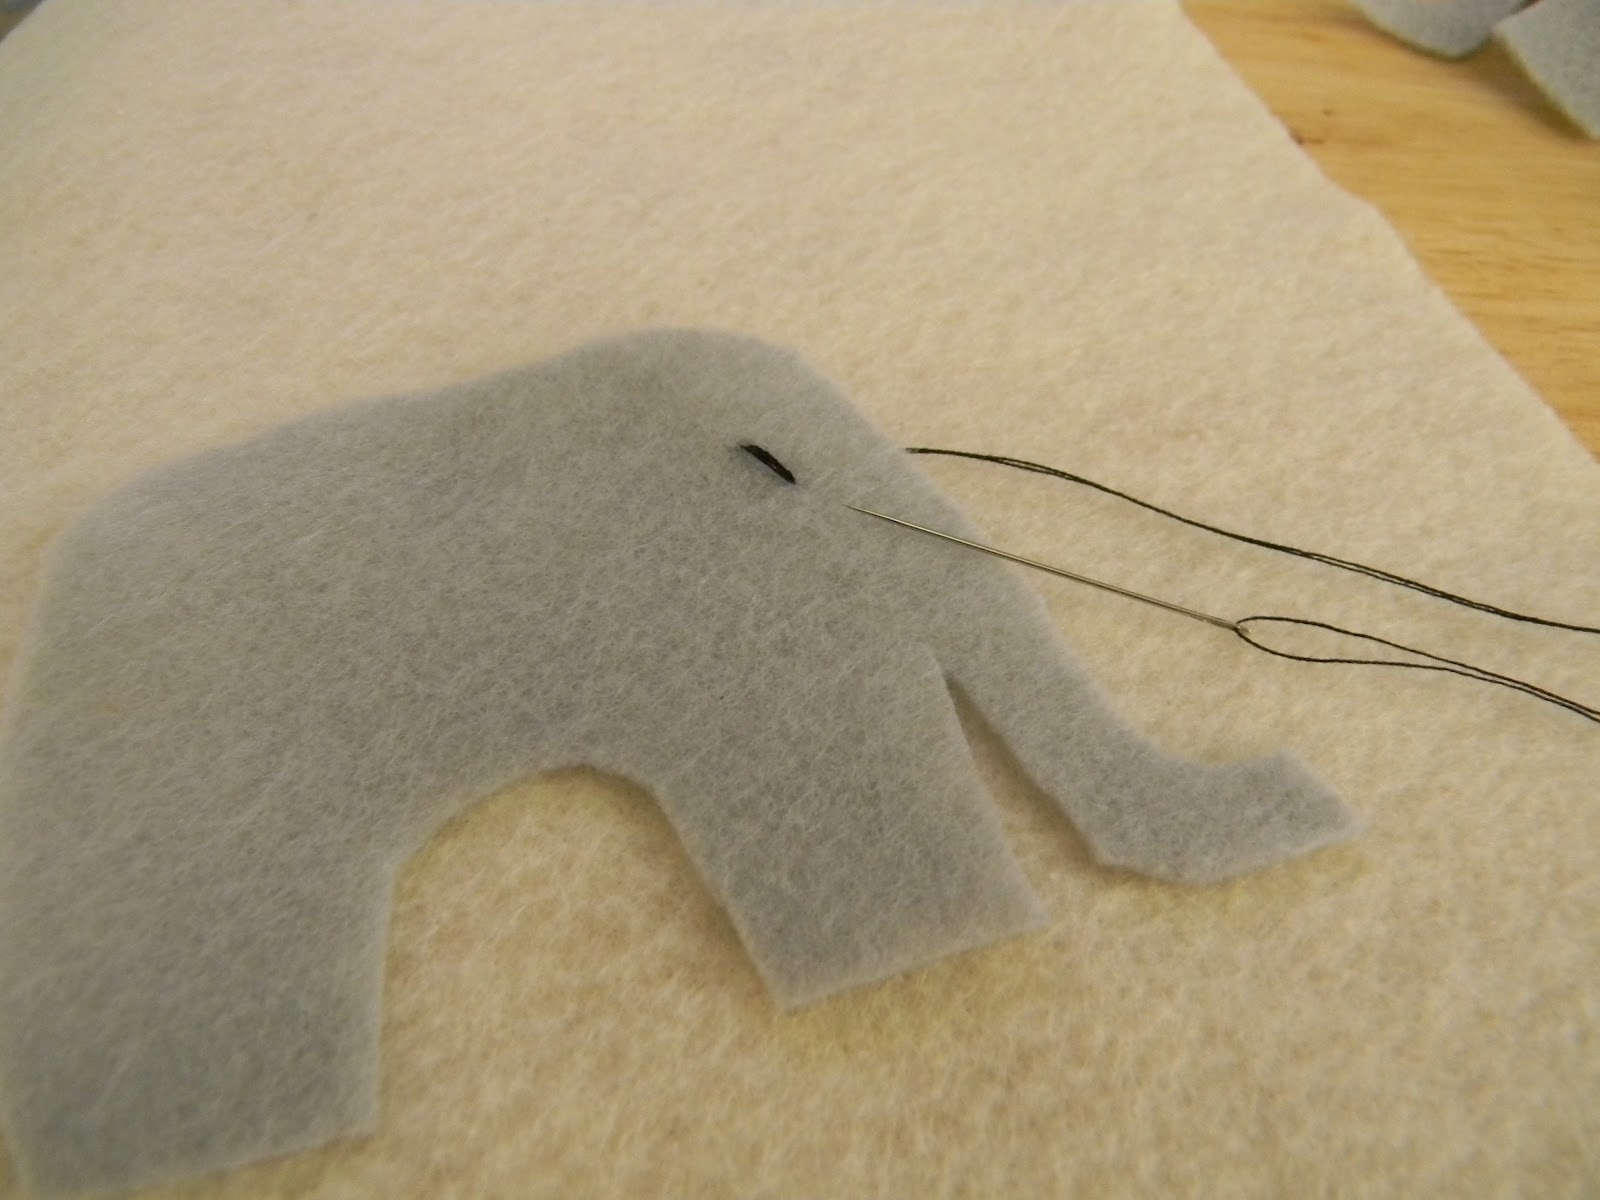
3) Sew on an eye on all of the elephants.

4) Next sew on the ears.

5) Now sew the two elephants together and stuff them as you go before closing them up.

Materials Needed

Felt in at least two different colors
Matching thread
Pillow stuffing
Buttons
Clear fishing line
Metal ring
Ribbon
1 small ring or key chain ring
Hot Glue
 First start off by sketching out an elephant on a piece of paper and cut it out. Then use that paper as a template to cut out elephants from the felt. I wanted to have 7 elephants, 4 in gray and 3 in cream, so I had to cut out 14 of them. Do the same for the ears 14 total. Next sew on black eyes on all the elephants keeping in mind that you sew the eyes on have of them on the opposite side (refer to image 3 and 4). Next sew on the ears in the color that is not the same color as the elephant. Now its time to sew the elephants together. While sewing together make sure you stuff the elephant as you go before closing it up. Next glue a couple of buttons on to the elephants. Besides elephants I also did felt hearts on the mobile. When it came to the hearts I kept it simple. There was no sewing involved, instead I glued two hearts together on the fishing line. I would suggest not doing the hearts until after the elephants are connected to the line first.

Now it is time for the assembly part. I really did not know what I was doing on the assembly, I would just try things until it worked. To attach the fishing line to the elephants I took the line and tied it in a knot a couple of times around a stitch on the top of the elephant. Next I would glue the hearts to the line. Repeat this steps until all your elephants and hearts are all connected to fishing line. The next thing I did was tie the eight strands of elephants at different levels onto the metal hoop and put a drop of hot glue on the spot I wanted the strand to stay. Then I took the ribbon and wrapped it around the hoop until completely covered. Then I cut out 8 strands of ribbon and glued them over a small metal ring one by one. Then the last thing to do is glue the ribbons one at a time to the hoop where each of the strands of elephants hang.

If you decided to make this mobile for yourself I wish you luck. I tried my best to describe how I made it and hopefully it makes some since. I would suggest looking at the photos when possible in hopes that it will help make since of things. If you  do decided to make the mobile you will be happy with your finished product :)  

Here is a close up of the one of the elephants hanging on the strand with the hearts.

Here is a close up of the top of the mobile. You will also see I made a moon at the top. To make the moon do the same thing as the elephants and stuff the two pieces of felt.

And here is one last look at the mobile hanging from my ceiling :)
Pin It

Thursday, July 5, 2012

Knitted Heart Blanket


When I found out that my friend Bethany was going to be having a baby I instantly went home and started looking up things on Ravelry that I can knit for a baby. I found a lot of cute things that I can make, however I did not want to start making anything until I knew what she was having. Well when I found out she was going to have a girl, named Jasey Rae, I instantly decided that I wanted to make a blanket with hearts. As a child I had a crocheted blanket with hearts in it that my mom made for me, therefore I thought it would be nice for me to make one for Jasey Rae. The blanket was part of my gift at Bethany's baby shower and she absolutely loved it and I am pretty sure Jasey Rae will love and appreciate it as well.   

The pattern used to make the blanket was called Baby Love Blanket by Renae Jones and I found it on Ravelry. The needles used were size 8 29in. The yarn I used was Lion Brands Pound of Love. I chose white because I felt it made it look very elegant, but any color will look just as nice. 


Here is a close up of the heart details <3

Pin It
Related Posts with Thumbnails