Showing posts with label Cakes. Show all posts

Sunday, February 9, 2014

Darth Vader and Death Star Cake


Here is my latest cake creation. I made it for my future Nephew Austin's Birthday. I got the idea for this cake from one I saw on Pinterest. Their Darth Vader was made with fondant and since I'm not good at using fondant yet I did mine in butter cream. And let me say he was no easy task. It actually took me a few times to do his face until I decided that this will be the best I can do. Since he is all black I had a hard time with the dark lines and making him look as close to the real thing as possible. I am glad with how it came out and the good thing is the cake was a hit, which makes me very happy. 


Pin It

Monday, March 4, 2013

HomeGoods Cake


Yesterday was the grand opening of HomeGoods in Clovis. So to celebrate all the hard work that the team put into getting the store ready, we thought it would be nice to give them a cake. I decided to make it a little more special by making a cake with the store logo on it. I was very proud of myself with the finished outcome and others were too. What I was most proud of was the fact that I made the logo free hand. I was going to just transfer the image onto the cake but I did not have piping gel or parchment paper. Luckily I was able to make the logo with out those things because the cake came out wonderful.
Pin It

Sunday, September 9, 2012

Neapolitan Coconut Cake


I was going through a Neapolitan phase so I decided why not make a Neapolitan cake. Lucky for me I had chocolate cake mix as well as strawberry and vanilla cake mix in my pantry. So one by one I baked them according to the package directions as they cooled I made some coconut butter cream frosting. The reason I did coconut flavor was because I was out of vanilla extract, so I used coconut extract instead. After the cake was cool I began frosting the cake. After frosting the outside of the cake I covered the cake with shredded coconut. As soon as I finished the cake I quickly took some pictures and ate some. It was so yummy and tasted just like Neapolitan ice cream. 

Now because I used a cake mix I ended up with two layers of each flavor. But no worries because It was also a friend Josh birthday so I made him a cake as well.

Slice of cake close up.


So yummy!!!

Pin It

Wednesday, August 8, 2012

Bethany's Flower Congrats Cake


When my friend Bethany had her baby Jasey I decided that I should make her a Congrats cake. I actually had this idea planned when I made her baby shower cake, so I pre-made the flowers and leaves using royal frosting. I did the flowers on this cake using the color theme of her baby shower. Since the flowers were pre-made it made decorating this cake a lot easier. As soon as the cake cooled I covered it in butter cream frosting and then I placed the flowers in spots that I thought would look good. I brought Bethany this cake when I went to go see her and Jasey for the first time. It was unexpected nice surprise for Bethany and she loved it :)       


Pin It

Sunday, June 10, 2012

Beth and Jasey Rae's Baby Shower Cake


Today was my friend Beth's baby shower. She is very lucky because soon she will be having a little girl named Jasey Rae. I felt lucky too because I was asked to make the cake for the special occasion. The design of the cake was Beth and her Mom's idea, I helped to bring their design to life. The bottom tier of the cake was a four layer strawberry cake and the top tier of the cake was a four layer pink champagne cake, making the cake an 8 layer cake all together. To make the ruffles on the bottom tier I used Wilton tip # 124. The ribbon on the second cake was just regular ribbon. I made the polka dots a couple days in advance with royal frosting and placed them on the cake with butter cream frosting when it was time. The J on the top was a wood cutout on a stick. I used royal frosting to glue down edible pearl sprinkles to the J, I also made this a couple of days in advance. Overall I feel this was one of the best cakes I ever made. It was also the tallest cake I ever made. Everyone loved it, most importantly Beth loved the cake and that made me extremely happy. :)  

An up-close look at the J covered in edible pearl sprinkles.

A closer look at the top tier of the cake with polka dot decorations. As well as a look at the ribbon and bow.

The bottom tier of the cake decorated with ruffles.

Another view of the beautiful cake I made for Beth and Jasey Rae.  :)

Pin It

Friday, June 1, 2012

Tomas Law School Book Graduation Cake


First off I would love to say congratulations to my wonderful boyfriend Tomas on Graduating Law School I'm so proud of you. For those of you that don't know Tomas, he just spent the last four years in Law School where he studied just about everyday. So I felt he deserved a wonderful cake to celebrate his graduating. So the day before, while he was off at school studying for the bar, I made a cake with out him knowing and when finished I put it in our mini fridge and made sure he never went in there. On the morning of the graduation he came into the living room to the surprise of the table being decorated with confetti and balloons and in the center of the table was his book cake. Which at first quick glance he thought I just put his books on the table, but as he came closer he realized that the books were a cake. He loved the cake so much he took pictures of it and showed his friends. He then proceeded to tell me how much he loved his cake and it was the best cake anyone ever made for him. That made me so happy to hear.

This cake was actually very easy to make. The bottom red  book was a 9x13 red velvet cake that I cut in half and stacked on top of each other. The top blue book is actually a rice krispie treat which was also made into a 9x13 pan that I then cut in half and stacked on top of each other also. First I frosted the red book and decorated it to look just like Tomas Law book. To make the pages on the book I used Wilton Tip #48. after finishing the red book I moved on to the blue one which I also decorated to look like his law book. Instead of putting the edition of the books or publishers names, I put his school name and the year he graduated in their place. I even put "Congrats Tomas" in the place of those things as well. The finished product came out great and most importantly Tomas loved it and that is what matters most to me.  :)

The side view of Tomas book cake.

The table that I decorated and surprised Tomas with the morning of his graduation :)

Tomas and me. I am so proud of him :)

My mom, Tomas and I.

Congratulations Tomas!!!
Pin It

Wednesday, April 18, 2012

Ariel's Mushroom Cake with Gnomes

My little sister turned 21 this year back in February. So for her birthday my parents brought her to Fresno so we can take her out and celebrate. My sister loves gnomes, so one of the things my parents got her were Gnomeo and Juliet Statues. My Mom and I thought it would be cute if I made her a mushroom cake and place the gnomes next to the cake. I set up the cake with the gnomes on my table that way when she came through the door she would see the gnomes with the cake. I also placed her present from me and some balloons on the table and we sang Happy Birthday for her when she came through the door. She was excited. :)

To make the cake I used the Nordic Ware 3D Cupcake Pan and baked the cake according to direction. One thing I would recommend is to bake the top separately from the bottom that way the top does not burn. After the cakes have cooled, place the bottom half upside down and then spread some frosting on top. Then place the top of the cupcake on top to create the mushroom shape. Frost the cake with whatever colors you want. You can make little mushrooms to by just making regular cupcakes. If you want some green grass for decoration just dye some coconut with green food coloring. Place gnomes on side of cake if you want or you don't have too. :) Enjoy:)

Pin It

Sunday, February 12, 2012

Chocolate Tunnel Angel Food Cake


Today I was going to make a pineapple angel food cake, that is until I turned the cake box over and saw a recipe for a Tuxedo Angel Food Cake. It looked so yummy that I decided to make that instead. The reason why I changed the name is because mine did not come out looking like theirs and instead mine looks like it has a chocolate tunnel going around it. Their recipe also called for making a frosting to drizzle on top, but I decided I did not need the extra calories. I wish I thought of this idea sooner because it is so tasty plus it is super easy to make. The only problem is I can't keep my hands off it.

Chocolate Tunnel Angel Food Cake

1 box angel food cake mix
3 Tbsp cocoa powder

Follow directions on the back of the angel food cake mix box. Pour half the batter into a tube pan. Add cocoa powder to remaining batter. Pour into pan on top of white batter. Bake according to directions on the back of the box. Cool and enjoy :)
Pin It

Tuesday, July 12, 2011

Chocolate Whoopie Pies


On Sunday while cutting my coupons out of the newspaper I came across a recipe for Chocolate Whoopie Pies. They looked so good I just had to try them. I followed the recipe given for the cakes, but when it came to the filling I did not have any marshmallow filling, so I used the filling recipe that my mom used when she made Whoopie Pies a while back. They came out very good. LinkI feel they actually taste better cold, but that is just my opinion. Well if you never had a Whoopie pie I would recommend you do. :)


Chocolate Whoopie Pies

Cakes:
1 2/3 cups all-purpose flour
2/3 cup cocoa powder
1 1/2 tsp baking soda
1/2 tsp salt
4 Tbsp butter softened
4 Tbsp vegetable shortening
1 cup packed brown sugar
1 egg
1 tsp vanilla extract
1 1/4 cups milk

Filling:
1 cup butter, softened
4 cups powdered sugar
1 tsp vanilla extract
2 Tbsp water

Preheat the oven to 375*F. Line baking sheets with parchment paper. Sift together flour, cocoa powder, baking soda, and salt. In a mixer, with a paddle attachment, beat butter, shortening, and brown sugar on low speed until combined. Increase speed to medium and beat for 3 minutes. Add egg and vanilla; beat 2 more minutes. Add half the flour mixture and half of the milk to the batter, beat on low. Add the rest of the flour mixture and milk. Using a spoon drop batter 1 Tbsp at a time onto the baking sheets, spacing 2 inches apart. Bake for 10 minutes, or until cakes spring back when gently touched. Remove from oven and transfer to cooling racks. While cooling prepare the filling. Add the butter, powder sugar, vanilla, and water to a mixer. Beat until smooth. Place filling on one of the cakes and then take another cake and place it on top making a sandwich. Repeat until all cakes are filled and enjoy. :)
Pin It

Wednesday, June 29, 2011

Red, White, and Blue Firecracker Cake


I dedicate this post to my mom. While talking on the phone with my mom yesterday, she told me about this firecracker cake recipe that she found on BettyCrocker.com. and she said that I should make it. Now if you were wondering why she wouldn't make it herself, it was because she doesn't like to eat anything blue. She will eat natural blue things like blueberries, but she will not eat things that are dyed blue. So instead of having the cake go unmade, I went ahead and made it since I don't have a problem with blue. Now if you don't have a problem with eating blue things and are looking for a cake to make for the Fourth of July, I would recommend this one because it was actually very easy to make. Enjoy :)


Red, White, and Blue Firecracker Cake

1 box Betty Crocker® SuperMoist® white cake mix
Water, vegetable oil and egg whites called for on cake mix box
Red food color
Blue food color
1 container (12 oz) Betty Crocker® Whipped fluffy white frosting

Heat oven to 325°F. Generously grease 12-cup fluted tube cake pan. Make cake batter as directed on box, using water, oil and egg whites. Pour 1 cup of the batter into small bowl; stir in red food color until well mixed. Pour another cup of the batter into separate bowl; stir in blue food color until well mixed. Pour red cake batter into bottom of pan. Carefully pour remaining white batter over red batter in pan. Carefully pour blue batter over white batter. (Blue batter does not need to cover white batter completely; it looks better if it just forms a ring in the center of the white batter.)

Bake as directed on box or until toothpick inserted near center comes out clean. Cool cake 5 minutes. Meanwhile, place cooling rack over cookie sheet. Turn pan upside down onto cooling rack. Cool cake completely, about 30 minutes.

When cake is cool, divide frosting evenly into 3 microwavable bowls. Microwave 1 bowl of frosting uncovered on High a few seconds until smooth enough to drizzle over cake. With spoon, drizzle all of white frosting back and forth around cake in a striping pattern. Repeat microwaving second bowl of frosting until smooth. Stir in a few drops blue food color until well blended. Drizzle over cake, scattering frosting back and forth. Repeat with remaining bowl of frosting and red food color, making sure red, white and blue frostings can be seen on cake. Let cake stand at room temperature until frosting is set before serving.

Pin It

Tuesday, June 28, 2011

Cougar Cake #2

I don't know what has come over me, but I think some kind of lazy bug bit me. For some reason I just could not get myself to make anything. I think it had more to do with the heat. The thought of turning the oven oven sounded miserable because it would just make the house hotter. Now I could just turn the AC on, but we are trying to hold out until it is hotter outside. We have given in a couple of times because we just couldn't take the heat especially when I had to make a cake for someone. Plus I didn't want the frosting to melt so I had to make sure it was cool in the house. Well this cougar cake is actually the second one I made. I made the first one a couple of years back for my friend's 30th birthday. The reason for the cougar cake is because her husband says that him and his friends always said that cougars were 30. Well the joke continued and now my friend's friend is getting a cougar cake for her 30th birthday. Now for some reason I lost the photo of the first cougar cake I made so it is not exactly the same, but it is pretty close. All I did was find an image of a cougar that I liked, but instead of transferring it with piping gel like I did last time, I actually drew the image of the cougar myself on to the cake. I was actually proud of myself because that was the first time I drew the image on my own with out having to do the whole transferring thing. Well that is how the finished product came out and I hope she likes her cake. :)

Pin It

Tuesday, May 17, 2011

Mario Kart DS Cake in Red


Here is my latest cake creation, which I am very proud of. As you can see it is a red Nintendo DS which has a game of Mario Kart in progress. This cake will be for my friend's son Jaxon's 6th birthday. Well one day me and Jaxon sat down and started talking about what kind of cake he wanted for his birthday. He told me he wanted to have a cake with Mario on it because he loves Mario and he loves the Super Mario Bros cake I made last year (which happens to be my top blog post of all time :) ) Well he also told me that he wanted a Nintendo DS for his birthday and that he loves playing Mario Kart. So I got the idea that I should make a cake that looks like a DS and have Mario Kart playing on it. Now I knew that the images were going to be a challenge to make, so I came up with the idea of laminating a couple of Mario Kart images to put on top of the cake. Plus if I laminate them it will give it that glossy look of the screen on a real DS. So I researched the web to find some photos, I cropped them down to the size I needed and then I laminated them. Then I baked a regular sized rectangle cake and frosted it red. I place the laminated images on the cake and frosted little buttons on the cake as well as the other details need to make it look like a DS. I even frosted the little touch screen stick on the side as a nice extra touch. And as you can see from the photos how it all came together in the end. I know Jaxon will love his cake and I can't wait to bring it to him. :)


Here is another image of the cake .

I added these on last minute becasue I forgot that there are buttons on the sides of the DS


I added the power switch and where the stick goes as well.


Pin It

Thursday, May 5, 2011

Jaylynn's Wedding Cake With Purple Hearts


This here is the first wedding cake that I have ever made. I have done wedding cupcakes and a bridal shower cake before, but never a wedding cake. So I was a little nervous at first. I made this cake for my friend and coworker Jaylynn's wedding. The cake is a chocolate cake with raspberry filling. She wanted a cake with white buttercream icing with purple hearts decorated on it, and this is how it came out looking in the end. So I hope she likes it and that she has a wonderful and beautiful wedding. Congratulations Jaylynn :)
Pin It

Saturday, April 30, 2011

Red Wine Bottle Cake


This here is my latest cake creation, which is a red wine bottle shaped cake. It is not as extravagant as other cakes I saw online, but it is the best that I could do. So let me talk a little about what I did. The reason I did the star tip design is because since I carved the two layer cake into a wine bottle shape, I didn't want to get crumbs in the frosting when spreading it. Therefore I did the star tip that way the crumbs would not go everywhere. The hardest thing about this cake was making the frosting a red wine color, which I was never able to do. Therefore it is more of a grape purple color. Now you cant really notice in the picture, but there is three shades of purple on the cake, however it was not intentional. Every time the frosting would get warm while piping, I would put it in the fridge to cool. When ready I would take it out and continue frosting the cake. Well I didn't notice until the next day that each time I did that the purple shade got darker and darker. Even with the little flaws I think the cake still came out great and I hope that Penny loves the cake. :)
Pin It

Monday, March 14, 2011

Brownie Ice Cream Cake

Happy Birthday To Me !!!!!! Yup, today was my birthday and I had a very great day. To celebrate Tomas and I went to the Fresno Chaffee Zoo and we had a blast. (I posted some of the pictures of the animals under the My Life section of my blog if you want to see them). Anyways for my birthday I wanted to make myself something special. I really did not want a cake, but I wanted something like a cake. Therefore I thought that instead of cake I will make brownies and turn it into an ice cream cake. It came out good, very rich, but very good. Since it was frozen it made it very difficult to cut, so I recommend defrosting it a bit before serving. Enjoy :)
Brownie Ice Cream Cake
2 brownie mixes (or prepare your favorite brownies)
Ice cream
Chocolate frosting
Prepare your brownies according to the package, but bake in two round greased cake pans. Bake 40 minutes or until toothpick inserted in the center comes out clean. Remove from the oven and let the brownies cool completely. When cool remove the ice cream from freezer and set on the counter to soften. once soft enough to handle, spread the ice cream on to one of the brownie layers. Place the second layer on top of the ice cream and then place the brownie layers back into the freezer to set. When set, remove fro the freezer and frost the cake. When ready to eat, defrost for a little while then cut and serve.

Pin It

Sunday, February 27, 2011

3D Hello Kitty Cake


Saturday was my friend's daughter Jillian's 4th birthday party. So this year she wanted me to make her a Hello Kitty cake for her birthday. Since I have already made a Hello Kitty cake once before I decided that I wanted to challenge myself and have her sitting up this time instead of laying flat. To make this challenge easier, I went and bought the 3D teddy bear pan put out by Wilton, but instead of frosting it to look like a bear I frosted it to look like Hello Kitty. For her whiskers I used some black plastic string because I couldn't find any black licorice rope, but I didn't look at too many places for the licorice in the first place :) For the words and border around the cake I used edible pearl sprinkles in pink and white. The pearls were very time consuming because I placed each one on the cake individually. Because I used the pearls for the words, they ended up a little off centered, but because they took a while to place on the cake I didn't want to spend more time fixing it. I don't think Jillian cared or even noticed that the words were off centered, all she cared about was that she got a cake with Hello Kitty on it just like she wanted.


Here is a close up of the pearl detail.


Pin It

Monday, January 31, 2011

Giant Toasted Coconut Donut Cake


While looking through a sales ad one day I came across an ad for a giant 3D donut pan. I just had to have it so I rushed to the store to buy it. Unfortunately when I got there they had none left in stock, so I became very sad. Well for Christmas I got lucky because my family found one and bought it for me. And it took me until now to finally put it to good use. I figured the best way to try it out would be to make a giant toasted coconut donut cake. Now to be honest I didn't eat any of it because I don't really care for cake much, but I am assuming it was good because the plate was cleaned in no time. To make it I didn't do anything special. All I did was prepare a cake mix and bake it in the donut pan. When done I stacked the two layers together to make the donut. I then took a can of vanilla frosting and placed it in the microwave for no more than 15 seconds. I then took that frosting and pored it over the top of the donut cake. I then took about 1 cup sweetened coconut and placed it on a cookie sheet and toasted it under the broiler until the coconut was a nice golden brown. I then sprinkled that coconut on top of the frosting. And Viola I had a giant toasted coconut donut cake. If you don't have a donut pan then you can do this cake with any pan you desire. If you do make this cake or any cake then I hope you enjoy it. :)
Pin It

Thursday, December 2, 2010

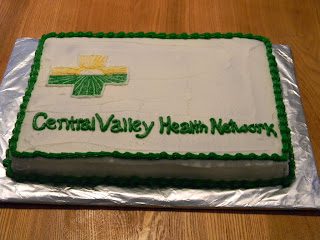
Central Valley Health Network Cake


This here is my latest cake. It is not something easily recognized because it is the logo to my friends company. About a week ago my friend sent me a picture of their logo and asked if it would be possible to put it on a cake, I told her it would be no problem at all. It actually looked easier then what it was. It was the logo I had issues with because I I was never satisfied with the orange color. In the end it worked out just fine and she liked it. Lets just hope her job liked it too. :)
Pin It

Saturday, November 27, 2010

Turtle Cake


I hope everyone had a great Thanksgiving, I know I did. I went home to Atwater and spent time with my family. Unfortunately I could only stay for the day because I had to work the next day at 6:30 in the morning. Well anyways did you know that there was another day worth celebrating on Thanksgiving? The 26th of November was also national cake day, So to celebrate I made a turtle cake. It was actually a death by chocolate cake, but I made a turtle topping and poured it on top. Everything came out great and tasted wonderful. However there was one problem with my caramel sauce; it was a little on the thin side. But it turned out to not be a bad thing because it just soaked into the cake making the cake have a moist caramely top. Well I hope you get to enjoy this cake and I hope you had a wonderful Thanksgiving and ate lots of great food. :)
Turtle Cake
Death by chocolate cake
4 eggs
1 cup sour cream
1/2 cup water
1/2 cup oil
1 package chocolate cake mix
1 package instant pudding mix
12 oz package semi-sweet chocolate chips
Caramel Turtle Topping
25 caramel squares unwrapped
2 Tbsp milk
2Tbsp butter
1/2 cup chopped pecans
1/2 cup chocolate chips
Preheat the oven to 350*F. Beat together the sour cream, water, and oil in a large bowl. Add the cake mix and pudding mix. Beat until smooth. Stir in the chocolate chips. Pour into greased bundt pan and bake for 1 hour. Remove from oven and let cool on a wire rack.
Next prepare the topping. Melt the caramels, milk and butter in the microwave for a minute and a half. Make sure to stir every 30 seconds. Cook until melted. Place the cake on a plate and pour the caramel on the top of the cake. Next sprinkle the pecans and the chocolate chips on top. Serve and enjoy :)


Pin It

Sunday, November 14, 2010

Cherry Blossom Cake

Guess what? I made another cake. I have been making cakes like crazy lately, but I don't mind one bit because I absolutely love it. It is also great practice. I made this cake the other night for my friend Amie. It was her birthday and they invited me and Tomas to come over for some drinks. I didn't want to show up empty handed so I hurried up and put together a cake for her. While making it I was saying that I felt like I was partaking in one of those cake challenges because I had this cake finished in less than 20 minutes (not including baking time though). What made this cake a little easier is I made the cherry blossoms a few days back, so all I had to do was pop them on. One special thing about this cake, for me at least, is that it was one of the first times I used fondant. I tried using it years ago, but I had no idea what I was doing, therefore the cake suffered a little. However, this cake came out cute, it has a few mistakes (such as it being a little short and the branches are a little too thick) but hey I'm learning. :)
Pin It
Related Posts with Thumbnails