Showing posts with label Other Creations (non food). Show all posts

Friday, September 13, 2013

Quick Pink Monkey Diaper Cake


This post is a little over due. I made this diaper cake for my sisters baby shower that was in May and now its September. I don't know why I didn't post it sooner, but at least I'm sharing it now. I made this diaper cake as a surprise for my sister and put it as a centerpiece on her gift table. It was a fun and cute way for me to give her some diapers as a gift, along with the many other gifts I gave her. 

It is actually very easy to make the diaper cake and took no time at all to assemble. I will try my best to describe what I did to make it. I have some pictures that show the assembly, but I don't have photos of some of the steps because the cake require both my hands and I had no one home to take pictures of me making it. Good luck when you make your diaper cake and I hope whoever you give it to loves it as much as my sister did :)

Supplies Needed

About 100 diapers (preferably with minimal to no pattern)
A paper towel roll
About 6 rubber bands
Wide pink ribbon
Another size pink ribbon (smaller than the other)
Pink shredded gift basket paper
Hot Glue
3 different sized cake pans
A cute stuffed animal for the top


This is what the layer looks like put together with the rubber bands 

Building the layers
 
Start placing the diapers in the cake pan in a fan like motion going around one of the cake pans with the top of the diaper on the inside and the bottom going around the edge. Keep filling with the diapers until you cant put anymore. Slide 2 rubber bands onto the diapers. Set aside until you make the other two cake layers.

To put the pieces together

Start with the biggest layer on the bottom. Place a paper towel roll in the center of the cake. Next take the medium sized cake and slide through the middle down to the top of the big layer. Next slide the small layer down the paper towel roll. Now with the cake assembled you can decorate it.


 Here is how it looks with the paper towel roll in the center

Here is how it looks putting the top layer on.


Now to make the cake pretty

 Cut and wrap the biggest sized ribbon around the cake. Piece the edges of the ribbon together with some hot glue. Now take the smaller ribbon and wrap that around the wider ribbon and press shut with some more hot glue. For an extra touch make a few bows and glue them to the ribbon on the cake. Now start stuffing some of the shredded gift basket paper into the diapers of the cake. Finish by placing the stuffed animal on top. Now you are ready to give your gift to someone special. :)

Here is how it looks with the ribbons and the process of stuffing the shredded paper into the diapers.


Here is another look at the finished product.
Pin It

Thursday, September 5, 2013

Photo Tile Coasters


I wanted to make something special for my friend Beth's birthday. So I decided that I would make her some photo coasters of her and her daughter Jasey. A long time ago I saw the pin on Pinterest on how to make them so I pinned it for future use. They were actually very easy to make, but you do have to have time and patience because of the dry time between coats of Mod Podge and the spray acrylic adhesive. 

The hardest thing about making these coasters is picking the pictures you want to use. I went onto Beth's Facebook and began picking what pictures I wanted to use. I chose 10 that I liked the most and because I wanted the coasters to be black and white, I transferred the color photos to black and white for the coasters. After picking up the photos at the store I then chose the best 6 that fit onto the tile best. 

The finished tiles turned out great. I wrapped them with a cute bow and box and gave them to Beth. She absolutely loved her coasters. I also made her some Starbucks Frappuccino Cupcakes for her birthday as well, which she also loved. Whether you make these coasters for yourself or for a gift, you or your friend will absolutely love them.  


Photo Tile Coaster Supplies

6 white ceramic tiles 
6 photos 
Glossy Mod Podge
Clear Acrylic Adhesive ( I used the one put out by Plaid)
Black Felt
Hot Glue
Acrylic Paint
Paint Brush 
Sponge Applicator

First paint the edges of your tiles with the color of your choice, I chose black to make the photos stand out. After the edges are dry cut the photos down to the size of the tiles. Apply some Mod Podge to the back of the photos and place onto the tile. After they are dry apply a layer of Mod Podge on the top of the photo and tile then allow to dry. Apply a coat of Mod Podge 2 more times allowing time to dry between each coat. Now it is time to spray the acrylic adhesive. I did this outside, since it was very hot outside I brought them inside to dry because they were not drying outside, instead mine were just getting stickier. Before spraying the adhesive lay down some newspaper then wax paper on top of that. Now you can begin spraying. Do at least 5 coats allowing dry time between each. When I brought mine in the house to dry I would slide the wax paper with the tiles onto a cookie sheet and transport them that way. If the weather is nice then you can leave them outside to dry. After the 5 coats and they are dry, it is time to put the felt backing on them so they won't scratch your surfaces.  Cut the felt (I used black) to fit the tiles. Use hot glue to apply felt. Now you have a set of beautiful coasters to enjoy.  :)

I pin I found on Pinterest on how to make these came from TheFrugalGirls.Com

Here is how I presented the coasters to Beth :)

 This is the Picture Beth took of the Photo Tile Coasters and the Starbucks Frappuccino Cupcakes I made her for her Birthday :)
Pin It

Thursday, February 14, 2013

DIY $2 Perfume Plate


I wanted something pretty to display my perfumes on in my bathroom. Well the idea came to me while browsing on Pinterest when I came across a bunch of links showing how to make a desert plate from just a small plate and a candle stick. Some people painted theirs but I decided to keep mine plain and simple. So I went to the Dollar Tree and bought 1 glass desert plate and 1 glass candle stick. I went home and right away I made my plate. I was so happy with the finished product I decided I wanted to make another to put Tomas colognes on. This plate stand was so easy to make I know I will be making more again for parties and as gifts. :)


Perfume/ Desert Plate

1 glass plate
1 glass candle stick
Aleene's Glass and Bead Glue

Gently squeeze some glass and bead glue around the top of the candle stick where the plate is going to go (the reason you want to use this glue is because it dries clear and has a strong bond). Place the plate on top of the candle stick, but make sure it is centered while doing it. Next set it in a place to dry and set before using. After its dried, enjoy your plate stand however you choose :)


Here is how cute it looks with a few cupcakes on top :)
Pin It

Saturday, September 8, 2012

Nurse Bait


A few months back I came across this cute and clever gift idea on Pinterest for people who are in the hospital. This cute gift that I am talking about is called Nurse Bait. At the time I found this idea I had no one to give it to, but recently I have had 2 important people in my life to give it to, my Grandma and my friend Bethany. When it came to the one for my Grandma I used a lot of good hard candies because it had to be sent by mail. For Bethany's I used chocolates and some fruity candies since I was able to deliver it myself. Bethany and her Mom really loved this gift. Most importantly Bethany said it was a hit with the nurses, which let me know it served its purpose :)

Now I do not know who came up with this clever idea was or who wrote the poem. The Pin that I saw on Pinterest was just a picture with no link to follow. I wish I was creative enough to come up with this idea, but I didn't someone else did first and who ever did was very clever because this is a perfect gift to give someone in the hospital, that way they will get a little more needed attention from the nurses :)


Here is the close up of the Poem that I printed out and included with the gift.

This is how we placed it on the small table in the room for the nurses to see. Every time they came to check on Bethany we would point out the basket and ask if they would like a piece of chocolate :)
Pin It

Thursday, August 2, 2012

Elephant Baby Mobile


 In my previous post on Bethany's Baby Shower Gifts I gave a sneak peak of the baby mobile I made her. Well after a long wait, here it is. Before I get into detail on how to make it, let me start of by telling you how we came up with the idea. It all started with Pinterest. I was browsing through pins when all of a sudden this cute elephant baby mobile popped up. I clicked on it thinking there would be instructions on how to make it, but instead it took me to someones Etsy account that sells them. Well knowing that Bethany was having an elephant theme as well as the colors grey, coral, and peach I took a picture of the mobile and sent it to her. She text me back right away saying that it was exactly what she wanted. That is when I told her that it cost a lot, but I think I could recreate it for very little. So I went and bought all the materials which cost me under $10 and got started making the mobile. At first I almost gave up because the original one was made of wood on the top, but that was to difficult for me because I didn't have the necessary tools. That is when I came up with the idea of buying a metal ring at Joann's and wrap it in ribbon. After hours and hours of making the elephants it was finally time to put it together. To tell you the truth I had no clue what I was doing, but some how it all worked out in the end and Bethany loved it and I hope Jasey does too.

Below I will give the instructions on how to make the elephant mobile the best way I can. If you have any questions let me know and I will be happy to help. I have included a few photos showing the process on making the elephants.


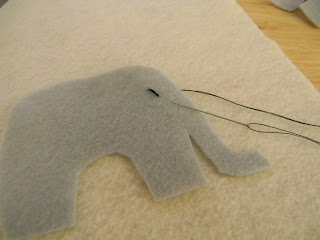
1) Use an elephant template to cut the elephants out of the felt

2) Cut out ears from the felt.

3) Sew on an eye on all of the elephants.

4) Next sew on the ears.

5) Now sew the two elephants together and stuff them as you go before closing them up.

Materials Needed

Felt in at least two different colors
Matching thread
Pillow stuffing
Buttons
Clear fishing line
Metal ring
Ribbon
1 small ring or key chain ring
Hot Glue
 First start off by sketching out an elephant on a piece of paper and cut it out. Then use that paper as a template to cut out elephants from the felt. I wanted to have 7 elephants, 4 in gray and 3 in cream, so I had to cut out 14 of them. Do the same for the ears 14 total. Next sew on black eyes on all the elephants keeping in mind that you sew the eyes on have of them on the opposite side (refer to image 3 and 4). Next sew on the ears in the color that is not the same color as the elephant. Now its time to sew the elephants together. While sewing together make sure you stuff the elephant as you go before closing it up. Next glue a couple of buttons on to the elephants. Besides elephants I also did felt hearts on the mobile. When it came to the hearts I kept it simple. There was no sewing involved, instead I glued two hearts together on the fishing line. I would suggest not doing the hearts until after the elephants are connected to the line first.

Now it is time for the assembly part. I really did not know what I was doing on the assembly, I would just try things until it worked. To attach the fishing line to the elephants I took the line and tied it in a knot a couple of times around a stitch on the top of the elephant. Next I would glue the hearts to the line. Repeat this steps until all your elephants and hearts are all connected to fishing line. The next thing I did was tie the eight strands of elephants at different levels onto the metal hoop and put a drop of hot glue on the spot I wanted the strand to stay. Then I took the ribbon and wrapped it around the hoop until completely covered. Then I cut out 8 strands of ribbon and glued them over a small metal ring one by one. Then the last thing to do is glue the ribbons one at a time to the hoop where each of the strands of elephants hang.

If you decided to make this mobile for yourself I wish you luck. I tried my best to describe how I made it and hopefully it makes some since. I would suggest looking at the photos when possible in hopes that it will help make since of things. If you  do decided to make the mobile you will be happy with your finished product :)  

Here is a close up of the one of the elephants hanging on the strand with the hearts.

Here is a close up of the top of the mobile. You will also see I made a moon at the top. To make the moon do the same thing as the elephants and stuff the two pieces of felt.

And here is one last look at the mobile hanging from my ceiling :)
Pin It

Sunday, July 8, 2012

Bethany's Baby Shower Gifts

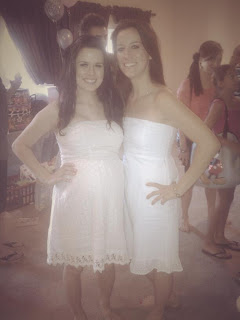
 Beth and I at her baby shower.

About a month ago was my friend Bethany's baby shower. Now I already showed you the cake I made as well as the blanket I knitted for her. Now I am going to show you the card I made, how I packaged the gift, and the onesie I made for the decorating contest. At the end of the post I will also be giving you a sneak peak of my next post of the baby mobile I just made.  


Usually when I go to someones party I always end up giving them a card that someone else gives them as well (I guess that's what happens when everyone shops at Target). Well I wanted to give Bethany a card that no one else would be giving her, so i decided I would make her a card. I decided that it had to have an elephant on it, since that was part of her theme. After looking online to get ideas I decided that I wanted to make an Origami elephant to put on the card. Now in order to make the Origami elephant I had to YouTube it and constantly pause the video to make sure I was making it right. Next I cut out the size card I wanted from some peachy color card stock paper. Then I cut out a cream rectangle card stock and glued it on the bottom. Next I took some ribbon from my stash and glued it on the cream piece of card stock. Next came gluing the elephant on. Because I used a thick piece of paper I had to use some hot glue to glue the legs close as well as other parts. To finish the card I wrote the baby's name on the front and wrote my message on the inside. I was happy to give Bethany my one of a kind card, especially since I knew no one else would be giving her the same card.  :) 


When it comes to gifts I like to make them as gift baskets whenever possible. Since I was doing a gift basket I needed a basket big enough to fit the blanket I knitted. So I went to the best place possible to buy the basket, work. If you didn't know already I work at HomeGoods. While at work one day I found the grey basket which worked out perfectly. The pink hat, dog bath towel, and the pink elephant frame, which I put Jasey's pic in, all came from HomeGoods as well. As a filler I got some baby lotion and baby wash to put in the basket. After arranging where i wanted the items I put some tissue in the holes and then it was time to wrap it up.


To wrap, I bought some clear cellophane and wrapped up the gift. To tie the top I took some ribbons from my stash and tied it shut with the card attached (which I had to punch a hole in). 


Bethany decided that she wanted to have a decorated onesie contest. So I decided to incorporate some of the things on her shower invitation. First, I found a polka dot onesie at Old Navy. Then I decided that the onesie needed pearls. I found a strand of half pearls and cut them into three strands and used jewel fabric glue to glue to pearls to the onesie to look like a necklace. Next came the tu-tu. I bought 2 yards of pink tulle and cream ribbon. I cut out a piece of ribbon that would be long enough to tie to the baby and then cut out strips of tulle and ribbon and tied them to the long ribbon. I kept going until the tu-tu was full.  


Here is a close up on the bear wearing the tu-tu.


Here is a sneak peak of my next post to come. It is of the baby mobile I made for Bethany's Baby Jasey. :)
Pin It

Friday, May 4, 2012

Beer Can Earrings, Bracelet and Flower Hair Pin


Just recently I was invited to a White Trash Party and I didn't know what I was going to wear. After searching online for outfit ideas and not finding anything I liked, I decided that I should make my accessories out of beer cans. Also with making my jewelry from beer cans I wouldn't have to spend that much money and Tomas would have beer to drink. On the day before the party I came home with a 12 pack of Coors Light and told Tomas to start drinking, which he was happy to do. After he drank a few I got to cutting. When it came to the hair pin I got the idea from a website, but I don't remember what site I found it on. The earrings and bracelet I came up with as I went. The fun thing about this jewelry is you can use any beer can or soda can you want. Just be careful when cutting the cans making sure you don't cut yourself. The first thing you need to do for any of these accessories is cutting the can. Puncture a hole right above the bottom of the can. Then cut the bottom off. Cut up the can towards the top and cut the top off, leaving you a flat piece to work with. I recommend cutting the can in the back that way you don't ruin the logo. Next its time to decide which accessory you want to make first.

If my instructions don't make any sense feel free to write me and I will get back to you as soon as possible.


Coors Bracelet 

1 Beer Can
1 Bangle Bracelet
Craft glue
Glitter
 
After cutting the can, like I mentioned above, cut the Coors logo out. I left the centers of the C and O's intact, you can cut them out if you want but if you cover it in glitter then it is not necessary to cut those centers out. Next glue the logo from the can to the bracelet. Depending on the size of the bracelet, the can might not lay flat or hang over the edge. On my bracelet the C went above the bracelet a little, but I was fine with it. Now its time to cover the bracelet in glitter. First do the black, then the red, then finish with the white. If you can has other colors do what you want first, but if it has white I recommend doing the white last, that way the other colors do not mix in it. Let dry then enjoy.


Beer Can Flower Hair Pin

2 beer cans (if you want the logo)
1 Rhinestone 
Craft Glue
Bobby Pin
Stapler 

After cutting the can, like I mentioned earlier, cut a small flower out of the logo. The cut another flower out a little bit bigger. For the third flower you can use the second can or the same can and make the third flower bigger then the second. Cut the fourth flower bigger than the third (refer to the photo below to see the different sizes). Now glue the flowers together one at a time. Now using the stapler staple center of the flower twice with the flat side of the staple on the bottom of the flower and the two bump side of the staple on the pretty side of the flower. Doing this will hold your bobby pin in place. After stapling it glue the rhinestone in the center of the flower. Let the flower dry then slip the bobby pin through the staples. Now you are ready to put it in your hair.

Here is what the flowers look like before gluing them together.


Beer Can Earrings

1 Beer can
8 Beer tabs 
2 earrings
Chain
28 small jump rings
Blade
Pliers
Glitter


The earring are harder than the other two to make, but they are not impossible to do.
Using the scrap beer cans from the above products or one beer can cut like I explain above, cut cut 12 circles from the beer cans logo. I also cut two of the mountains on the cans but bot depending on what can you may or may not have a small logo you can cut out and use. If there is nothing that you can use then cut a shape out or another circle. Next cover one side of a beer tab in glue and glitter after it dries do the other side of the tab in glue and glitter. Next I cut the chain giving it about 13 links. Hook the chain using a jump ring to the earring. Next you need to make small holes in all the can pieces. I used a pointed blade and just turned it back and forth until a big enough hole was formed for the jump ring (As shown in the first image below). Using pliers open the jump ring and slide the can through (As shown in the second image below). Now starting from the bottom hook on the mountain shaped piece of can with the jump ring to the chain. Using the pliers close the jump ring. Next hook on a circle piece of can to the next link. Then hook another circle piece the the next link. Now hook on the first glittered tab to the next link. Continue the pattern until you reach the top of the earrings. Enjoy.


Move the blade back and forth to make a small hole.

Open the jump ring with pliers and slide on the piece of can.

And here is me fashioning my beer can jewelry at the White Trash Party :)

Pin It

Tuesday, February 7, 2012

Rose Petal Wreath


Lately I have been spending a lot of time on Pinterest. I lose track of time as I look at the pages of things I can make. Well one of the things I see a lot of is wreaths. So it got me to thinking that I should make a wreath for every holiday and special occasions. To start things off I decided to make a wreath for Valentines Day. The wreath I decided to do was one with rose petals. I saw one similar on Pinterest where they used pins to hold the petals in place. I didn't want to see the pins so I just glued them on individually. I took me a while to find the rose petals I liked, but I found the perfect ones at Hobby Lobby. Their roses petals had four different types of petals per box. It took no time at all to make this wreath and the final product came out great. Now I need to start thinking about the wreath I will be making for St Patrick's Day.


These are the supplies you need. Foam wreath (one that won't melt when the glue touches it), red rose petals, and a hot glue gun.

To make the wreath just put a dab of glue on a petal and place on the wreath. Repeat until wreath is completely covered. While gluing in down don't glue them in a straight row, instead have them going different ways. Glue a ribbon to the back and tie to your door. Enjoy.


Happy Valentine's Day <3
Pin It

Thursday, January 26, 2012

Pearl Stitch Markers


I fell in love with knitting over these past few months. I love it so much that now I find myself knitting every chance I get. As I started to do more things with knitting I learned that I needed to buy things like stitch markers, which I did and all they were was solid color rings in different sizes. Well one day my mom gave me a couple of stitch markers that she made for me, they were so pretty that they got me to thinking that I should make more pretty stitch markers. So I pulled down my bead collection and got to brainstorming on how I wanted them to look. After I made 5 for myself I decided that this would be a cute gift idea for my mom and friends that knit. They all loved their stitch markers and they look so pretty on the knitting needles. Making stitch markers is so easy to do, I will definitely make some more really soon.


These are the supplies needed.
Beads, rings, head pins, pliers, and wire cutters.


Slide beads onto the head pin, making sure the hole of the first bead is not bigger then the end of the head pin or it will fall off. Next slide the ring onto the head pin leaving a little space in between the beads and the rings. Using the pliers bend the wire down under the ring and cross over the wire causing it to hold the ring in place so it doesn't slip off. Next take the wire cutters and snip off the extra wire. If necessary use the pliers to wrap the excess wire around the wire under the ring. Now you have yourself your own homemade stitch markers. Hopefully you can follow along with the directions I gave on how to make stitch markers. If needed feel free to ask any questions you may have.


To give these as a gift tie the markers onto a piece of scrap yarn and tie a nice bow.
Pin It

Monday, January 9, 2012

My First Knitted Scarf


It has been way too long since my last post. There were a lot of thing going on in my life to the point I had no time to do any blogging. One of the reasons why I have not had any time was because of my recent obsession with knitting. I started knitting at the end of September, and since then I have made a lot of nice things for myself as well as for others. The red scarf above was the very first scarf that I ever made. It is just a basic garter stitch on a size 15 knitting needles. I can't remember what kind of yarn it was, but I can say it is thick and soft. This scarf took me no time at all to make and I was very proud of myself for being able to make it. Now I have made much nicer scarfs, but I was always be proud of the first one I ever made.
Pin It

Monday, April 11, 2011

Sea Shell Wind Chime


Today I will be doing a post on something other than food. Just recently I made a sea shell wind chime out of some shells that I have collected over the years. Some of the shells I found at various beaches and I bought the more exotic ones at the store. Well i would always see sea shell wind chimes come in to the store I work at. I always thought they were nice, but I didn't want to pay a lot for something like that, especially if I could make it myself. And it turns out that is was actually very easy to make. The one thing that took a lot of time was drilling all the holes in each of the shells, but once you get past that step it takes no time at all to make it. After it is all put together you end up with a one of a kind custom made sea shell wind chime, which sounds very pretty when a breeze goes by. Now if my directions make no sense at all then I apologize. I tried to describe it the best way I could. If anyone ever has any questions on this or anything else I ever make feel free to ask away. Enjoy


Sea Shell Wind Chime


Various sea shells

Transparent plastic string/fishing line

Clear sea beads

1 wooden circle plaque

1 key ring


Drill holes in the tops of all the shells. Also drill a hole in the middle of the wooden plaque as well as three holes evenly around the edge. Cut a long piece of string and tie a knot at the end around a sea bead. String a shell on to the strand letting it rest on the bead. Leave about a 1-inch space from the shell and tie another knot on the string with a bead and the string down the next bead. Repeat until you have all four strands made. End each strand with a knotted sea bead to help support the wood plaque. String the strands through the wooden plaque and then tie all the strands around a key ring. Cut off excess stings and then hang it up some where nice.


Pin It

Friday, August 27, 2010

Custom Size Polo Shirt

This is a picture of the finished product
A couple years ago one of my friends gave me this Polo dress and ever since it has been sitting in my closet. I never liked how it looked on me and I didn't want to get rid of it because I thought that maybe one day I will change my mind and like it. A few days ago I was cleaning out my closet getting rid of the clothes I don't wear and I came across the dress again. So I tried it on, but unfortunately I still didn't like how it looked. Then I got the idea that I should turn it into a Polo shirt. So I pulled out my sewing machine and good scissors and cut the dress down and got to work. The shirt came out great. I am so proud of myself because you can't really tell that I did anything to the shirt. It looks like I bought the shirt that way. I am so happy because now I have a new shirt that I like. :)


Here is the dress before I messed with it. It looks exactly the same besides the fact that the dress is longer.
Pin It
Related Posts with Thumbnails