Thursday, September 5, 2013

Photo Tile Coasters


I wanted to make something special for my friend Beth's birthday. So I decided that I would make her some photo coasters of her and her daughter Jasey. A long time ago I saw the pin on Pinterest on how to make them so I pinned it for future use. They were actually very easy to make, but you do have to have time and patience because of the dry time between coats of Mod Podge and the spray acrylic adhesive. 

The hardest thing about making these coasters is picking the pictures you want to use. I went onto Beth's Facebook and began picking what pictures I wanted to use. I chose 10 that I liked the most and because I wanted the coasters to be black and white, I transferred the color photos to black and white for the coasters. After picking up the photos at the store I then chose the best 6 that fit onto the tile best. 

The finished tiles turned out great. I wrapped them with a cute bow and box and gave them to Beth. She absolutely loved her coasters. I also made her some Starbucks Frappuccino Cupcakes for her birthday as well, which she also loved. Whether you make these coasters for yourself or for a gift, you or your friend will absolutely love them.  


Photo Tile Coaster Supplies

6 white ceramic tiles 
6 photos 
Glossy Mod Podge
Clear Acrylic Adhesive ( I used the one put out by Plaid)
Black Felt
Hot Glue
Acrylic Paint
Paint Brush 
Sponge Applicator

First paint the edges of your tiles with the color of your choice, I chose black to make the photos stand out. After the edges are dry cut the photos down to the size of the tiles. Apply some Mod Podge to the back of the photos and place onto the tile. After they are dry apply a layer of Mod Podge on the top of the photo and tile then allow to dry. Apply a coat of Mod Podge 2 more times allowing time to dry between each coat. Now it is time to spray the acrylic adhesive. I did this outside, since it was very hot outside I brought them inside to dry because they were not drying outside, instead mine were just getting stickier. Before spraying the adhesive lay down some newspaper then wax paper on top of that. Now you can begin spraying. Do at least 5 coats allowing dry time between each. When I brought mine in the house to dry I would slide the wax paper with the tiles onto a cookie sheet and transport them that way. If the weather is nice then you can leave them outside to dry. After the 5 coats and they are dry, it is time to put the felt backing on them so they won't scratch your surfaces.  Cut the felt (I used black) to fit the tiles. Use hot glue to apply felt. Now you have a set of beautiful coasters to enjoy.  :)

I pin I found on Pinterest on how to make these came from TheFrugalGirls.Com

Here is how I presented the coasters to Beth :)

 This is the Picture Beth took of the Photo Tile Coasters and the Starbucks Frappuccino Cupcakes I made her for her Birthday :)
Pin It

Wednesday, July 10, 2013

Strawberry Butter


Last month Tomas and I went to dinner at Sweet Tomatoes. One of the things we always have there is the sourdough bread and butter. Well this time there was a new butter to choose from, it was strawberry butter. It was so good that I wanted to take some home with me so I can have it for breakfast on a bagel. I didn't take any home with me, however I started researching the web and I found a recipe by Martha Stewart. The recipe is very easy to make and taste very yummy. My strawberries are a little more chunky then they should be, but that's ok, because once the butter starts melting on my warm toasted bagel I am left with chunks of strawberries on top of my bagel. Enjoy :)


Strawberry Butter

1 cup (2 sticks butter)
1/4 cup powdered sugar
1/4 teaspoon salt (if butter is salted then don't add)
1/2 cup coarsely chopped fresh strawberries (I think I did 3/4 cup:)

Beat the butter, powdered sugar and salt (if needed) into an electric mixer for about one minute. Add the strawberries and beat until combined. Chill until ready to serve.
Pin It

Friday, July 5, 2013

Baby Monkey Cake Pops


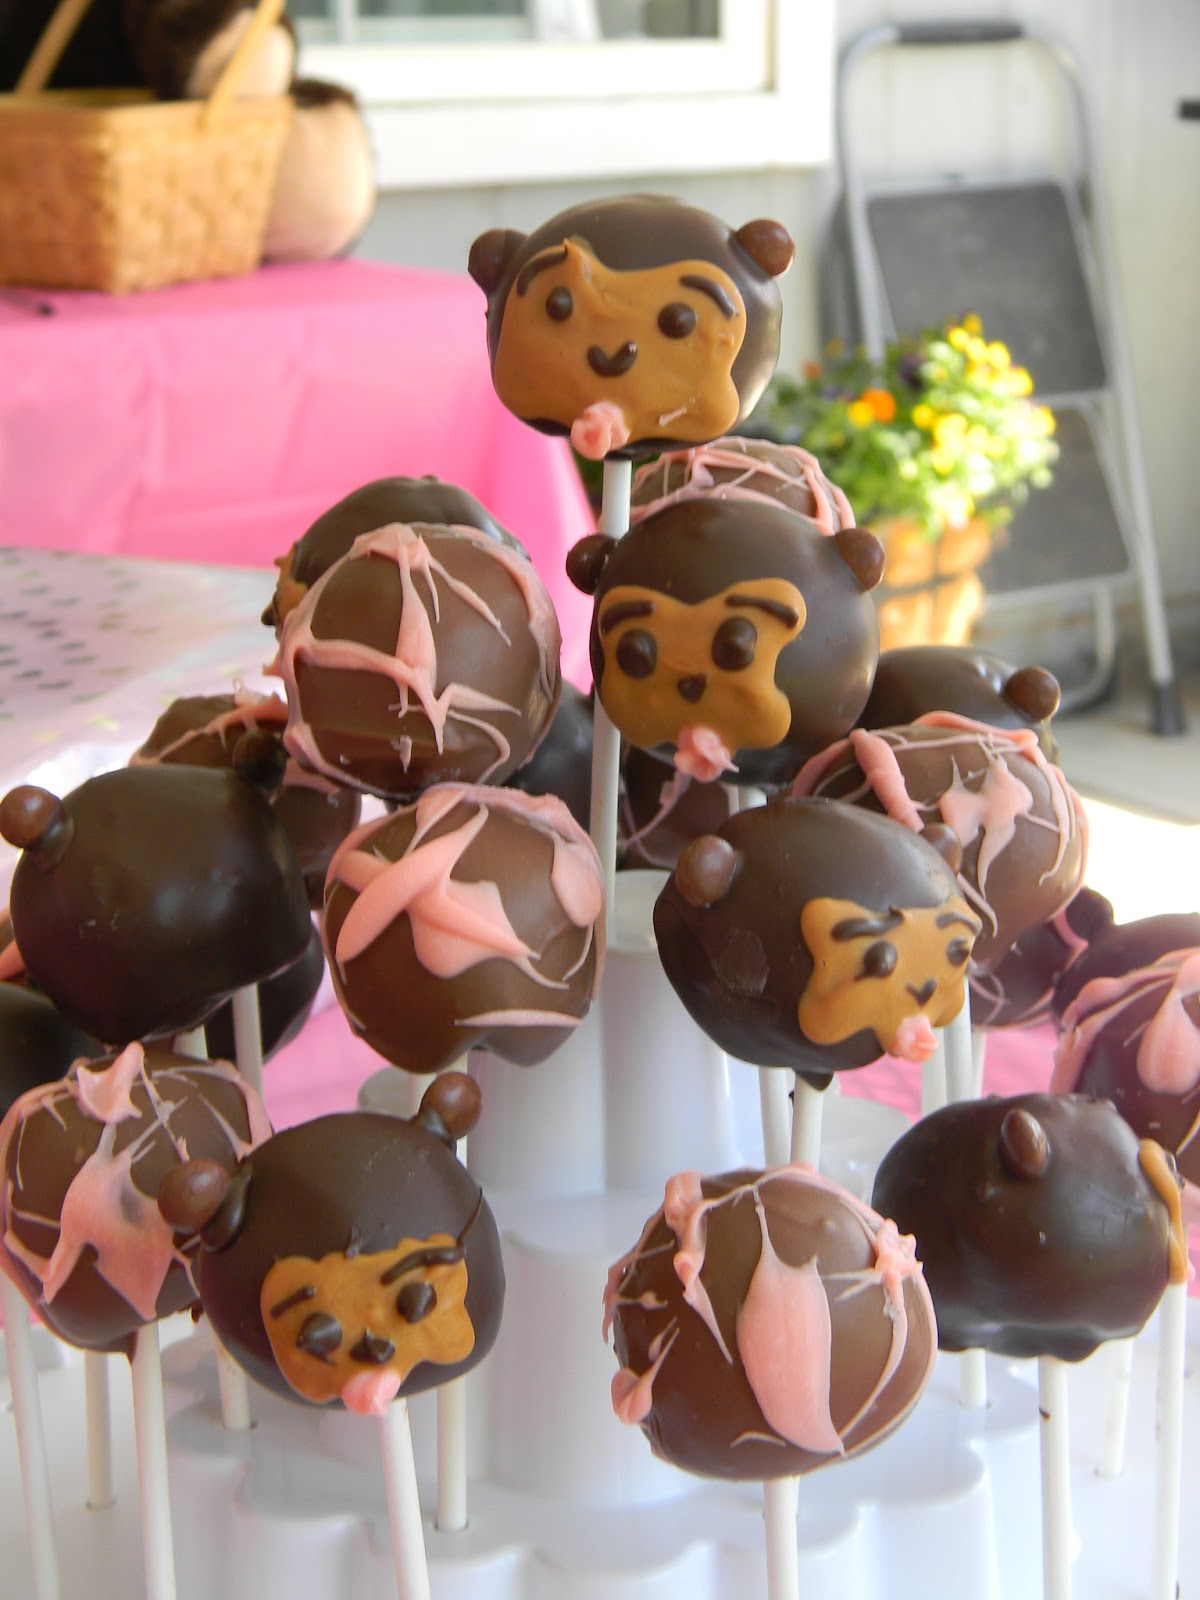
A lot has happened since the last time I was able to post something, one of those things being that my lil sis just had a baby girl named Marley. She is just so precious and all I want to do is buy and make things for her (which I will soon share some of the things I made for her). Before Marley arrived we threw my sister a monkey themed baby shower. I wanted to make a special extra treat so I made monkey cake pops. However, since they were a bit challenging and time consuming I only made 12 and I just splattered pink chocolate on the other 12. My cake truffles were very moist and since it is warm this time of year my cake pops didn't want to stay on the stick. After a lot of patience I was able to make it through making the 12 monkey pops. Everyone at the party loved them and thought they were cute.


To make the cake pops I used the same recipe I used to make my cake truffles, but if you decided to use the same recipe I suggest a lot of refrigeration. Since I was trying to get them done in a hurry they would hold on the stick. So I recommend placing them back in the fridge after you place the stick in them. Then after you finish decorating refrigerate again until ready to use.


To decorate  you will need 3 bags of melting chips (1 dark chocolate, 1 peanut butter flavor, and 1 pink) You will also need mini brown M&M's. First dip the cake pop into the dark chocolate. Before the chocolate dries place 2 brown M&M's on the sides as ears. Next take the peanut butter Melting chips and melt into a piping bag. Draw the shape of the face onto the front of the pop. Next take The melted dark chocolate and draw on a face. Next take the pink chocolate and make a circle and make a loop for the pacifier in the mouth area. Repeat for as many cake pops you want to make and enjoy.

Look at all those cute monkeys.
Pin It

Friday, March 29, 2013

Easter Egg Wreath


Last year I wanted to make a wreath for Easter, but I became too busy to make one. So when it came to Easter this year I made sure that I gave myself the time to make one for my front door. I kept it really simple that way anyone can make it. I also wanted to make it affordable so I tried to be resourceful by using a pool noodle to make the wreath form and I used ribbon I had in my stash. I found the eggs at the Dollar Tree so that helped in saving money also. The yarn to make the grass was the most expensive thing, but luckily they were on sale. I love making wreaths especially if I can do them with out spending too much. I have a couple more to share soon, but one is a surprise for someone so I wont be able to share for a while ;)  


Supplies Needed

1 pool noodle (cut down to size preferred, I cut about 6in off)
2 skeins Lion Brand Fun Fur Yarn
2 packages foam sparkly eggs (or any decorative eggs)
Ribbon
Wire
Duck Tape
Hot Glue 
Fishing line


To Make

First cut down the pool noodle to the size you prefer, I cut about 6 inches off. Duck tape the ends together, making sure it is secure. Start wrapping the yarn around the wreath (refer to images above). Stop once in a while to fluff the yarn because the threads tend to get stuck under each other keep wrapping until the whole wreath is covered using both skeins of yarn. If your wreath is smaller you will not need as much yarn, but if it is bigger you may need more. Two skeins was just enough for mine. Next make a bow using the ribbon and wire and fasten it to the wreath. Heat up the hot glue gun and glue the eggs to your wreath. Tie a piece of clear fishing line around the top by the bow. Now you are ready to hang your wreath for the Easter season. Enjoy :)
Pin It

Monday, March 4, 2013

HomeGoods Cake


Yesterday was the grand opening of HomeGoods in Clovis. So to celebrate all the hard work that the team put into getting the store ready, we thought it would be nice to give them a cake. I decided to make it a little more special by making a cake with the store logo on it. I was very proud of myself with the finished outcome and others were too. What I was most proud of was the fact that I made the logo free hand. I was going to just transfer the image onto the cake but I did not have piping gel or parchment paper. Luckily I was able to make the logo with out those things because the cake came out wonderful.
Pin It

Thursday, February 14, 2013

DIY $2 Perfume Plate


I wanted something pretty to display my perfumes on in my bathroom. Well the idea came to me while browsing on Pinterest when I came across a bunch of links showing how to make a desert plate from just a small plate and a candle stick. Some people painted theirs but I decided to keep mine plain and simple. So I went to the Dollar Tree and bought 1 glass desert plate and 1 glass candle stick. I went home and right away I made my plate. I was so happy with the finished product I decided I wanted to make another to put Tomas colognes on. This plate stand was so easy to make I know I will be making more again for parties and as gifts. :)


Perfume/ Desert Plate

1 glass plate
1 glass candle stick
Aleene's Glass and Bead Glue

Gently squeeze some glass and bead glue around the top of the candle stick where the plate is going to go (the reason you want to use this glue is because it dries clear and has a strong bond). Place the plate on top of the candle stick, but make sure it is centered while doing it. Next set it in a place to dry and set before using. After its dried, enjoy your plate stand however you choose :)


Here is how cute it looks with a few cupcakes on top :)
Pin It

Sunday, February 3, 2013

Football Chocolate Covered Strawberries


 It has been a very long time since I posted something on my blog and a lot has happened during that time.
Right after my last post I was promoted to Assistant Manager and then transferred to Bakersfield. With the promotion I was sent to Stockton for about a month, then it was off to Bakersfield. I did not move there so I was commuting sometimes from Fresno and sometimes from Visalia. I spent a lot of time on the road and pretty much had no personal life, until now because I was just transferred to Clovis. Yay!!! I will have a life again. Also during that time Tomas passed the Bar and just got a job. Yay!!! for Tomas. So now that I have my life back I thought it would be nice to start posting some of my creations again.

With today being the Super Bowl I thought I would make a nice treat to celebrate. So far there are no plans for celebrating. There are a couple of options that we were given so I thought I would be prepared just in case we go somewhere. I figured since everyone loves chocolate covered strawberries how about I make them look like footballs. Not only are they cute but they were super easy to make. Hope you enjoy them as much as we do.

Football Chocolate Covered Strawberries

1 lb Strawberries 
1 bag dipping chocolate
1/2 cup white chocolate chips

Wash and dry strawberries. Line a baking sheet with waxed paper. Melt dipping chocolate according to package directions. Dip strawberries in chocolate and place on lined baking sheet to dry. Place white chocolate chips in a ziploc bag and melt in microwave, kneading the bag every 30 seconds. Cut a corner of the bag off and squeeze onto dipped strawberries. Make a line across the top and the bottom, and another line going up the strawberry. Make a few little lines crossing over the line going up. It should resemble a football when done. Move the finished strawberries to a plate and serve.


Pin It
Related Posts with Thumbnails